 Download the zip file
Compatible with Windows 7, 8, 10, and 11 and multiple monitors.
- Download the zip file using the link above.
- Extract DesktopPic.hta.
- Place DesktopPic.hta in a folder containing one or more pictures (files with extension png, bmp, jpg, or gif).
- Run (double-click) DesktopPic.hta.
- At the UAC prompt, uncheck Always ask before opening this file and then click Run.
Note: Some antivirus software may falsely detect the download as a virus. This can happen any time you download a new executable and may require extra steps to whitelist the file.
DesktopPic provides two convenient methods to display one or more pictures on your Windows desktop...
Method 1: Slideshow
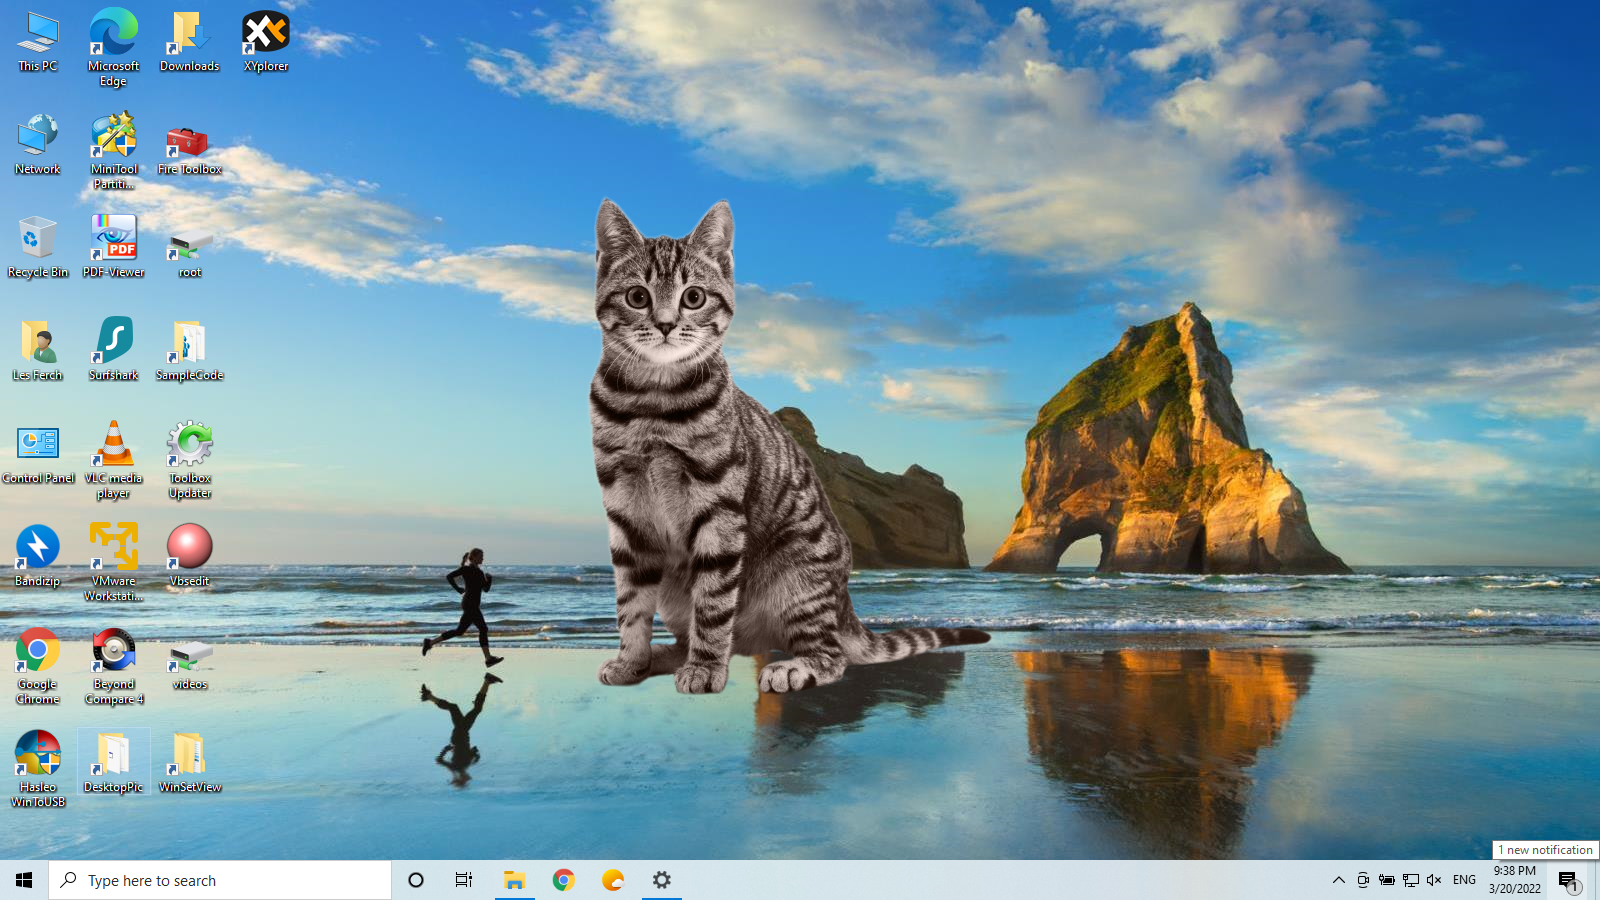
Displays one or more pictures in a movable, resizable window that has no borders or captions, so all you see is the picture. This will give the illusion of the picture being part of your wallpaper, but it's really just another window. Any desktop icons in the same region as the picture will be covered. Bitmap image formats, such as PNG (recommended), JPG, BMP, and animated GIFs are supported.

Method 2: Stamp Image to Wallpaper
One or more images can be stamped to the wallpaper in any size or position. This makes the picture part of the wallpaper, so it will never be on top of anything else and will require nothing to be left running. Images can only be stamped to the primary display, but it's easy to temporarily change the primary display using ⊞-P so that images can be stamped on the wallpaper for any monitor. Images with a transparent background are supported.
Notes:
- You can run multiple copies of DesktopPic to have more than one slideshow on your desktop (on any monitor).
- DesktopPic always maintains the original picture's aspect ratio.
- DesktopPic does not do a full screen slideshow (that capability is already built into Windows 7 and above).
- The Stamp feature provides the same result as if you edited your wallpaper using an image editing program. It just makes the process easier and more fun.
- The Stamp feature is multi-monitor aware on Windows 8 and above.
Notes:
-
If only one image file is in the same folder as DesktopPic, it will show that one image as long as DesktopPic is running. If more than one image is in the folder, DesktopPic will cycle through the images, showing each one for the number of seconds that has been set (5 seconds is the default).
-
The slideshow can be paused by pressing any one of left arrow, right arrow, spacebar, or backspace.
-
You can manually cycle forward through the images by pressing right arrow or spacebar and backward by pressing left arrow or backspace.
-
Pressing Enter resumes the slideshow.
Double-click anywhere on the displayed image or press Esc to show the DesktopPic interface.
Note: If Esc doesn't activate the interface, DesktoPic probably doesn't have focus. In which case, you can click once on the displayed image and then press Esc or just double-click on the displayed image.
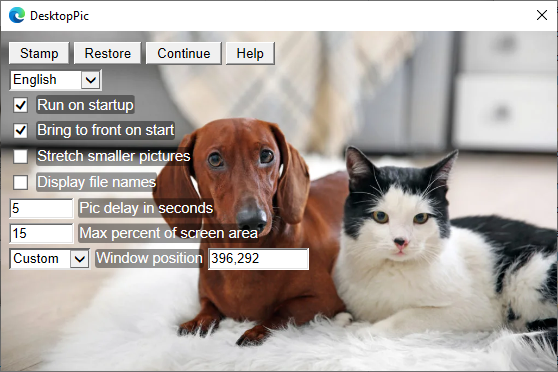
If Windows is set to a language that DesktopPic supports, that language should get selected automatically. The desired language can also be selected from the language dropdown menu.
Once the interface is displayed, you can drag and resize the DesktopPic window like any other window.
You can also select Centered from the Window Position dropdown menu to have the slideshow centered.
Coordinates may also be entered in the Window Position input box to position the window. For example, 0,0 will position the DesktopPic window at the upper-left corner of the primary display. These numbers change automatically when you drag move the window.
The DesktopPic window size can also be changed by directly entering a value for Max percent of screen area. This number represents the maximum amount of your screen area that will be used by the DesktopPic window. This number changes automatically when you drag resize the window.
Notes:
- Any entered values take effect when you Tab to another field, any time you click on the currently displayed image, and when you click the Continue button (or press Enter).
- Clicking on the currently displayed image also automatically readjusts the DesktopPic window size to match the aspect ratio of the currently displayed picture.
Change the value for Pic delay in seconds to the number of seconds you want each picture to be dislpayed.
-
Check Run on startup if you want DesktopPic to run when you login. This feature is supported for multiple copies of DesktopPic without any need to rename the DesktopPic.hta file.
-
Check Bring to front on start if you want DesktoPic to come to the front of all other windows when it's launched. This setting does not keep DesktopPic in front. It just affects how it starts.
-
Check Stretch smaller pictures if you want images, that are smaller than the current DesktopPic window, to be stretched to the size of DesktopPic window.
-
Check Display file names if you want the image file name displayed.
Press the Continue button or press Enter to hide the interface and continue the slideshow. All setting changes are automatically saved to a DesktopPic.ini file.
Note: All setting changes are also saved whenever you click on the currently displayed image while the DesktopPic interface is displayed.
These instructions assume you have reviewed the Slideshow instructions above and already have an understanding of the interface.
If the interface isn't currently displayed, double-click the image or press Esc.

Note: While the interface is displayed, F3 will open File Explorer to the current DesktopPic folder (location of slideshow images) and F4 will open File Explorer to the DesktopPic local AppData folder (location of stamped wallpaper images).
Use your keyboard left and right arrows (or spacebar and backspace) to select a picture to stamp.
- Drag the DesktopPic window to where you want to stamp the image.
- Resize the DesktopPic window to the image size you wish to stamp.
- Click once on the image to correct the DesktopPic window size to the image's aspect ratio.
Click the Stamp button to stamp the image to the current desktop wallpaper.
If desired, repeat steps 2-4 to stamp more images.
Notes:
- Click the Restore button to restore the unstamped wallpaper.
- If you click Restore by accident, just right-click your desktop wallpaper, select Personalize, and reselect your stamped wallpaper.
- To stamp an image on the wallpaper for another monitor, press ⊞-P to change the primary monitor, stamp as desired, and then use ⊞-P again to switch back to an extended desktop.
Click X to close DesktopPic.
