DynamicVINO is an open-source C++ library for establishing easy-to-use, extensible and scalable deep learning inference system based on Intel' s OpenVINO toolkit version 2.299. DynamicVINO provides an interface for adding new neural networks. It also provides asynchronous inference for various connection topology between neural networks. The connection topology can also be changed in runtime. Stars, Pull requests, issue report, forks are all welcome!
- Xuyang Chen - Design and Development
DynamicVINO is based on Intel' s OpenVINO toolkit version 2.299. Intel NC SDK is needed if you want to run the network on Intel Movidius NCS. To use Intel' s RealSense Camera with DynamicsVINO, you need to install Intel RealSense Camera package for RealSense Camera installation guide. Other Intel plugins like Intel GPU has not yet been tested but should work well with this library.
The building of the library has been successfully tested on Ubuntu 16.04. DynamicVINO uses CMake>=2.8 as building tool. By default the directories of InferenceEngine and OpenCV for OpenVINO are set to the default location. If you install OpenVINO in custom location, you need to change the directories in CMakeLists. To build the library, simply type:
cd DynamicVINO
mkdir build && cd build
cmake ..
make -j4
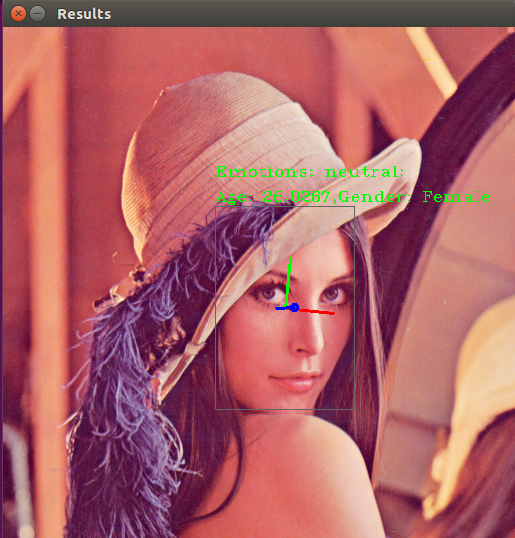
The sample included in the library is an implementation of various network for human face detection. It uses a similar input API as the samples from Intel' s OpenVINO library.
After building the library, in the build folder, type:
cd intel64/Release

./dynamic_vino_sample -m <location of the .xml file for face detection network> -m_em <location of the .xml file for emotions detection network> -m_ag <location of the .xml file for age gender detection network> -m_hp <location of the .xml file for head pose estimation network> -i StandardCamera -d CPU -d_em CPU -d_ag CPU -d_hp CPU
This will let the sample build a multi-network inference system, where the output of the face detection network will be fed as the input to all the emotions detection network, age gender detection network and head pose estimation network. The result is like the following screenshot:
Explanations for main options:
-h					Print a usage message.
-i "<device_name>"	The device can be one of the following three strings:
						1. "RealSenseCamera": The input cames from Intel RealSense Camera
						2. "Standatd Camera": The input cames from ordinary Camera that can be ready by OpenCV
						3. <Video File Path>: The path of a video file that is readable by OpenCV.
-m					Path to an .xml file with a trained face detection model.
-m_em				Path to an .xml file with a trained emotions detection model.
-m_ag				Path to an .xml file with a trained age gender detection model.
-m_hp				Path to an .xml file with a trained head pose evaluation model.
-d					Specify the target device for face detection (CPU, GPU, FPGA or MYRIAD)
-d_em				Specify the target device for emotions detection (CPU, GPU, FPGA or MYRIAD)
-d_ag				Specify the target device for age gender detection (CPU, GPU, FPGA or MYRIAD)
-d_hp				Specify the target device for head pose detection (CPU, GPU, FPGA or MYRIAD)
In DynamicVINO, we provide high level encapsulation for input device, output device and network inference separately. And we use a class called Pipeline to handle the data flow between those encapsulation. The usage of DynamicVINO lib can be separated into four steps:
auto plugin_for_device = Factory::makePluginByName("CPU","","",false);
The second and third argument is used for passing user custom layer lib location. For further information on using custom layer, check OpenVINO document on this topic and source code.
auto input_ptr = Factory::makeInputDeviceByname("RealSenseCamera");
auto output_ptr = std::make_shared<Outputs::ImageWindowOutput>("Detection Results");
Now you have real sense camera as your input device and an OpenCV image window called "Detection Results".
The inference instance is abstracted into a blackbox that enqueue input frames and return different kinds of results.
//Establish a network model from given model.xml and model.bin file
auto face_detection_model = std::make_shared<Models::FaceDetection>("model.xml", 1, 1, 1);

//Create an engine that the previous model will run on from plugin for target device
auto face_detection_engine = std::make_shared<Engines::Engine>(plugin_for_device, face_detection_model);

//Generate a inference that uses the created engine to carry out inference for established model
auto face_inference_ptr = std::make_shared<openvino_service::FaceDetection>(0.5); //0.5 is threshold for face detection
face_inference_ptr->loadNetwork(face_detection_model);
face_inference_ptr->loadEngine(face_detection_engine);
Since the input device, output device and inference instance are all in position, let' s assemble them together!
Pipeline pipe;
pipe.add("video_input",std::move(input_ptr));//add input device as the start point of data flow
pipe.add("video_input","face_detection",face_inference_ptr); //add a face detection inference after the input device;
pipe.add("face_detection","video_output", output_ptr); //add output device after face detection inference
pipe.setCallback(); //set callback function for each inference instance
That' s all, now you have a pipeline that represents the whole face detection data flow. The topology of the pipeline should be like:
 You can establish the Pipeline by a series of add function. You need to provide the name of previous device/inference, the name of the current device/inference and the current device/inference instance. One pipeline should have only one input device.
To run the pipeline for one frame and print the result on output device, simply use:
You can establish the Pipeline by a series of add function. You need to provide the name of previous device/inference, the name of the current device/inference and the current device/inference instance. One pipeline should have only one input device.
To run the pipeline for one frame and print the result on output device, simply use:
pipe.runOnce();
The Pipeline class in DynamicVINO is scalable, which means we can add various kinds of networks and forms various topology. For example, if you want to add networks for emotions detection and age gender detection to the result of face detection, you can do step 3 twice to get two inference instances emotions_inference_ptr and agegender_inference_ptr. Then remove the statement that adds output after face detection:
inferencepipe.add("face_detection","video_output", output_ptr);.
Finally, we can add new instances to the previous pipeline:
pipe.add("face_detection", "emotions_detection", emotions_inference_ptr);
pipe.add("face_detection", "age_gender_detection", agegender_inference_ptr);

//add output device after new detection inference
pipe.add("emotions_detection","video_output", output_ptr);
pipe.add("age_gender_detection","video_output");  //output device instance can be omitted if it has been added before.
Now the pipeline topology is like:
 You can also follow the same to add more output device instance to the pipeline.
DynamicVINO is documented in Doxygen syntax. To get the Doxygen document, use:
cd DynamicVINO

doxygen Doxyfile
DynamicVINO is designed to be extensible for adding new inference class. To add new inference class you need to add three new classes: MyModels, MyInference and MyResult
- MyModels should be a derived class of Models::BaseModel class (defined in models folder).
- MyInference should be a derived class of openvino_service::BaseInference class (defined in inference folder).
- MyResult should be a derived class of openvino_service::Result class (also defined in inference folder). MyInference should be the friend class of MyResult. You may also need to define how the result should interact with different output device in MyResult class. See document and source code of our derived inference class for detailed information for adding new inference.
- To add new Input device class, you need to define a MyInputDevice class that derives from Input::BaseInputDevice class (defined in input folder). And if you want to use a factory class to generate input device, you need to modify the implementation of Factory::makeInputDeviceByName.
- To add new Output device class, you need to define a MyOutputDevice class that derived from BaseOutput class. You may also need to define how different Result class should interact with new output device by extending both the base Result class and the derived Result class with new functions. See document and source code of our derived input and output class for detailed information for adding new device.
This project is licensed under the Apache-2.0 License.
- Add a Remove function for Pipeline establishment.
- Potential speed up can be achieved by moving starting next inference before handling output for current inference in Pipeline' s callback function.
- Refine check logic in add function of Pipeline
- printPipeline function needs to be beautified.
- Find more potential speed up.