- Prerequisites and Stability Tests
- Overclocking Info
- Overclocking
- Undervolting
- Flashing a VBIOS
- Miscellaneous
- Tips and Tricks
-
Download MSI Afterburner and set a fan curve. Settings -> Fan -> Enable User Defined Control. Set a fan curve as high as possible while still being audibly tolerable. Setting a high fan curve is always preferable for benchmarking, but the same overclock settings may not be stable on a lower fan speed.

-
While still in settings, go to User Interface -> User interface skinning properties and select a skin, such as the MSI Cyborg Afterburner skin, as it will be easier to follow.
-
Download HWiNFO and run it in sensors only.

-
Go to MSI Afterburner, max out power and temp limits, and prioritize the power limit. Note that laptops and some GPUs cannot go over 100%. Some GPUs can have a higher power limit by shunting or by flashing a higher power limit VBIOS.

-
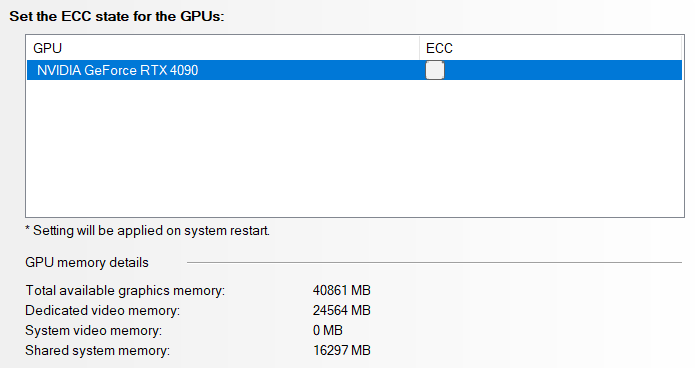
If using a Lovelace GPU, disable ECC in the Nvidia Control Panel for more performance (needs more testing).
- MSI Afterburner: This software is the most widely used and robust. Other software may be lacking in certain features and are generally not recommended.
- HWiNFO: HWiNFO is the most frequently used monitor software as it presents the values of all the sensors available and is an excellent software to have when overclocking your CPU, RAM, and GPU.
- GPU-Z: GPU-Z is a software that reports the model, VBIOS, and the hardware specifics of your GPU.
- OCCT: OCCT stress tests while providing sensor values from HWiNFO. OCCT can be used instead of HWiNFO as well.
-
One of the best stress tests is just playing games. Unfortunately, there is no conclusive stress test for GPUs other than OCCT, and playing games is a great way to find instability. Instability is when you have application crashes, freezes, driver crashes, BSODs, major stutters, or shutdowns.
-
Superposition: This benchmark will stress your GPU and VRAM well and is good at finding instability. One should use Superposition for reliable scores to see performance regressions. Make sure to set the preset so it maxes out the VRAM without going over.

-
3DMark: This is widely used to stress your GPU well and is also good at finding instability. Note that it is not recommended for performance regressions as there is a lot of variance in scores, and Superposition is better for getting accurate scores. There is a demo version you can download for free. Run the Time Spy benchmark, as it is the most relevant test.

-
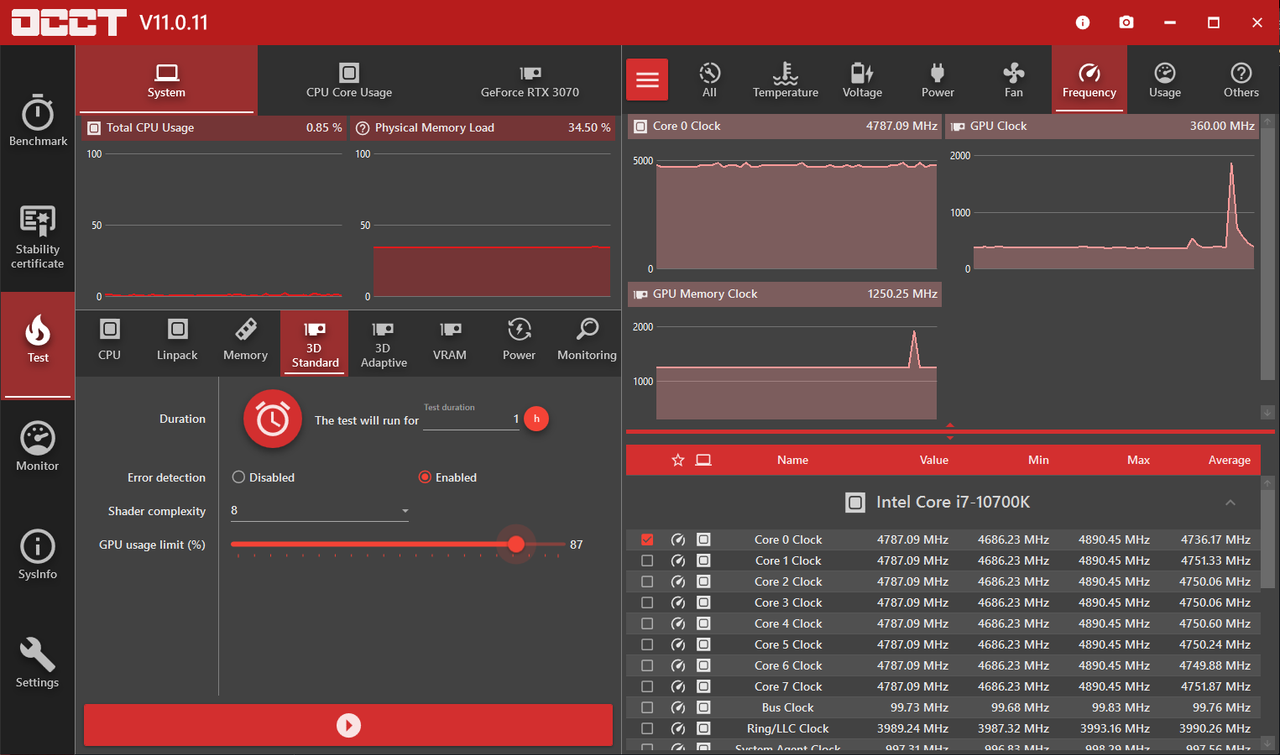
OCCT: This test is the best for finding errors and stressing your GPU; however, it requires careful fine-tuning and takes a while to find the “sweet spot” as it power throttles at stock settings. Also, make sure you do not turn off your monitor, as some graphics drivers crash because of this.
- V10: Go to the 3D Standard tab under test. Turn on error detection and shader complexity to 8. Next, decrease the GPU usage limit (%) until you barely (5% of the time) power throttle. Then, click start and leave it running for an hour.
- V11: Go to the 3D Adaptive tab under test and set the values to the screenshot below. You can tweak these values to your GPU, such as the minimum and maximum intensity. Then, click start and leave it running for an hour.


-
Furmark: Draws a lot of power and doesn’t effectively test due to elevated temperatures and power limiting.
-
Kombustor: Same issue as Furmark.
-
Heaven: This is an ancient testing program (13 years ago) that doesn’t stress your GPU much. However, it can be helpful because you can run it in the background and loop it for free. I would not recommend this program unless you want to run it in the background for extended periods. If you decide to use this, your settings should look like this:

- Overclocking is the process of increasing clock speeds and performance for generally higher heat and lower stability. For the GPU, that means increasing the speed at which the core and VRAM run, which are core and memory clock speeds, respectively. Undervolting limits the amount of voltage supplied to the GPU and will lower wattage, voltage, and temperatures.
- Overclocking can provide those extra frames or decrease the processing time in workloads and provide you with a slightly better experience. Undervolting will reduce temperatures and voltages and provide a quiet and stable experience. Combining the two is possible and is commonly done.
- Overclocking typically increases temperatures to gain performance. Undervolting will decrease temperatures and voltage to give consistent performance. While with overclocking, you may achieve a higher clock speed than undervolting, that clock speed may not be sustained under stress. They both have their place, and you should choose the one that better fits your needs. For Ampere and Lovelace, undervolting is heavily recommended as they consume a lot of power and power throttle very often unless they are modded in some way or have a high power limit.
-
Here is a list of all the abbreviations and definitions of performance limits in HWiNFO:
Performance Limit Abbreviation Definition Performance Limit - Power Pwr GPU has hit the power limit defined by its VBIOS and throttled. Performance Limit - Thermal Thrm GPU has hit the thermal limit and throttled. Performance Limit - Reliability Voltage vRel Too much voltage for current temps. Performance Limit - Max Operating Voltage VOp GPU has hit the voltage limit defined by its VBIOS. Performance Limit - Utilization Util GPU is not under full load.
-
Overclocking is dangerous: Modern Nvidia GPUs are locked in terms of how far you can push the voltage unless you have a modded VBIOS or have a physical modification to your card. Therefore, your card’s voltage is safe, and increasing clock speeds will not increase the voltage to unsafe values.
-
Overclocking too much is dangerous: There is no such thing as overclocking a modern GPU with a hard voltage lock and a normal VBIOS too much. An overclock is only "bad" when unstable, fixed by stability testing.
-
Undervolting will lower performance: Undervolting will improve performance when power limited and reduce temperatures otherwise (12.5 (Pascal) - 15 MHz (Turing, Ampere, and Lovelace) increase for every 5 °C cooler).
-
Core voltage increases voltage used: The core voltage slider will generally not do much, but it increases the aggressiveness of the V/F curve and makes your GPU use the higher voltage points within the threshold of safe voltages of the card but does not work on most modern cards.
-
Dragging the point at the correct voltage to your desired clock speed is a common way to undervolt. This is an unoptimal way because the effective clock speed is lower than the clock speed displayed when using this method. Instead, use the slider in Afterburner to change clock speeds.
-
The best or maximum overclock for a specific card: There is no best or maximum overclock. Every physical chip is different and will overclock differently, so copying settings is not advisable as there may be more headroom to overclock, or it may be unstable.
-
Undervolting reduces effective clocks on Lovelace: This is a misconception caused by improper undervolting and will not happen if undervolted properly.

- Before proceeding, ensure you have read the Setup portion of the guide.
- You can combine an overclock with an undervolt or choose one over the other. An overclock with an undervolt will lead to more performance, however.
-
Open Afterburner and put the core clock offset to +75 as a baseline. This baseline will generally be stable, and 75 MHz ensures it fits with the 12.5 MHz steps that Pascal uses and the 15 MHz steps that Turning, Ampere, and Lovelace use.

-
Apply the settings
 and save
  them to a profile.
-
Click this
 to have the overclock applied at startup.
 -
Test the overclock, see if it is stable in both benchmarks and games, and monitor the temperatures using HWiNFO and stay under 80 °C on the core and 95 °C for the hotspot. Instability includes application crashes, freezes, driver crashes, BSODs, major stutters, and shutdowns.
-
If stable, increase core clock speeds in increments of +15 MHz (Turing, Ampere, and Lovelace) /12.5 MHz (Pascal) using the slider or typing in a value. If the benchmarks or games crash, decrease clock speeds by the same amount and retest until you have reached stability. Temperatures and power limits will always be limiting factors. There is no “limit” on how far you can overclock; however, you will know you have reached the limit once you experience errors or crashes in stress tests and games. Remember that an overclock can be stable in one game but not another.
-
After testing the core overclock sufficiently and confirming its stability, you can increase the memory clock.

-
Start at a memory clock offset of 500 MHz and increase in 50-100 MHz increments. Memory clocks usually scale much higher than core clocks (even over 1000 MHz).
-
To test the stability of the memory clock, you will need to look for performance regressions and artifacts. If you see any receding or a lower score or visual artifacts, decrease the memory clock by 50-100 MHz and retest. The recommended benchmark for finding performance regressions (GDDR6X) is Unigine Superposition, as the scores are consistent.

-
Here are some examples of artifacts:


-
- Test the overclock, see if it is stable in both benchmarks and games, and monitor the temperatures using HWiNFO and stay under 80 °C on the core and 95 °C for the hotspot.
- If stable, increase memory clock by 50-100 MHz; if unstable, decrease memory clock in 50-100 MHz increments and retest. Continue repeating this process until you have found your maximum stable overclock.
- Before proceeding, ensure you have read the Setup portion of the guide.
- Undervolting can be done by itself or combined with overclocking. Increasing the core clock after an undervolt will reset the graph, so you must redo the undervolt each time you increase the core clock. This does not apply to the memory clock.
-
Click CTRL F to open the curve editor and this video guide and start at a baseline of 900 mV. Anything above this value will likely power throttle on many cards, and going above this value is situational, and the temperature difference will not be as noticeable. You can raise this in a later step.
- Your curve should look like this to start:

-
Select all the points past the voltage you want (900 mV) by holding down shift and left click and highlighting.
-
Drag all the points down by selecting a point and dragging it down. Ensure the highest point on the part you are dragging down is lower than the highest point to its left. (Optionally, with everything selected including the maximum preferred voltage (ex. 900mV), click on 900mV - hold shift - press ENTER twice)
- Your curve should now look like this:

-
Apply the settings
and save them to a profile. -
Click this
to have the overclock applied at startup.- Your curve should look like this:

-
Run various workloads and games and check HWiNFO for power throttling in sensors only under GPU Performance Limiters.

-
If you are power throttling in-game, lower voltage by 25 mV and retest. Once you are satisfied with temperatures and are not power throttling, you have found the optimum voltage. 25 mV is an arbitrary baseline value and can be changed to larger or smaller increments.
-
Lowering voltage by 25 mV means that you will be at 875 mV from 900 mV, and your curve should look like this:

-
-
Continue to lower voltage until satisfied with temperatures and power throttling. Too low voltage may have performance regression because of the decreased core clock.
This section is for people who have already tested their overclocks but still want additional headroom. Flashing a VBIOS can be very helpful as it can increase power limits and overclocking headroom. However, it can also be risky and will void the warranty.
- Ensure that the card of the new VBIOS you’re flashing from has the same power connectors as the card you’re flashing to (2x8 pin, 1x12 pin, etc.).
- Check the number of HDMI and DP ports of the new VBIOS and the card you’re flashing and make sure they match. Note that this is not mandatory, but ports may not function if they differ.
- When you flash a VBIOS, the V/F curve and fan curve will differ, so your current overclock may not be stable or lower than usual, and the fan speeds may differ.
- If your power goes out while flashing, there is a chance of bricking your card, just like a motherboard BIOS flash.
-
Download GPU-Z and go to Advanced -> NVIDIA BIOS -> Power Limit -> Maximum.

-
After you have followed the steps above, go here and locate a suitable VBIOS with a higher power limit for your card.

-
There may be some XOC VBIOSes with a 1000w power limit, but these are highly discouraged unless you know what you are doing and have sufficient cooling/power.
-
After finding a VBIOS, download it and NVFlash.
-
Create a new folder in your home directory with any name and put the ROM and the contents of the extracted NVFlash folder inside. The folder should look like this.

-
Shift right-click inside the folder and select Open in Windows Terminal/Powershell.
-
Once the window is open, type
./nvflash64.exe --save example.rom- Two dashes before save
-
Then type
./nvflash64.exe -6(type the first letter of the ROM and hit tab to complete)- One dash before 6.
-
Type “y” when prompted (twice), and keep in mind that your screen will flash/go black for a moment.
- If the VBIOS failed to flash and you confirmed all the prerequisites to flashing, type
./nvflash64.exe —protectoffbefore flashing. - If that still fails, try this version of NVFlash.
-
Hold down shift and click restart.
-
At the Choose an option screen, go to Troubleshoot > Advanced options > Startup Settings > Restart. Finally, type
4to boot into safe mode.
-
Go into MSI Afterburner and uncheck this to have your overclock not applied at startup. If you have this checked, uncheck it as well.

This is used when you suspect your drivers are causing issues or want a less bloated driver.
-
Install the latest drivers, DDU, and NVCleanstall.
-
Unplug your Ethernet/turn off Wi-Fi to ensure that Windows doesn’t install drivers on its own.
-
Hold down shift and click restart. Go to Troubleshoot > Advanced options > Startup Settings > Restart.
-
Finally, type 4 to boot into safe mode.
-
Run DDU, select GPU as the device, and click clean and restart.
-
Boot into your computer like normal and run NVCleanstall.
-
Select use driver files on disk and select the driver you installed earlier.
-
Make sure everything is unchecked unless you need PhysX or the HD audio via HDMI/USB-C Driver.

-
Click next and uncheck everything other than Disable Installer Telemetry & Advertising.
-
Lastly, click install, and your drivers will install.
- The most crucial thing about overclocking is experimentation; try different things like increasing voltage to get higher clocks or lower voltage to get lower temps and more consistent clocks.
- Temps are important. GPUs should stay as cool as possible for longevity, audibility, and performance:
-
For starters, taking off your side panel can improve thermals in limited airflow scenarios; if they do, a case with more airflow will help thermals considerably.
-
Repasting your GPU with a high-quality paste such as NT-H2, KPX, GELID GC-Extreme, or MX-4/6. It’ll last a long time and has an incredible impact on temperatures. Spreading the paste to ensure it covers the entire die is crucial.
-
Deshrouding and adding fans such as Phanteks T30s, Noctua NF-A12x25s, or ARCTIC P12s are also an excellent way to improve temps as stock fans tend to be less than great.
-
A more aggressive fan curve on your CPU, GPU, or case can help airflow and thermals. Go as high as audibly tolerable.
-
Removing dust filters can help with airflow due to the misalignment of holes.
-
Some GPU backplates act as insulators instead of heat dissipators, and replacing/removing them may be beneficial.
-
A PCI fan bracket mounted with fans blowing directly under the GPU may improve airflow.
-

-
If using a Lovelace GPU, disable ECC in the Nvidia Control Panel for more performance (needs more testing).