Essentials

The MIMBCD-UI project is a project that deals with several modalities of medical images. Our Framework will incorporate information from following (see next Figure) different modalities: (i) MammoGraphic (MG) images (both views CC and MLO); (ii) UltraSound (US) images; (iii) Magnetic Resonance Imaging (MRI) volumes; and (iv) Text. If you have some questions, please follow our FAQ page.

In this page, it is intended to be used as a reference for the concepts of the project Framework. If you are new to our project, we recommend that you start by reviewing the concepts below and then looking at the various prototypes to see how to use each.
There are a few pre-defined settings files that you can find in config/ folders. These are JSON files and all settings can be accessed as showed below. Our User Interface (UI) settings are also available on several folders and files.
As a DICOM server, we are using the Orthanc server. Configuring Orthanc simply consists of a configuration file. Orthanc has numerous configuration that is documented in the default configuration file. Please follow the official configuration documentation for more information.
Our prototypes configuration files can be found typically on REPOSITORY_NAME/config/ folder. Also, each NodeJS repository has a package.json file. This file contains a lot of meta-data about the respective repository. Mostly, it will be used for managing dependencies of the repository and scripts. The scripts will help in generating builds, running tests and other stuff in regards to the respective repository.
Environment files are useful when deploying on several server stages. For instance, if we want to have specific values across multiple environments (e.g., prod, test, stage or dev). Our values change frequently and are highly dynamic, therefore, the environment variables can be changed easily. In our solutions, we use the env.json file on the config/ folder to manage our environments.
The following example shows us a possible env.json file sample:
{
  "environment": "sample.json"
}
There are several different ways to set environment variables. Each has a slightly different use case. The dicomServer tag configures the settings regarding the DICOM server. The mainserver tag configures the settings regarding the prototype server configurations.
The following example shows us a possible sample.json file sample:
{
  "dicomServer":
  [
    {
      "prefix": "://",
      "transferProtocol": "http",
      "hostname": "localhost",
      "portEscape": ":",
      "port": "8042",
      "suffix": "/",
      "serviceProtocol": "wadouri"
    }
  ],
  "mainServer":
  [
    {
      "prefix": "://",
      "transferProtocol": "http",
      "hostname": "localhost",
      "portEscape": ":",
      "port": "8080",
      "suffix": "/",
      "hotjar": "123456"
    }
  ]
}
Starting with our several repositories, a User Interface (UI) is provided to use each prototype on the client-side and server-side. Simply follow the README.md information to setup each prototype on your local machine, or in a remote server. In our prototypes, we follow a Web Access to DICOM Objects by URI (WADO-URI) requests. The WADO-URI requests are HTTP requests that use the GET method as defined in IETF RFC2616. A Medium.com story, titled as "Using CornerstoneJS and Orthanc to Support Deep Learning Projects", introduces the meta tag structures but we still we summarize it here.

Each .dcm file (DICOM) contains a file header portion. We call it File Meta Information portion working as a single SOP Instance (i.e., a hierarchy of identifiers for each individual). For more information regarding your SOP Instance questions, follow this post. The header is made up of a 128-byte preamble, followed by the characters DICOM, all uppercase. The preamble must contain all zeroes if it is not used (sometimes applications will use it for proprietary data).
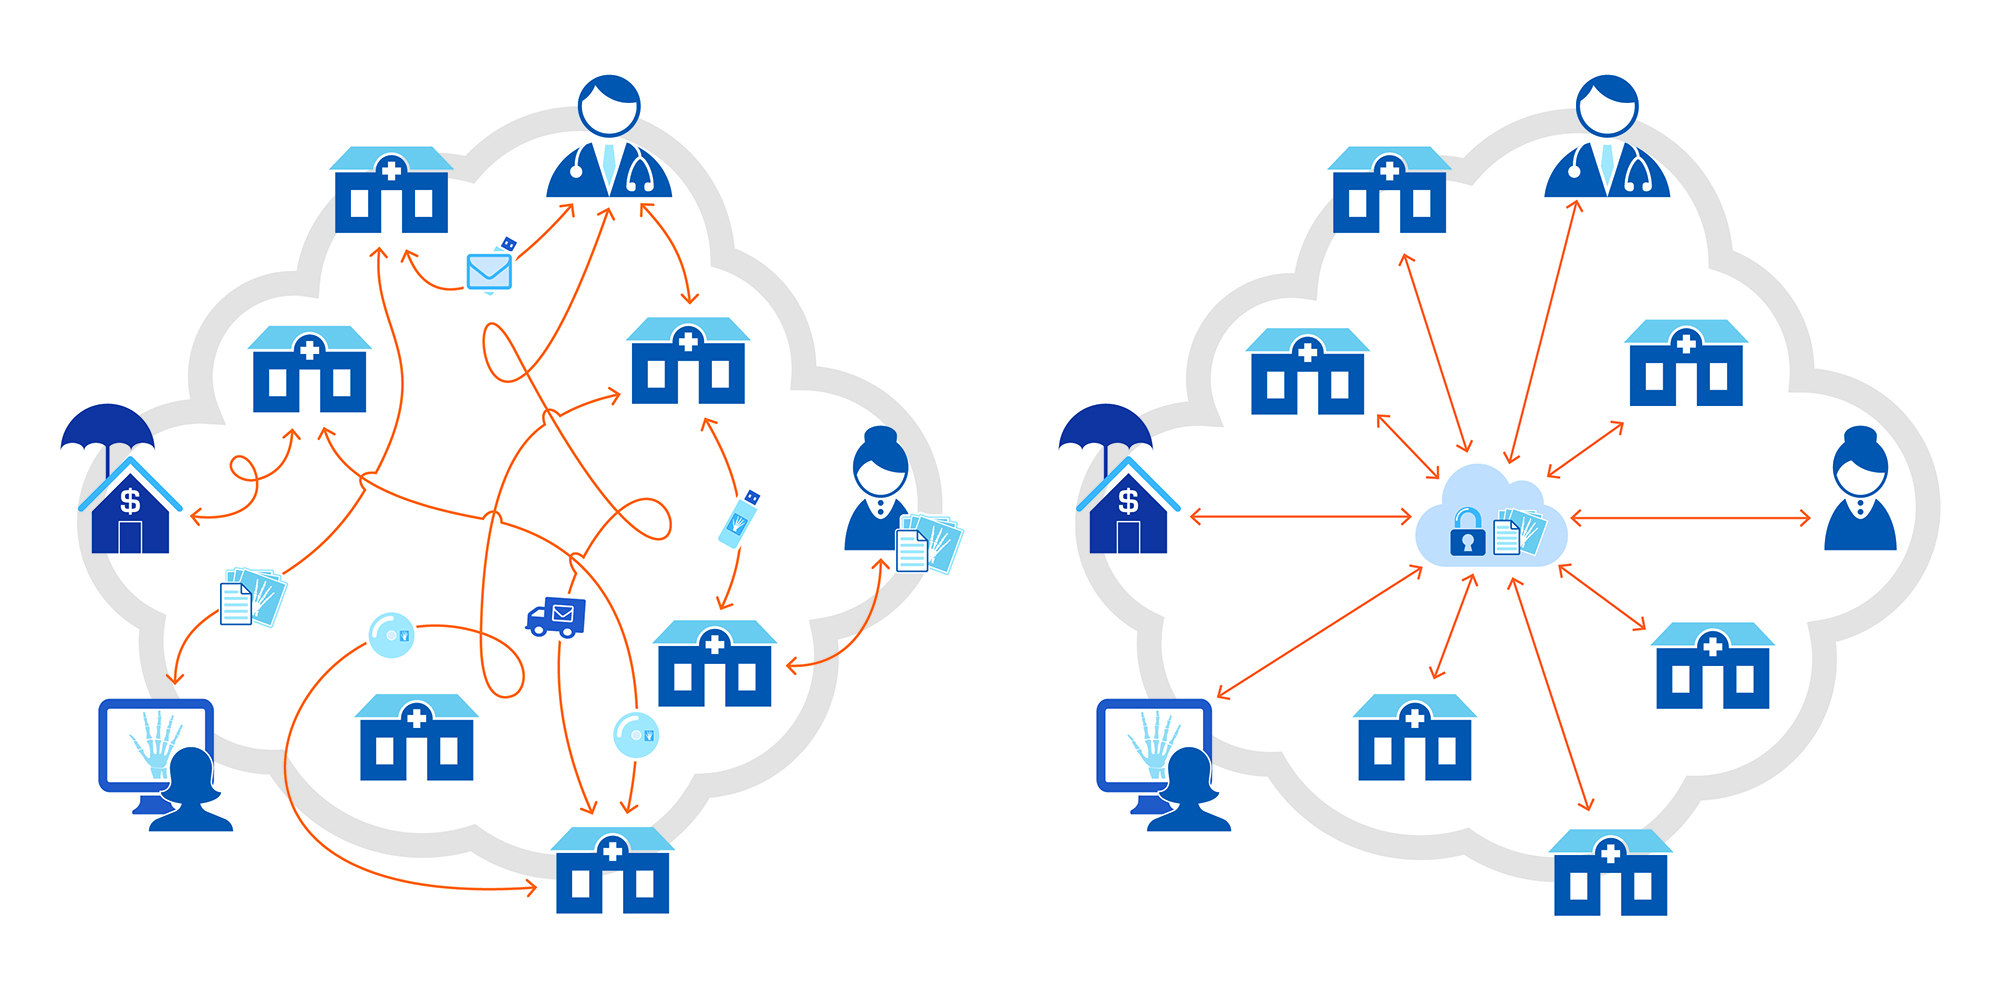
Usually, we use a client-server model to express our distributed structure, by partitioning tasks or workloads between the providers of a resource or service. For users accustomed to working in high-performance environments, it is natural to question whether workstations and servers have what it takes to manage medical image distribution throughout clinical institutions. For this reason, we focus on a client-server model ensuring to meet or exceed the demands of today’s radiologic environments.
Our prototypes are mainly developed on web technologies such as HTML5, CSS3 and JavaScript. Like web applications, they provide a platform-independent solution to display DICOM studies for all medical modalities. The fully customizable application is a powerful collection of JavaScript and NodeJS libraries, as well as web services, while it is perfect for any integrator who needs a fast, lightweight Medical Imaging (MI) solution (see next Figure) without sacrificing any features that health care professionals demand, including 3D volumes.

Each prototype takes full advantage of everything modern web browsers offer, giving us a shorter learning curve and confidence that such applications will satisfy clinician's demands for User eXperience (UX) and usability. The plethora of fast access, client-side tools, and medical-specific image processing make it a premier choice for working in the health care space on a research project. The shift to a web-based system for image assessments rather than a workstation-based installed application will improve workflow efficiency. Also, it will enhance accessibility and promote collaborative image review for the radiologists at cooperating clinical institutions (see next Figure). To achieve our design goals, the viewer and all of its functionality will be delivered to client-side exclusively through the web browser.
Commonly, our client-side logic will be found on the REPOSITORY_NAME/src/client/ folder. Inside this folder, we will have the css/ folder with all used stylesheets. Secondly, we will have the lib/ folder where we can find the client-side used libs. Thirdly, we will have a set of basic UI components. The set of UI components are fourfold: (1) the loaders/ folder; (2) the modals/ folder; (3) the tools/ folder; and (4) the viewport/ folder. Each folder represents a specific UI behavior described as follows. The loaders are the set of loading methods that will show the patient's lists consumed by the PACS, i.e., the DICOM servers. The modals are just windows pop-ups that we trigger when pressing expected links. The tools are the buttons and respective behavior of the buttons. Finally, the viewport is the set of files and methods where we manage the showing images.
Our prototypes support a complete imaging metric workflow. To streamline implementation, it was tested using various DICOM servers, such as the lightweight Orthanc server. By default, measurement data is stored in several JSON files database, which we call as datasets. Researchers can configure alternate data exchange mechanisms to support their datasets. Clinicians can leverage the prototype’s built-in datasets and DICOM servers to act as the central repository of DICOM images. Then any DICOM-compliant viewer or workstation can "pull" the datasets from the archive as needed. Accelerators may have significant constraints that limit the size of the image datasets they can render. Since loading images usually requires a call to a server, for the image loading we need to do it asynchronously. Our prototypes require that Image Loaders return an Object containing a Promise which the system will use to receive the Image Object asynchronously, or an Error if one has occurred. On the CornerstoneJS documentation, we find the same behavior workflow (see next Figure) followed by us.
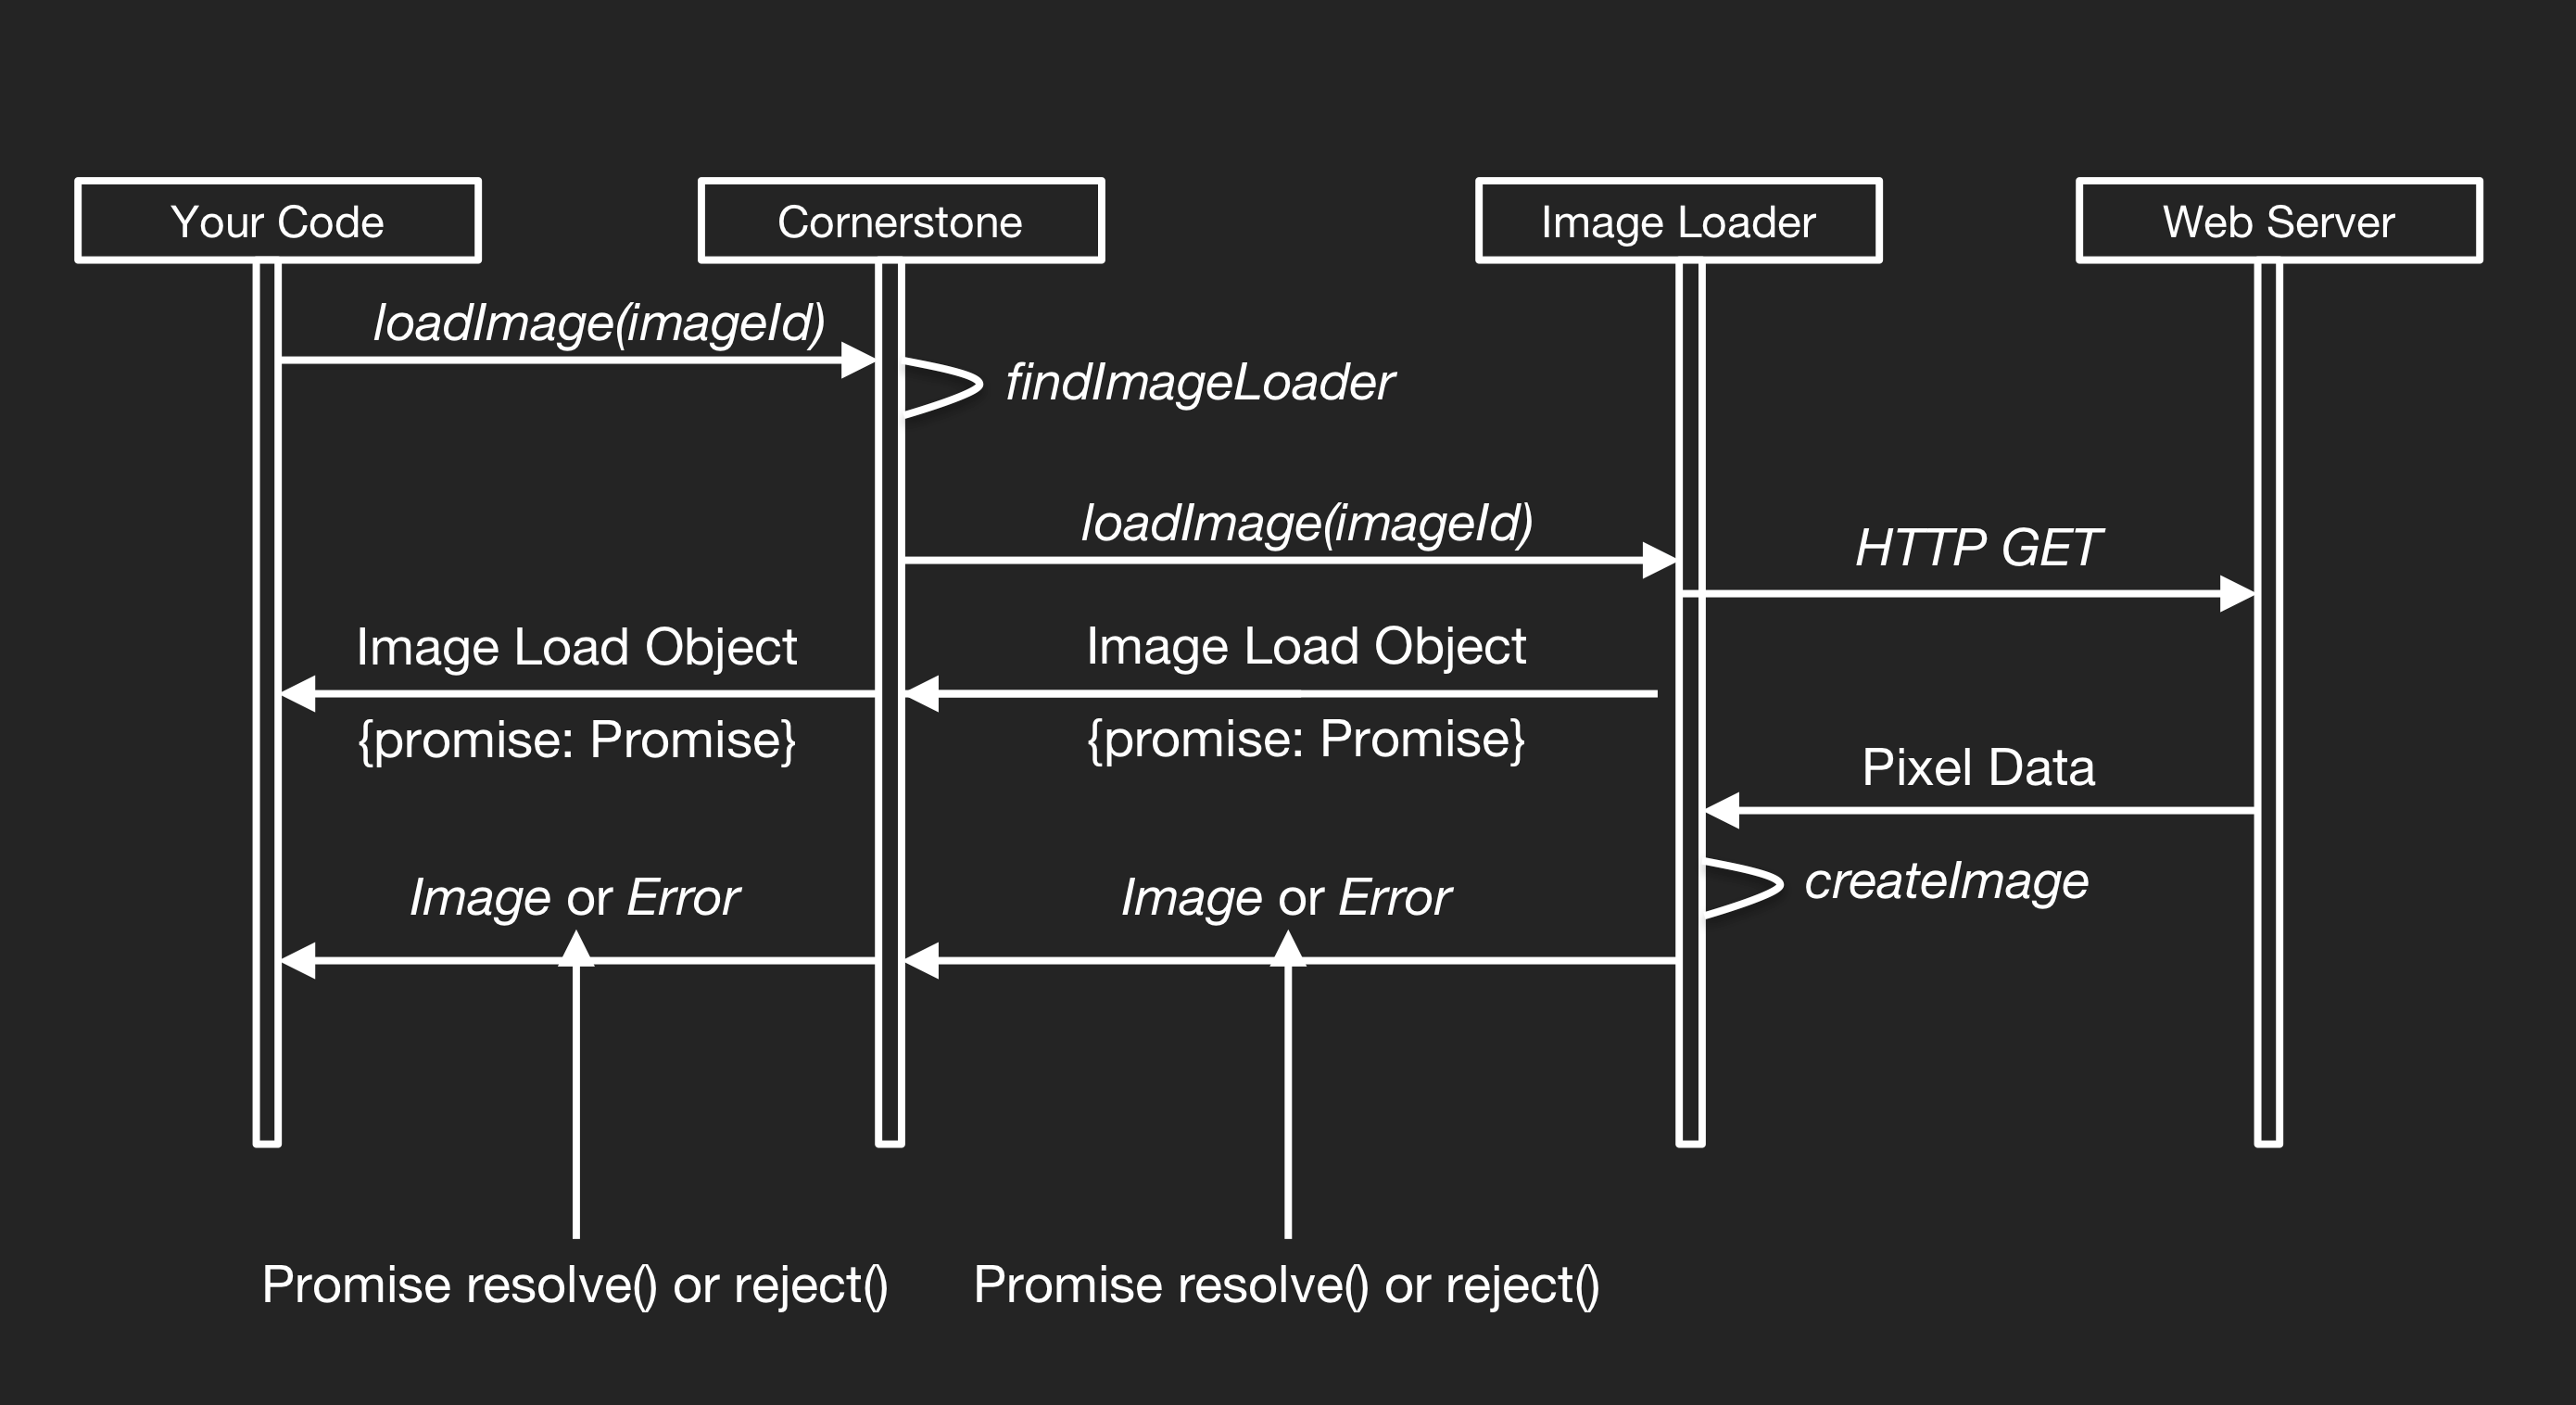
What we do is to register the ImageLoaders so that we can load specific ImageId URL schemes. In the end, the passed back Image Object will resolve the Promise and then display it using the displayImage() of the CornerstoneJS library. By default, the viewer is configured to a remote server connection. Each prototype runs the server application using NodeJS and can connect to DICOM Image Archives over both DICOM Service Exchange and DICOMWeb protocols. Nevertheless, we can find the full server-side logic on the REPOSITORY_NAME/src/server/ folder.