This project dockerizes the multimedia demo that can be used for the collection of social media items from multiple sources. The only prerequisite is a machine with a running instance of Docker and Docker Compose. It uses Docker Compose to buddle all the services into the same YAML file and makes easier the deployment of the application.
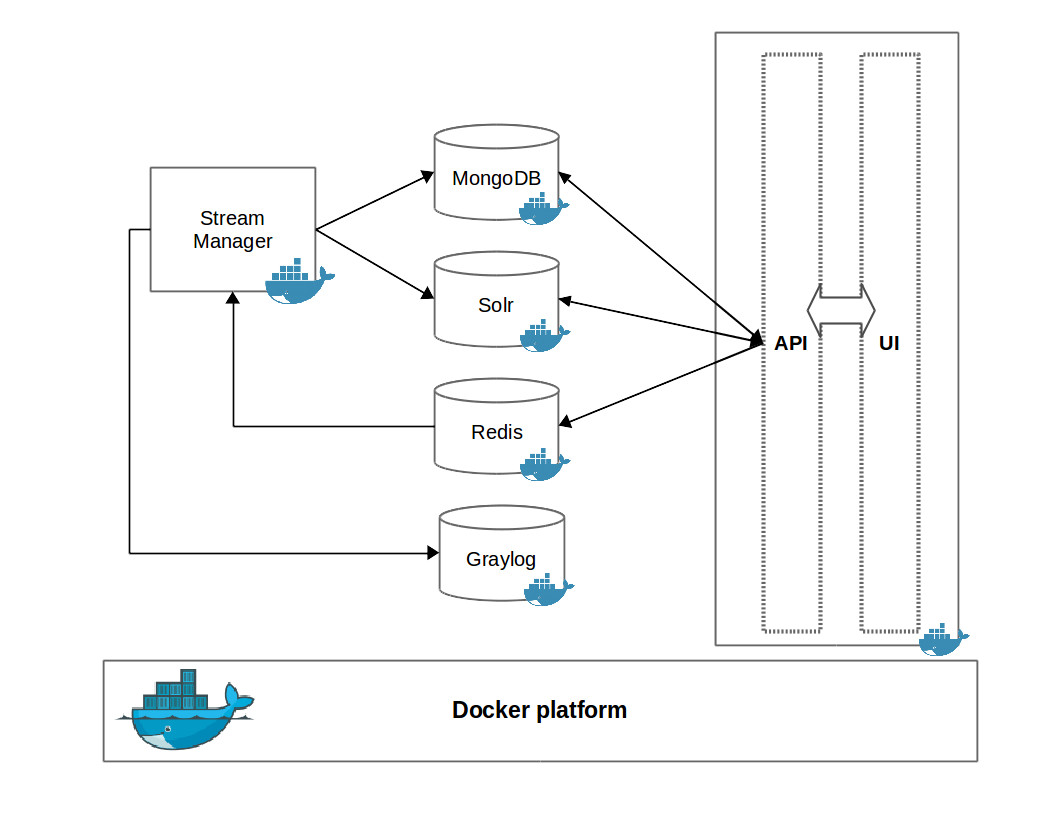
The services that multimedia demo is built upon are the following:
- graylog - An Open Source Log Aggregator and Management server. This service aggregates and maintains the logs produced by the rest of the services.
- redis - Redis is an open source, in-memory data structure store, used as database, cache and message broker. Used primarily as a publish/subscribe service between different components of the demo.
- mongodb - MongoDB is an open-source, document database. Used to store items collected from social media platforms.
- solr - Solr is the popular, blazing-fast, open source enterprise search platform built on Apache Lucene. Is used primarily for the indexing of the collected social media items.
- web - This service consists of two parts: 1) A REST API used to provide access to the collected social media items and to expose several statistics related to them, and 2) the web interface of this demo.
- streammanager - Stream Manager monitors a set of seven social streams : Twitter, Facebook, Instagram, Google+, Flickr and Youtube to collect content relevant to a set of keywords, users or locations, by using the corresponding APIs that are provided from each platform.
For mongodb service the official Docker images hosted in Docker hub is used. First off all, you have to specify volumes in docker-compose.yaml to ensure data persistence. The directory /data/db inside the container that runs mongodb is mounted to the directory ./mongo_data_dir on the host machine's local filesystem. You can change this directory to any other local directory.
mongodb:
    image: mongo:3.2.11
    volumes:
        - ./mongo_data_dir:/data/db
**Important: ** Running mongodb without enabled authentication makes mongodb instance extremely vulnerable to hack attacks. It's highly recommended to run mongodb with the --auth flag and access it by using authorized users. In this tool --auth flag is included by default in docker-compose.yaml file.
mongodb:
  image: mongo:3.2.11
  command: mongod --auth
To access mongodb properly, you have to create a user with the appropriate permissions. More specifically, to run the tool you have to create a user with the role dbOwner for the database Demo, which is the default database that social media monitoring tool inserts the collected data.
To create this user run the create_user.sh script before the deployment of the tool. This script starts a temporary container with a mongodb image and then creates the user. Make sure that the /path/to/mongodb/data/dir is the same as that used for data persistence in docker-compose.yaml. Also ensure that the same mongodb version is used both in the script and docker-compose.yaml (e.g. 3.2.11).
docker run -d -p 27018:27017 -v /path/to/mongodb/data/dir:/data/db --name tmpMongoDB mongo:3.2.11You must specify you own password in the line of the script depicted below:
docker run -it --link tmpMongoDB --rm mongo:3.2.11 sh -c \
    'mongo admin --host tmpMongoDB --eval "db.createUser({ user: \"admin\", pwd: \"place-your-own-password\", roles: [ { role: \"dbOwner\", db: \"Demo\" } ] });"'
The above command will create a user named admin, with the specified password, having full permissions in database Demo. This used will be used for authentication/authorization in web service and stream-manager-service.
web:
  environment:
    MONGO_USER: admin
    MONGO_PASSWORD: you-own-password

streammanager:
  environment:
    MONGO_USER: admin
MONGO_PASSWORD: you-own-passwordFor these services the official Docker images hosted in Docker hub are used. To ensure data persistence in solr, data volumes of Docker are used, as specified in docker-compose.yml. There is no need for data persistence in redis, as at this version of the demo, redis used only as a publish/subscribe service.
solr:
    image: solr:6.3.0
    volumes:
        - ./solr-cores:/opt/solr/server/solr
More specifically, the directory /opt/solr/server/solr is mounted in ./solr-cores or any other directory that contains solr-cores. There are three cores, corresponding to three collections: Items, MediaItems and WebPages. Make sure that user that execute tha docker images has r/w rights to these directories. The easiest way is to give full access:
$chmod 777 -R ./solr-coresweb service Docker image consists of two parts that run on top of Apache Web server as specified in the corresponding Dockerfile: 1) a REST API that exposes the collected data, and 2) a web-based UI. Both of these directories are mounted as data volumes, so the developer can update the API and the UI on the fly.
In the UI, the end user can create a collection of interest and specify a set of keywords or a set of accounts from several social media platforms. To validate the existence of the accounts, the UI returns a list of account, while the user type on the corresponding box, and only an account among them can be selected for monitoring. In order to activate this feature, the web-service/api/credentials.ini file has to be edited.
Given that the demo is deployed on a server having IP address xxx.xxx.xxx.xxx, the UI is accesible via http://xxx.xxx.xxx.xxx/ui and the underlying REST API via http://xxx.xxx.xxx.xxx/api. For a detailed description of the API check the documentation under http://xxx.xxx.xxx.xxx/doc/v0.1/.
stream-manager-service is a java process on top of Docker built upon mklab-stream-manager. The project is cloned from the corresponding github repository and the java executable is generated using mvn during Docker build. This step is quite slow and can take up to 30 minutes as mvn build can be a quite slow procedure. The following snippet of stream-manager-service Dockerfile describes this prodedure:
RUN git clone https://github.com/MKLab-ITI/mklab-stream-manager.git && \
    cd mklab-stream-manager	&& \
    cd checkout tags/mklab-stream-manager-0.3 && \
	  mvn clean package && \
    cd /
Note that after cloning from github, the compilation is performed on a specific release of the project tagged as mklab-stream-manager-0.3. As mklab-stream-manager is under development and new features are added to this project, it is considered as a good practice to use a stable release. However, to use the latest version of stream manager, as cloned from the master branch of the repository, remove the third line of the snippet above:
cd checkout tags/mklab-stream-manager-0.3 && \After succesfull building, in order to be able to run the service correctly, the stream_manager/streams.conf.xml has to be edited. Most parts of that file are set in order to having stream-manager-service work in conjunction with the other services of the demo. The user has only to specify the streams(social media platforms) that are active, and set the corresponding credentials.
For example, in order to activate monitoring of twitter comment out the following section and set Key, Secret, AccessToken and AccessTokenSecret:
<Streams>
    <!-- Twitter Stream Handler -->
    <Stream id="Twitter">
        <Parameter name="Classpath">
           		<![CDATA[gr.iti.mklab.sfc.streams.impl.TwitterStream]]>
		</Parameter>
        <Parameter name="Key"><![CDATA[]]></Parameter>
        <Parameter name="Secret"><![CDATA[]]></Parameter>
        <Parameter name="AccessToken"><![CDATA[]]></Parameter>
        <Parameter name="AccessTokenSecret"><![CDATA[]]></Parameter>
        <Parameter name="maxRequests"><![CDATA[180]]></Parameter>
        <Parameter name="timeWindow"><![CDATA[15]]></Parameter>
  	</Stream>
  	....
</Streams>For data logging a graylog server is used, based on the officiual Docker image (graylog2/allinone). All the logs produced by the services are redirected to it. The default ports exposed outside the container are 9000, 12201/tcp and 12201/udp. For logs persistance, the internal directory in the container used for the keeping of logs is mounted to an external directory:
graylog:
  image: graylog2/allinone
  ports:
    - 9000:9000
    - 12201:12201
    - 12201:12201/udp
    volumes:
- ./graylog/logs:/var/log/graylogTo start the services:
$ cd mmdemo-dockerized
$ docker-compose up
This will create or download images and pull in the necessary dependencies for each service. Once done, it runs the Docker and map the ports to whatever is specified in the docker-compose.yml file.
By default, the services will expose the following default ports:
- redis -> 6379
- solr -> 8983
- mongodb -> 27017
- web -> 80 (as apache web server is used internally)
- graylog -> 9000, 12201, 12201/udp
Note that if these ports are already in use, e.g. if the machine that runs docker has a running instance of mongodb, then the corespondong service will fail to start. If it's necessary to change this, edit the docker-compose.yml. For example, in order to change the exposed port of redis from 6379 to 6380, edit the following section in docker-compose.yml:
  ...
  redis:
    image: redis
    ports:
      - "6380:6379"
    ...
Verify the deployment by typing:
$ docker psManos Schinas (manosetro@iti.gr), Symeon Papadopoulos (papadop@iti.gr)