This is a companion app for the Open.HD drone platform.
Note: the screenshots here are very outdated at the moment.
Binaries are available in the releases tab in GitHub.
- Live digital video stream in-app
- Drag and drop OSD widgets (if you've ever moved apps around on an iPhone/Android, it's exactly like that)
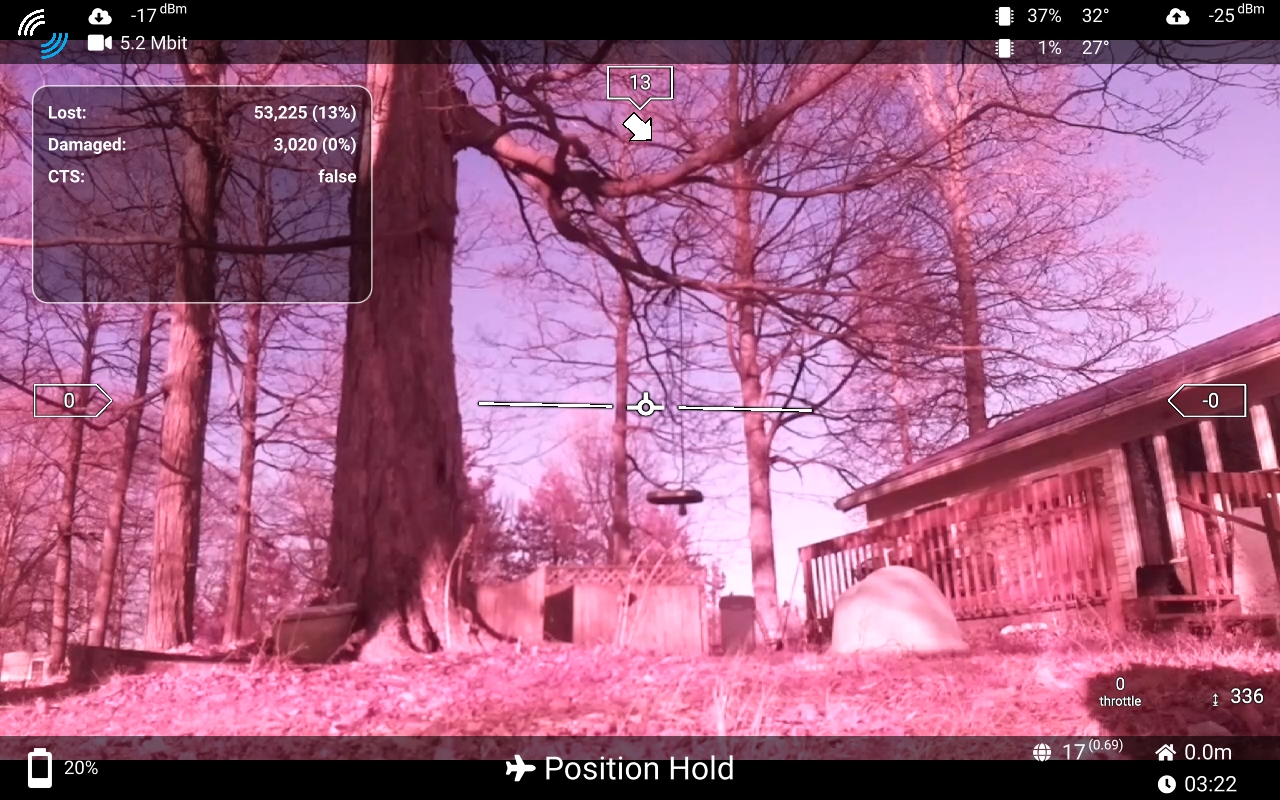
- Tap OSD widgets to bring up popup detail panels with more infomation
- Picture-in-picture support for the drone 2nd camera (if one is being used)
- Full control over all GroundPi settings from inside the app
- OpenGL hardware accelerated UI on every platform
- GroundPi (using touchscreen or HDMI output+mouse)
- Windows
- Mac
- Linux
- iPhone/iPad
- Android
- Mavlink telemetry
- LTM telemetry
- FrSky telemetry
- Vector Open telemetry
- Smartport telemetry
- Speech to announce warnings and telemetry messages
- Full video decode acceleration
- Not yet enabled on Windows
- Control air-side GPIO pins
- Open.HD presets, for features that are a little complex to set up
- Reboot/shutdown airpi and groundpi independently
- Virtual on-screen joystick for flying
- Live charts to show radio and system statistics
- Fully localized and translated UI
- Resizable widgets (mostly matters for the PiP camera view)
- Drone vibration display for all telemetry protocols that support it
- Recording video+OSD together on all platforms
- Mavlink commands
- Arm/disarm
- Start mission
- Setting waypoints
- Rebooting flight controller
However, the app itself should run the same on every platform with the exception of hardware video decode and PiP on Windows.
Things like RC and video rendering are inherently dependent on platform support to some extent. For example, iOS is never going to support USB connected joysticks or TX, but will support things like bluetooth gamepads if the GroundPi is 5.8Ghz (otherwise the interference is horrible in some cases and may not be reliable, please test carefully).
| Feature | GroundPi | Windows | Mac | Linux | Android | iOS |
|---|---|---|---|---|---|---|
| Video | Yes | Yes (no hardware accel) | Yes | Yes | Yes | Yes |
| Settings | Yes | Yes | Yes | Yes | Yes | Yes |
| PiP 2nd cam | Yes | No | Yes | Yes | Yes | Yes |
| RC | Yes | Disabled | Disabled | Disabled | Disabled | Disabled |
| Backlight Control | Yes | N/A | N/A | N/A | N/A | N/A |
| Mavlink | Yes | Yes | Yes | Yes | Yes | Yes |
| LTM | Yes | Yes | Yes | Yes | Yes | Yes |
| FRSky | Yes | Yes | Yes | Yes | Yes | Yes |
| Vector | Yes | Yes | Yes | Yes | Yes | Yes |
| Smartport | Yes | Yes | Yes | Yes | Yes | Yes |
| MSPv2 | No | No | No | No | No | No |
| Voice Feedback | Untested | Untested | Untested | Untested | Untested | Untested |
The OSD widgets can all be dragged around the screen and positioned wherever you like. They will stay where you put them after a reboot.
To move them around:
- Tap and hold a widget until it starts to wiggle and "unlocks".
- Drag the widget to a new location
- Tap and hold it again (or hit the checkmark button) to lock it again.
While a widget is unlocked, a box will be drawn around it to indicate where the edges are. This makes it easier to avoid overlapping widgets, or overflowing the edge of the screen. Some widgets, like flight mode, are larger than they seem due to variable sized contents.
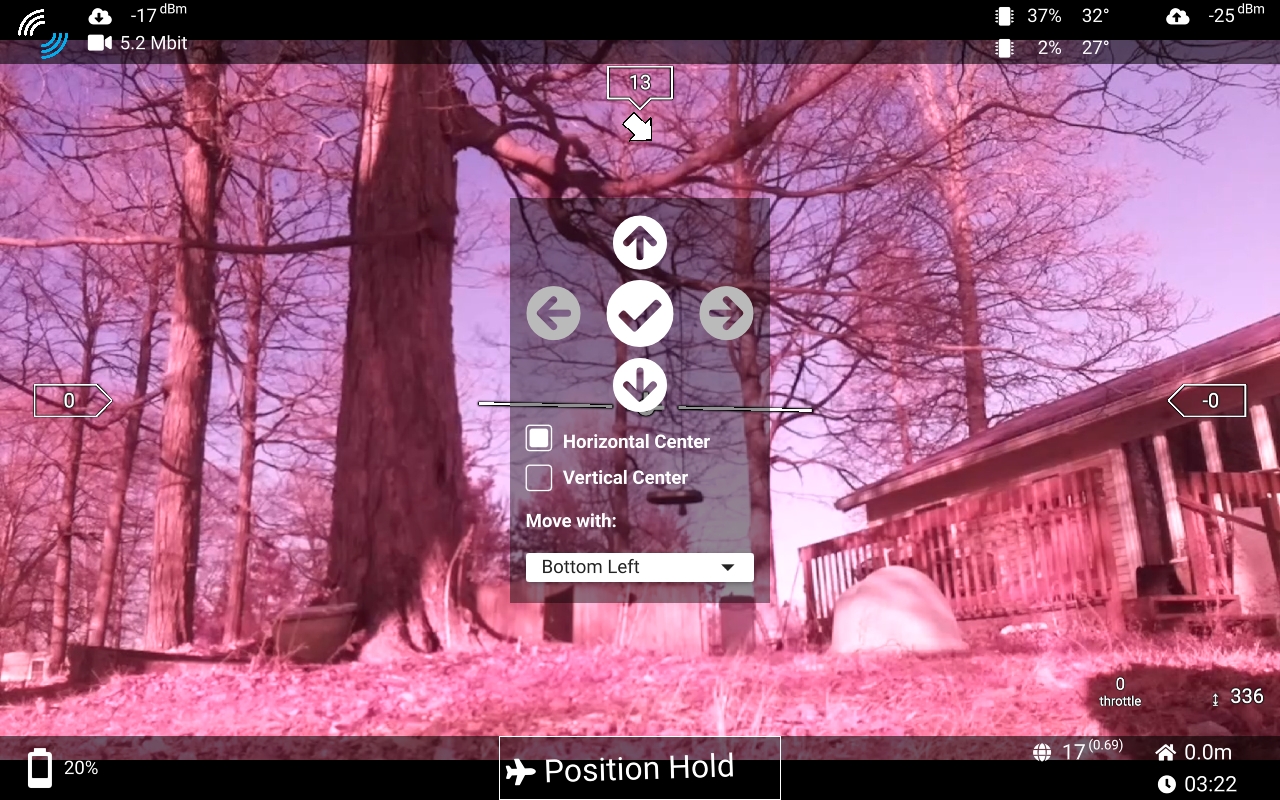
If you can't place the widget exactly where you want by touch alone, you can use the fine adjustment controls on the screen to move it up/down/left/right pixel-by-pixel, as well as set horizontal/vertical centering. When centering is enabled, the widget will "snap" back to the horizontal/vertical center once you lock it again.
On platforms that have resizable windows, you can also set a corner affinity to ensure that the widget stays where you want it when the window is resized.
Only one widget can be unlocked at a time, to prevent accidentally moving the others when positioning them near each other.
Widgets can all be completely enabled/disabled individually in settings, and some of them have settings of their own that can be accessed by tapping once on the widget to open the detail panel.
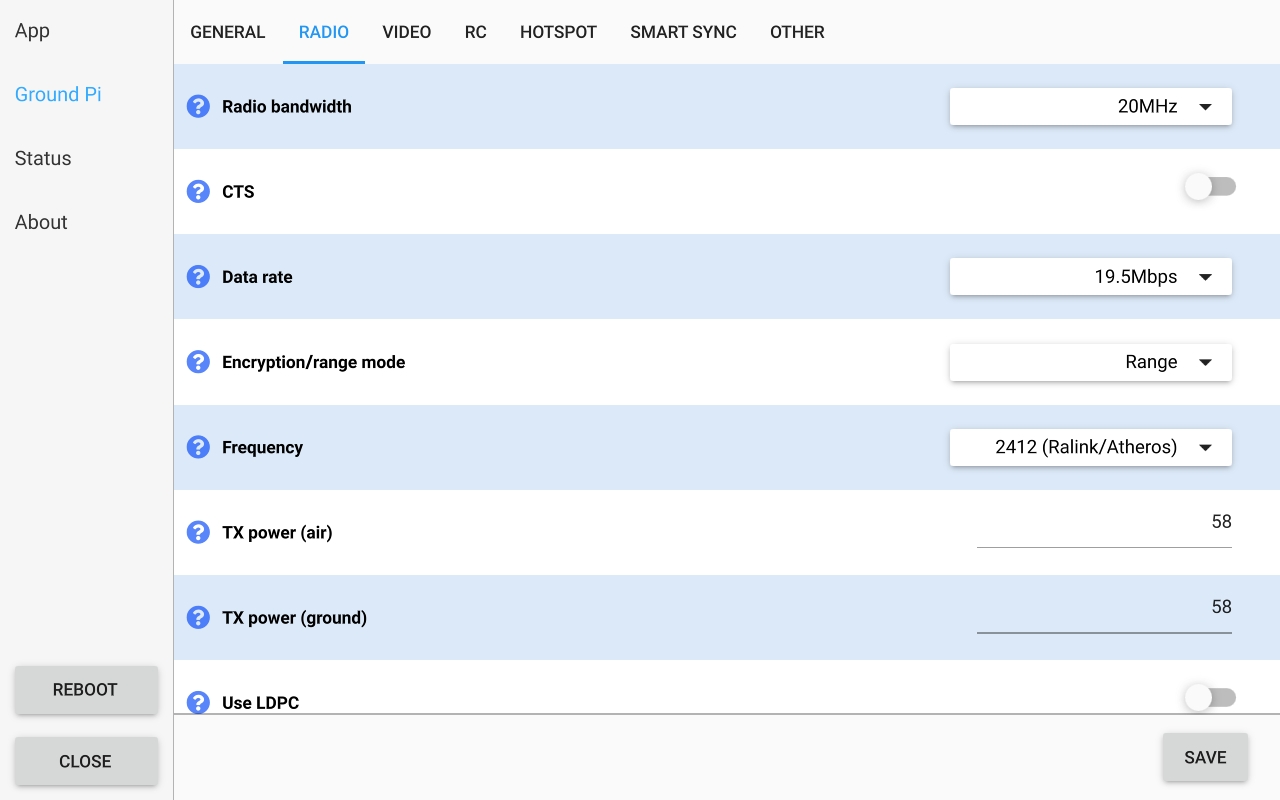
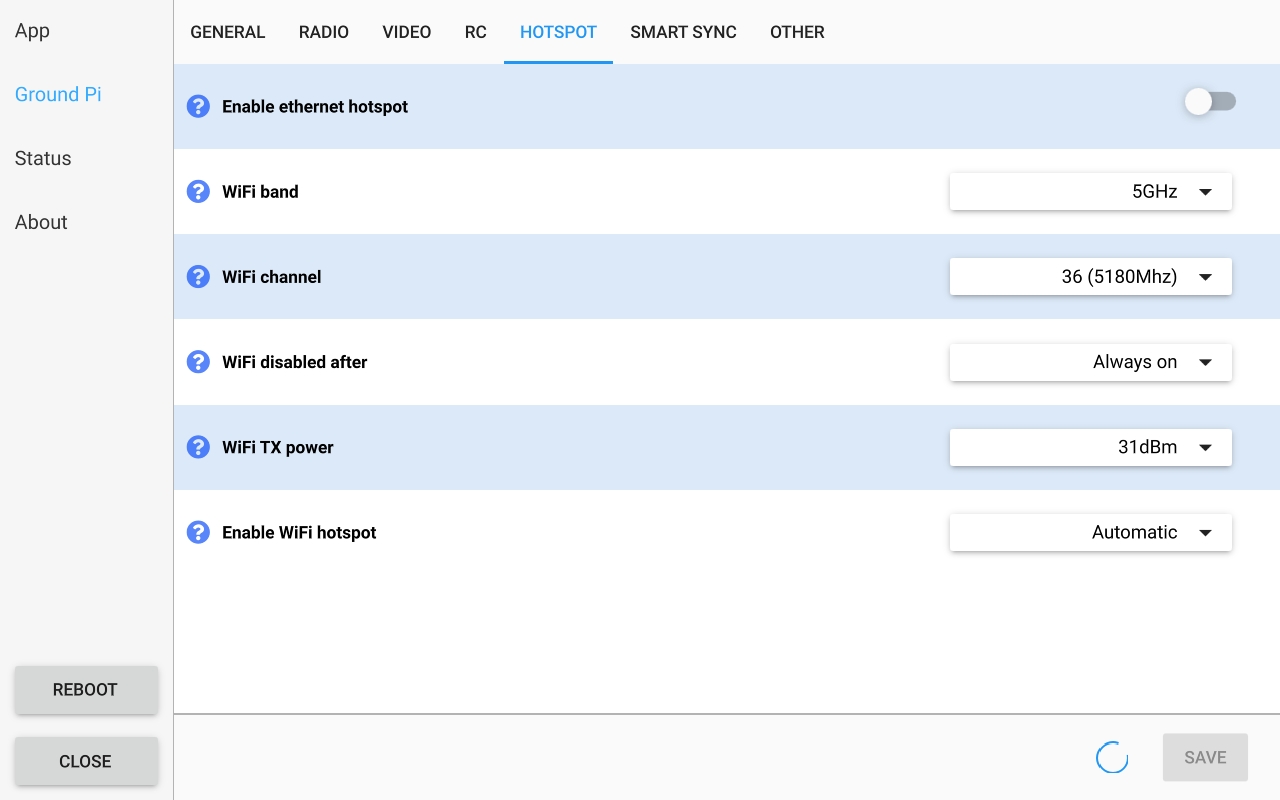
The app has a full touch interface for GroundPi settings, including radio frequency, video resolution and bitrate, the Wi-Fi and Ethernet hotspot settings, etc.
Some settings are treated specially and presented in a specific tab. This allows them to use appropriate UI controls and to limit the possible choices where that makes sense.
However all settings, including any new settings added to the GroundPi in the future, can be changed from the app. This does not require an app update, the new settings will simply show up in the "other" tab with a plain text editing field ensuring they can be changed no matter what the value is supposed to be. Just be careful not to break anything by entering the wrong value in those fields :)
Note: When the app is running on the GroundPi itself, changing some settings requires a USB keyboard (those that use a text field rather than a dropdown or number picker).
There is an on-screen keyboard for the ground station but it is not enabled yet. Once it is tested and working well, this will not be required anymore.
This is currently handled a little differently on the GroundPi, because Open.HD itself can already handle RC and therefore it works the same as it always has.
On other platforms, RC is currently disabled via compiler flag to prevent anyone from using it and accidentally causing a flyaway or getting injured. The code is not yet finished and has a few bugs to resolve before it can be trusted.
The app can announce warnings and errors, along with other telemetry messages from the drone, including arming errors and GPS glitch conditions.
The speech system is part of Qt rather than custom made, however it doesn't work exactly the same on every platform.
Voices on Mac, iPhone/iPad, and Android sound quite natural, while the quality of the voices on Linux (including the GroundPi) depends on which speech backend was selected at build time.
I haven't yet picked or even tested specific backends on Linux to ensure the voices sound natural, so they may sound robotic at the moment.
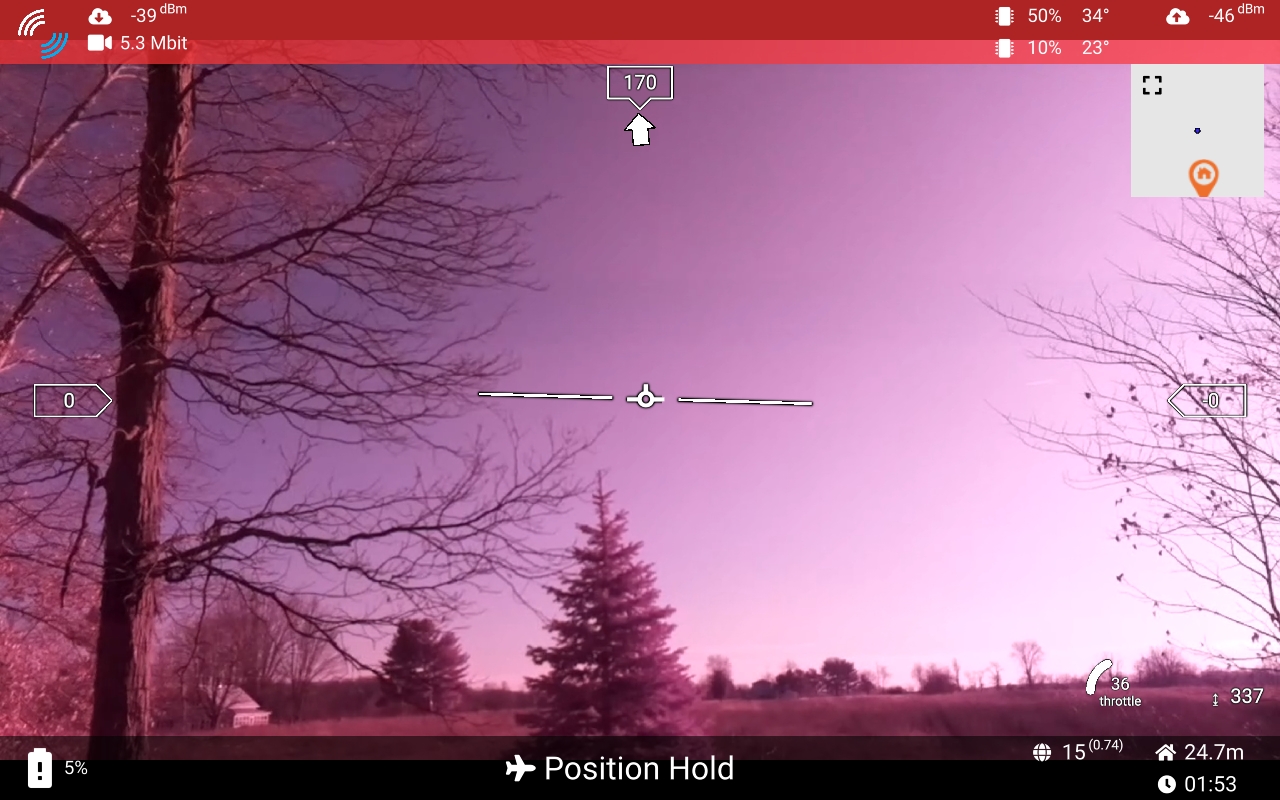
The Open.HD telemetry should display the same information that the original Open.HD OSD does, including the RF RSSI, air/ground temperature and CPU load, video bitrate, etc, regardless of where the app is running.
For vehicle telemetry, only Mavlink is fully integrated at the moment, but other protocols are being added.
On the GroundPi, the app is simply an overlay on hello_video just like the original OSD, so video should work exactly the same as it always has, though there is an additional PiP overlay available for the 2nd camera if one is being used.
On most other platforms, GStreamer and qmlglsink are used to render the video stream using available hardware decoders and OpenGL, but are being removed in favor of custom hardware decode and rendering (currently working on Pi, iOS, Mac, Android).
Video should be working on Windows but is currently not hardware accelerated.
The code is mostly C++ and uses the Qt framework, specifically QtQuick which is designed for portability and renders using OpenGL.
This allows the same app to run on Windows, Mac, Linux, iOS, and Android, as well as directly on the GroundPi itself (either using the official touchscreen or an HDMI screen + mouse).
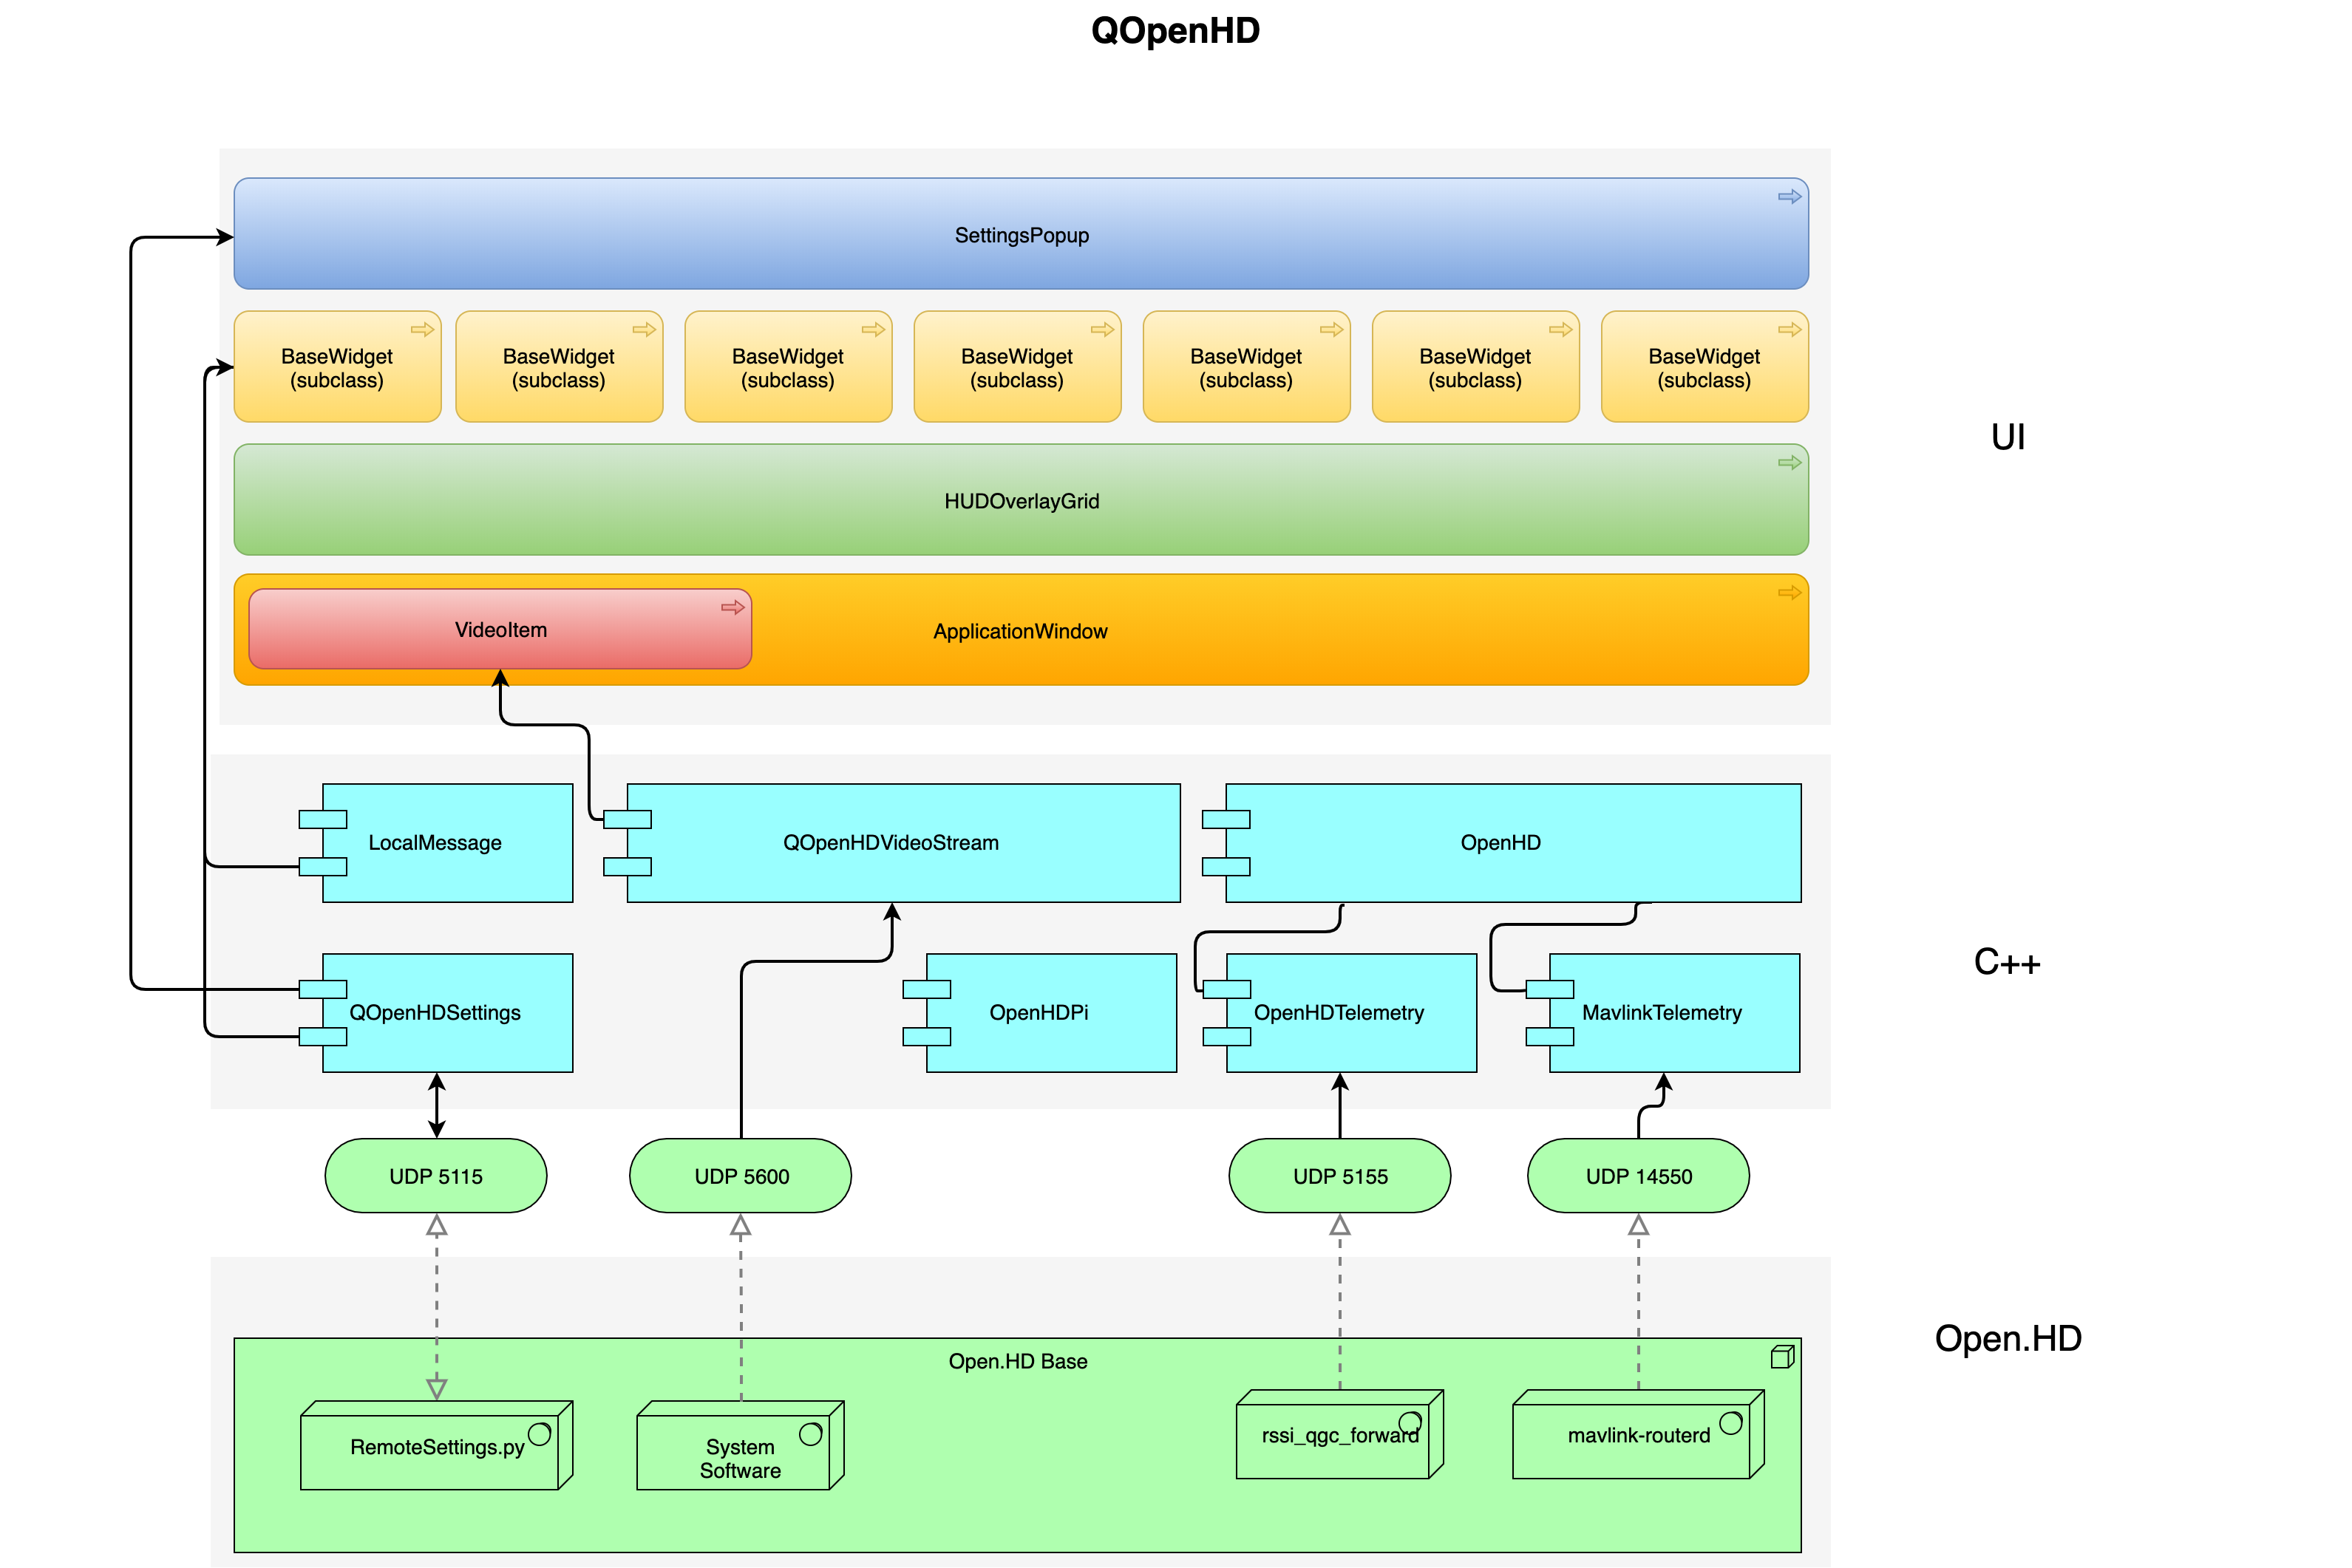
The core is C++ (in src), and the UI is designed with QtQuick, which is an OpenGL accelerated, declarative UI framework. You can find the UI files in qml.
QtQuick is designed to be an MVC code architecture, and QOpenHD follows that pattern for the most part. The UI layer is separated into declarative UI "forms" with a matching logic-only layer them, you can see that in the file names for most of the components (there will be a -Form.ui.qml for each one).
There is a small amount of "glue" code in the QML layer, the language is basically Javascript but designed to integrate with QML. There is more of this in the QML layer than I would like at the moment but some of it can be moved down to C++ in the future.
Binaries and GroundPi images are available in the releases tab in GitHub.
However if you still want to build it yourself, you can.
These are only a rough outline rather than exhaustive build steps (that would fill several pages and be very complciated to write and keep updated).
The build process is dependent on which platform you're building on and which platform you're building for. It can be quite complicated and irritating when something doesn't work right, or if you aren't familiar with all these development frameworks and toolchains.
In general, you'll need Qt 5.15.0+ and the GStreamer development package on some platforms, specifically version 1.14.4.
-
Install Xcode from the Mac App Store.
-
Install Qt using the Qt online installer
-
Have the Qt Installer download Qt 5.15.0+ for Mac, and Qt Creator
-
Clone the source code:
git clone --recurse-submodules https://github.com/OpenHD/QOpenHD.git
If you aren't using git from the command line but using a GUI git client instead, make sure you update the submodules or QOpenHD will not build properly.
Once you have those steps done you can open QOpenHD.pro with Qt Creator, build and run it.
-
Install Xcode from the Mac App Store.
-
Install Qt using the Qt online installer
-
Have the Qt Installer download Qt 5.15.0+ for iOS, and Qt Creator
-
You will need an Apple developer membership to install directly to an iOS device
-
Clone the source code:
git clone --recurse-submodules https://github.com/OpenHD/QOpenHD.git
If you aren't using git from the command line but using a GUI git client instead, make sure you update the submodules or QOpenHD will not build properly.
Once you have those steps done you can open QOpenHD.pro with Qt Creator, build and run it.
-
Install Visual Studio 2019 (free)
-
Install Qt using the Qt online installer
-
Have the Qt Installer download Qt 5.15.0+ and Qt Creator
-
Download the GStreamer development kit for Windows, both the Runtime and Development packages. You must use the 32-bit MinGW packages, NOT the one labeled MSVC, and it should be version 1.14.4. (QT will look for gstreamer in c:/gstreamer/1.0/x86 )
-
Clone the source code:
git clone --recurse-submodules https://github.com/OpenHD/QOpenHD.git
If you aren't using git from the command line but using a GUI git client instead, make sure you update the submodules or QOpenHD will not build properly.
Once you have those steps done you can open QOpenHD.pro with Qt Creator, build and run it.
-
Install Qt using the Qt online installer
-
Have it download Qt 5.15.0+ for Linux
-
Install GStreamer development packages from the package manager. On Ubuntu this would be
apt install gstreamer1.0-gl libgstreamer1.0-dev libgstreamer-plugins-good1.0-dev gstreamer1.0-plugins-good libgstreamer-plugins-base1.0-dev gstreamer1.0-plugins-base libgstreamer-plugins-bad1.0-dev gstreamer1.0-plugins-bad gstreamer1.0-plugins-ugly gstreamer1.0-qt. Those should pull in any others that are needed as well. -
Clone the source code:
git clone --recurse-submodules https://github.com/OpenHD/QOpenHD.git
If you aren't using git from the command line but using a GUI git client instead, make sure you update the submodules or QOpenHD will not build properly.
Once you have those steps done you can open QOpenHD.pro with Qt Creator, build and run it.
-
Install Android Studio
-
Use Android Studio to install Android SDK level 28, along with NDK r18b and the associated build toolchain.
-
Install Qt using the Qt online installer
-
Have the Qt Installer download Qt 5.15.0+ for Android, not for the OS you're building on.
-
Clone the source code:
git clone --recurse-submodules https://github.com/OpenHD/QOpenHD.git
If you aren't using git from the command line but using a GUI git client instead, make sure you update the submodules or QOpenHD will not build properly.
You can then open QOpenHD.pro using Qt Creator and set up the Android kit (left side, click the Projects tab), build and run the app on your device.
I have never tried to run it on the Android simulator, I doubt it would work very well (particularly GStreamer).
Building GroundPi images with QOpenHD integrated is handled by the Open.HD image builder as it is very complicated to get right. It requires a specific set of packages to be preinstalled on the image, and requires building Qt from source to enable eglfs.
Prebuilt SD card images are available on the releases tab in GitHub.