This project started as a simple Proof of Concept for sending PRN CAMM-GL1 (similar to G-Code) cut files to a CAMM-3 PNC-3000 CNC Mill from Node-RED. The original DropOut.exe program and printer drivers provided by Roland required a Windwos XP or earlier operating system and were extremly basic in functionality. senderCAMM-3 allows you to run a stock PNC-3000 from Windows 10 with a modern user interface while still using the original 1986 control circuitry on the mill.
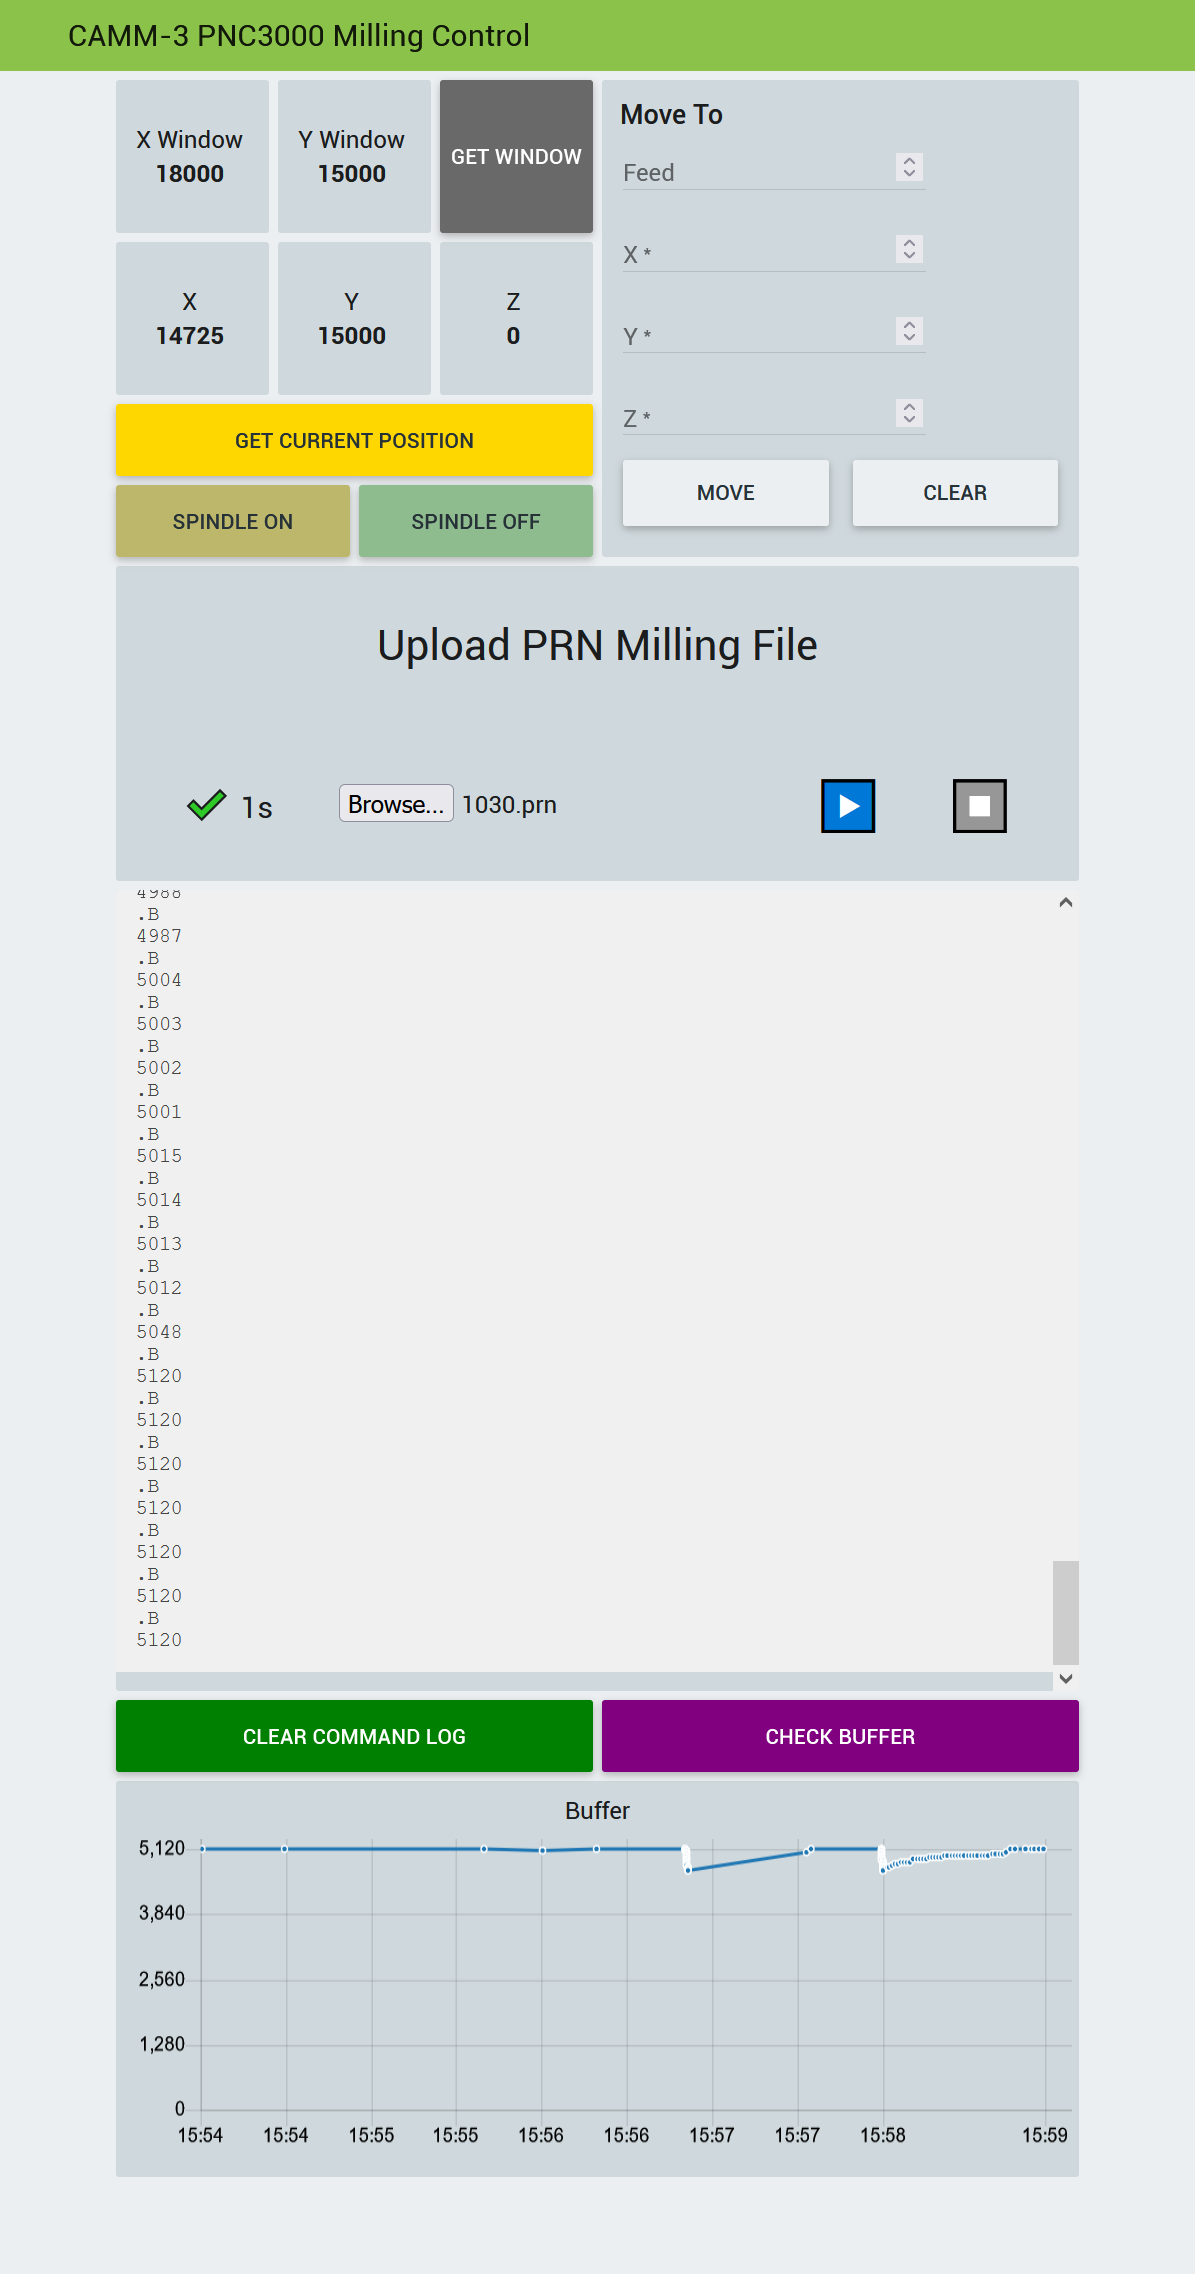
The CAMM-3 PNC-3000 has a 5120 KB circular command buffer size that will quickly run out and wrap over if you deluge it with commands at the full 9600 baud rate. To avoid this, senderCAMM-3 appends ESC.B (1B2E42) to every command sent to the Mill over the serial port which returns the remaining buffer. When the buffer starts getting low, senderCAMM-3 simply stops sending new commands until the buffer has room again.
An experimental post processor has been developed to output PNC3000 PRN files from HSMWorks/Fusion 360 and can be found in the Post Processor folder. Use it at your own risk. In your CAM setup, you must ensure your X,Y origin is below and to the left of ALL move operations in your output PRN file. If any Move (Z) commands are sent to the mill with a negative X or Y value it will error and not cut additional commands sent. Z axis does accept both positive and negative numbers.

-
A Windows 10 machine with Node-RED installed
-
The node-red-node-serialport, node-red-contrib-ui-upload, node-red-contrib-chunks-to-lines, and node-red-dashboard added to the NodeRed pallete
-
Native DB-9 Serial Port with working CTS/RTS Hardware Flow Control
-
A valid PRN cut file (An example for cutting the text "CNC" at 2mm/s feed rate and .5mm passes is included)
(other Operating Systems and configurations may work but are untested as of yet)
- Install Node-RED as per the default instructions provided at https://nodered.org/docs/getting-started/windows
- Start Node-RED and visit it in the web browser at http://localhost:1880 (assuming you installed it locally)
- Add the node-red-node-serialport, node-red-contrib-ui-upload, node-red-contrib-chunks-to-lines, and node-red-dashboard to your Node-RED Pallete
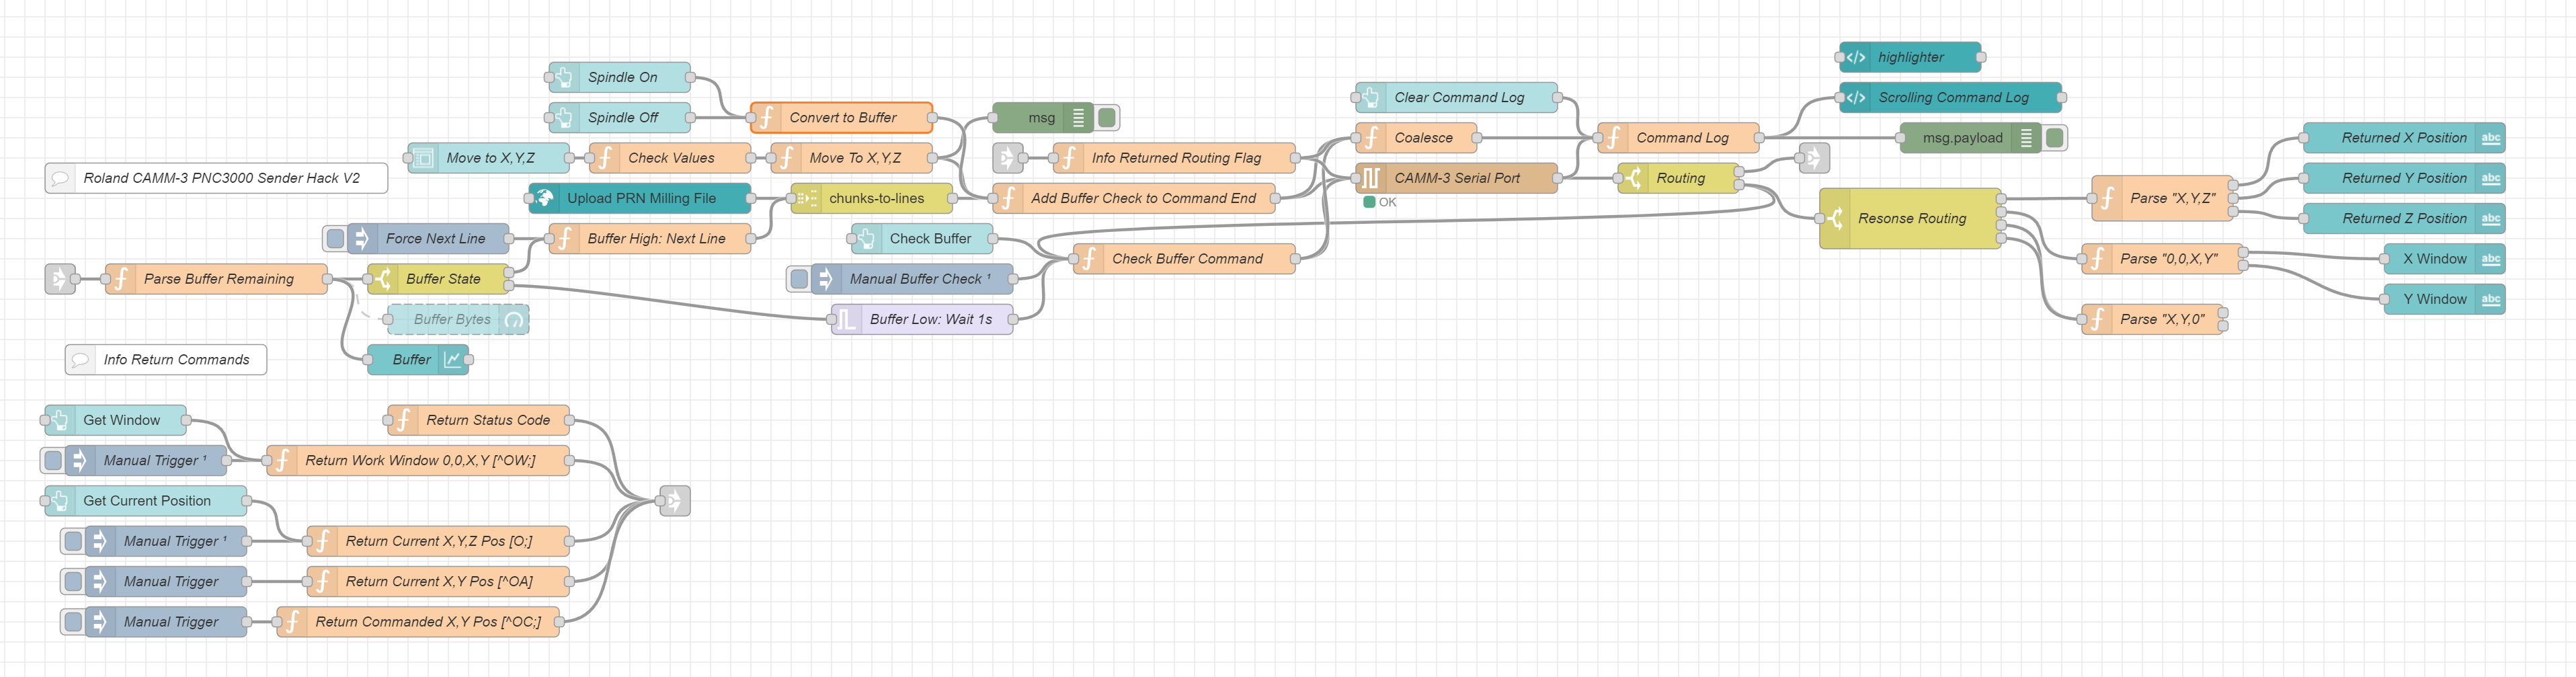
- Import the Camm3-Sender-V1.0.json flow into your running instance of Node-RED
- Double Click the "CAMM-3 Serial Port" node and then click the Pencil icon and change the COM port to match your setup
- Click the Deploy flow button at the top right to save your changes and apply them
- Visit http://localhost:1880/ui/ in your browser, in the upload field click "choose file" and select your PRN cut file
- Turn on and prepare the Mill for Cutting (Generally set Z0 and Home at the front left top origin of the stock)
- Ensure the Mill is out of "Manual" mode and ready for cutting to begin
- Be ready to press the Emergency Stop button on the Mill if something goes wrong
- Single Click the Play button in the upload field to begin sending your Cut code
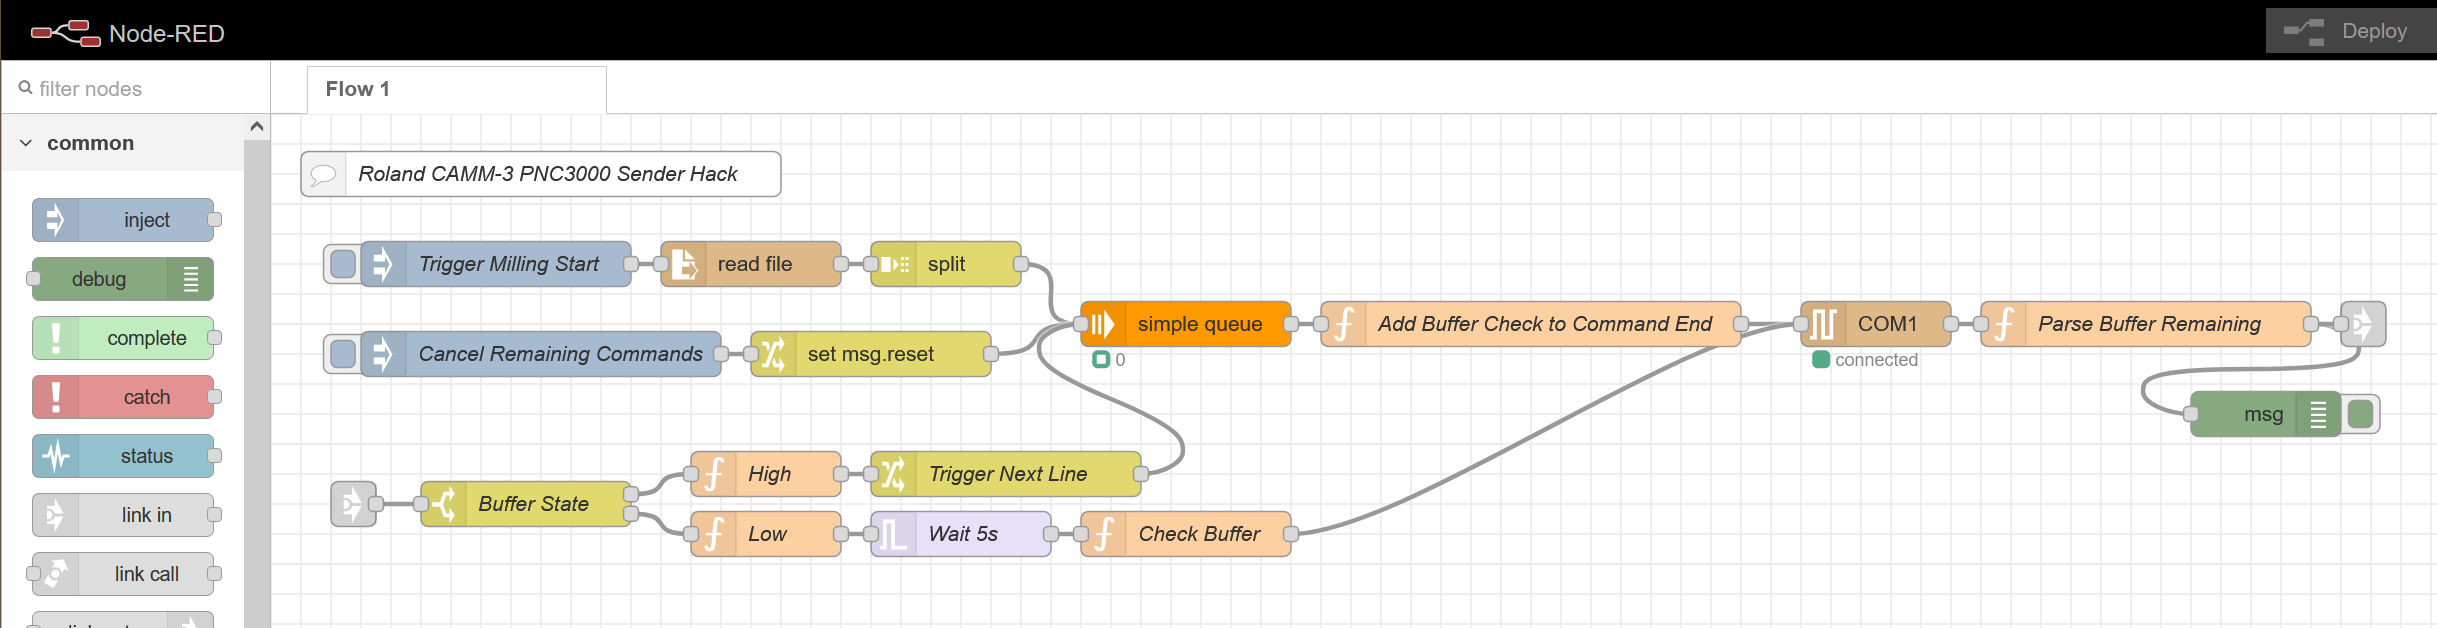
The earliest most basic working version has been kept for anyone wanting a bare-bones buffer monitoring sender
- Install Node-RED as per the default instructions provided at https://nodered.org/docs/getting-started/windows
- Add the node-red-node-serialport and node-red-contrib-simple-message-queue to your Node-RED Pallete
- Import the Camm3-Sender-V0.1.json flow into your running instance of Node-RED
- Double Click the "Trigger Milling Start" node to edit it and change C:\out\1001.prn to your PRN cut file location
- Double Click the COM1 node and then click the Pencil icon and change the COM port to match your setup
- Click the Deploy flow button at the top right to save your changes and apply them
- Turn on and prepare the Mill for Cutting (Generally set Z0 and Home at the front left top origin of the stock)
- Ensure the Mill is out of "Manual" mode and ready for cutting to begin
- Be ready to press the Emergency Stop button on the Mill if something goes wrong
- Single Click the "Trigger Milling Start" button to begin sending your Cut code
THIS SOFTWARE IS PROVIDED BY THE AUTHOR ``AS IS'' AND ANY EXPRESS OR IMPLIED WARRANTIES, INCLUDING, BUT NOT LIMITED TO, THE IMPLIED WARRANTIES OF MERCHANTABILITY AND FITNESS FOR A PARTICULAR PURPOSE ARE DISCLAIMED. IN NO EVENT SHALL THE AUTHOR BE LIABLE FOR ANY DIRECT, INDIRECT, INCIDENTAL, SPECIAL, EXEMPLARY, OR CONSEQUENTIAL DAMAGES (INCLUDING, BUT NOT LIMITED TO, PROCUREMENT OF SUBSTITUTE GOODS OR SERVICES; LOSS OF USE, DATA, OR PROFITS; OR BUSINESS INTERRUPTION) HOWEVER CAUSED AND ON ANY THEORY OF LIABILITY, WHETHER IN CONTRACT, STRICT LIABILITY, OR TORT (INCLUDING NEGLIGENCE OR OTHERWISE) ARISING IN ANY WAY OUT OF THE USE OF THIS SOFTWARE, EVEN IF ADVISED OF THE POSSIBILITY OF SUCH DAMAGE.