Purpose of this tool is to migrate data from various sources to Kentico Kontent. More specifically, the goal is to make bulk import of data possible with Kentico Kontent. At this stage the tool is capable to:
- Import data with use of GUI or endpoints interface.
- Import data in JSON or CSV formats with a predefined structure.
- Generate blueprints for JSON or CSV formats to make it easier to compose the correct structure of import data.
Planned features are:
- No planned features. Waiting for your feedback.
There are 2 ways on how to run the tool:
Both the GUI and the endpoint interface require you to acknowledge structure of the import data.
There are 2 ways how to access the GUI:
- Use the GUI on a testing Heroku instance (please use this option only for evaluation purposes):
https://migration-tool-kentico-kontent.herokuapp.com/- Obtain the code and run the tool locally on your machine. It is a Node.js app. Make sure you have Node.js installed and run the following command in the tool directory.
npm installRun the server
npm startThen the GUI is available on the following address:
http://localhost:5000/
To import data successfully you need to fill in following fields in the GUI:
- Project settings - Required fields for Project ID and Content Management ID. (Tip: You can obtain these values in the API keys page in the Kentico Kontent administration interface of your project).
- Import data - A required field which should contain import data of the following structure. Could be in JSON or CSV format. You can generate a blueprint to help you structure the import data.
When you hit the Import data button you can see information about the ongoing import process in the Logs area. When the import process gets finished the response appears in the Import data field.
There are 2 ways how to access the endpoint:
- Use an endpoint on a testing Heroku instance (please use this option only for evaluation purposes):
https://migration-tool-kentico-kontent.herokuapp.com/<YOUR_PROJECT_ID>- Obtain the code and run the tool locally on your machine. It is a Node.js app. Make sure you have Node.js installed and run the following command in the tool directory.
npm installRun the server
npm startThen the endpoint is available at the following address:
http://localhost:5000/<YOUR_PROJECT_ID>The best way how to access the endpoint is using Postman. The endpoint accepts requests with the following attributes:
- The requested URL must contain your Project ID.
http://localhost:5000/<YOUR_PROJECT_ID>- The request must be POST.
- The request must contain the Authorization header with the Content Management API key:
Authorization: Bearer <YOUR_API_KEY>- Content type header:
Content-type: application/jsonor
Content-type: text/csv- The request body must be of JSON or CSV format with predefined structure. You can generate a blueprint to help you structure the import data.
To be able to import data successfully to Kentico Kontent you need to provide the data in a specific format. To help you compose the data structure correctly you can generate a blueprint. The blueprint is a scaffolding for your import data for a selected content model. There are 2 ways how to generate the blueprint:
To generate a blueprint in GUI you need to:
- Fill in a valid Project ID.
- Select a content model.
- Select JSON or CSV format.
- Hit the "Generate blueprint" button.
- The blueprint appears in the code editor.

The best way how to access the endpoint is using Postman. To generate a blueprint the request must have the following attributes:
- The requested URL must contain your Project ID, format and content model codename in the following format:
http://localhost:5000/<YOUR_PROJECT_ID>/blueprint/<FORMAT>/<CONTENT_MODEL_CODENAME>- Supported formats are json and csv.
- The request must be GET.
To import your data successfully you need to fill in your data in the blueprint. See the example with a description of how the data should be filled in for supported import data formats:
To be able to import data successfully to Kentico Kontent you need to follow the predefined JSON or CSV structure and fit your data in the structure.
Example:
{
    "items": [{
        "item": {
            "name": "Management API test post 1",
            "type": {
                "codename": "simple_type"
            },
            "sitemap_locations": [{
                "codename": "sample_sitemap_grand_child"
            },{
                "codename": "sample_sitemap_child"
            }],
            "external_id": "42"
        },
        "variants": [{
                "language": {
                    "codename": "czech"
                },
                "elements": {
                    "simple_text": "Management API testovací článek 1",
                    "simple_number": 20
                }
            },
            {
                "language": {
                    "codename": "default"
                },
                "elements": {
                    "simple_text": "Management API test post 1",
                    "simple_number": 10
                }
            }
        ]
    }]
}- The top-level property
itemsencapsulates all data. Is type of array and each item of the array represents a Kentico Kontent content item and it's language variants. Is required. - Each content item consists of the
itemandvariantsproperties.- The
itemproperty stores general data about the content item. Object and is required.- The
nameproperty represents the name of the content item. String and is required. - The
type.codenameproperty represents codename of a content model and must fit one of the content models specified in your Kentico Kontent project. String and is required. - The
sitemap_locationsproperty represents codenames of sitemap locations to which the content item should be assigned. The codenames must fit the ones that are specified in your Kentico Kontent project. Array and is optional. - The
external_idproperty represents your custom identifier for the content item. The property is designed to be used when you are migrating data from other systems where the data items already have an identifier assigned. String and is optional.
- The
- The
variantsproperty stores specific data for each language variant in the project. Each language variant is represented by an array item. Array and is required.- The
language.codenameproperty represents codename of a language variant to which the data should be assigned. The codename must fit one language variant in your Kentico Kontent project. String and is required. - The
elementsproperty represents data that should get imported in the Kentico Kontent project. Object and is required.- Child properties of the
elementsobject represent content elements of the content model specified in theitem.type.codenameproperty. Key of each property represents codename of a content element in the content model. Value of the property is your data you attempt to import. Make sure the values are of a correct data type relevant to the mapped content element type.
- Child properties of the
- The
- The
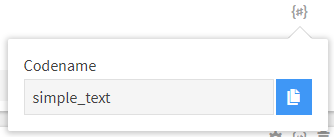
Tip: Values for codename properties could be obtained in the Kentico Kontent administration interface under the {#} icon:
typecodename in the Content models > Content types > specific type page.sitemap_locationscodenames in the Sitemap page.languagecodenames in the Project > Localization page.
The elements property maps your data to content elements of the chosen content model in the item.type.codename property. Each content element accepts a different data type:
- Data type String is accepted by the Text, Rich text, Url slug content elements.
- Data type Number is accepted by the Number content element.
- Data type Array is accepted by the Multiple choice, Modular content, Taxonomy, Asset content elements.
- Data type String in the datetime format ("2017-11-16T11:19:57.3768443Z") is accepted by the Date & time content element.
To fully understand the sturcture of properties in the elements property (especially when it comes to content elements that accept Array values) I recommend you to check the Kentico Kontent documentation Try to make several list requests with use of the Delivery and Content Management APIs and see their responses.
Please note, uploading Binary files and adding Assets to the Asset library are not supported features in the tool.
Example:
name,type,sitemap_locations/codename,external_id,czech/simple_text,czech/simple_number,default/simple_text,default/simple_number
Management API test post 1,simple_type,sample_sitemap_grand_child|sample_sitemap_grand_child,42,Management API testovací článek 1,20,Management API test post 1,10
Columns delimiter could be , or ; characters. Column values delimiter is |.
When structuring import data in CSV you need to follow these rules:
- The first row is the header that defines the structure of imported items. The other rows represent items that you want to import.
- The
namecolumn represents the name of the content item. Required. - The
typecolumn represents codename of a content model and must fit one of the content models specified in your Kentico Kontent project. Required. - The
sitemap_locations/codenamecolumn represents codenames of sitemap locations to which the content item should be assigned. The codenames must fit the ones that are specified in your Kentico Kontent project. Could consist of multiple values separated by the|character. Optional. - The
external_idcolumn represents your custom identifier for the content item. The property is designed to be used when you are migrating data from other systems where the data items already have an identifier assigned. Optional. - Other columns stand for specific data for each language variant in the project. They could have one of the following formats depending on the content element they represent:
Text, Rich text, Url slug, Number, Date & timecontent elements should have header in format<language_codename>/<content_model_codename>.Multiple choice, Modular content, Taxonomycontent elements should have header in format<language_codename>/<content_model_codename>/codename. Could consist of multiple values separated by the|character.Assetcontent element should have header in format<language_codename>/<content_model_codename>/id. Could consist of multiple values separated by the|character.
Please note, the CSV structure has been built on the foundations of the JSON structure described above. Under the hood, CSV import data are translated to JSON and imported to the Kentico Kontent project. The / character in the header columns stands for a delimiter of parent and child properties of the JSON structure. For example
sitemap_locations/codename
sample_sitemap_grand_child;sample_sitemap_child
is translated to
"sitemap_locations": [{
    "codename": "sample_sitemap_grand_child"
},{
    "codename": "sample_sitemap_child"
}]Below you can find a brief description of what the tool does under the hood:
- Checks content type of the request body. If is CSV it is translated in JSON.
- Checks whether the request body is not empty.
- Makes a request using the Content Management API to get project items. By this request, the tool checks whether the provided Project ID and Content Management API key are valid.
- Makes a request using the Delivery API to get content models and their content elements.
- Validates whether the JSON object obtained in the request body fits the required structure.
- Validates whether the JSON object obtained in the request body fits the content models and their elements.
- Validates existence of referenced content models.
- Validates existence and data types of properties in the
elementsproperty.
- If the previous steps are successfull the tool is ready to import the data. Please note that before the import process the tool checks the existence only of content types and their content elements. It does not check existence of other referenced information i.e. language variants, taxonomy groups, sitemap locations. This will be probably checked during the import process.
- Imports data in the Kentico Kontent project. In case of language variants, taxonomy groups, sitemap locations or other imported information do not exist in the Kentico Kontent project, the import process will fail and content items imported during the process get deleted.
- The whole process finishes in one of the following states:
- Data are successfully imported. The array of objects with id and codename of imported content items is sent in the response in the JSON format.
- The process fails. A response that contains a relevant message is sent in the response.
When the phase of importing data starts, the tool makes requests to Kentico Kontent. One request for each content items plus one request for each language variant of a content item. Examples:
- If you import 1 content item with 1 language variant, 2 requests are made.
- If you import 1 content item with 2 language variants, 3 requests are made.
- If you import 2 content item with 2 language variants, 6 requests are made.
- If you import 100 content item with 3 language variants, 400 requests are made.
If the process fails the tool sends more requests to delete already imported content items. One request for each content item. There is no need to send additional delete requests for language variants. This is done to preserve the state of the Kentico Kontent project before the import process has had started. This is important to know because this could make you exceed the number of Content API calls in your Kentico Kontent pricing variant. I recommend you to test the import process on a small number of content items.