
Kidney stones are not a new subject but it is one of the major health concerns these days, if not detected at early stages might also become life-threatening. A small piece of stone may pass through urinary track without causing symptoms. If a stone grows to more than 5 millimetres it can cause blockage of the ureter resulting in severe pain in the lower back or abdomen. Hence, it’s necessary to have an approach to detect the stone in the kidney to avoid further health issues. In this project we will be using transfer learning to make the prediction.
- https://www.researchgate.net/publication/279164550_Analysis_and_Implementation_of_Kidney_Stone_Detection_by_Reaction_Diffusion_Level_Set_Segmentation_Using_Xilinx_System_Generator_on_FPGA
- https://as-proceeding.com/index.php/ijanser/article/view/545
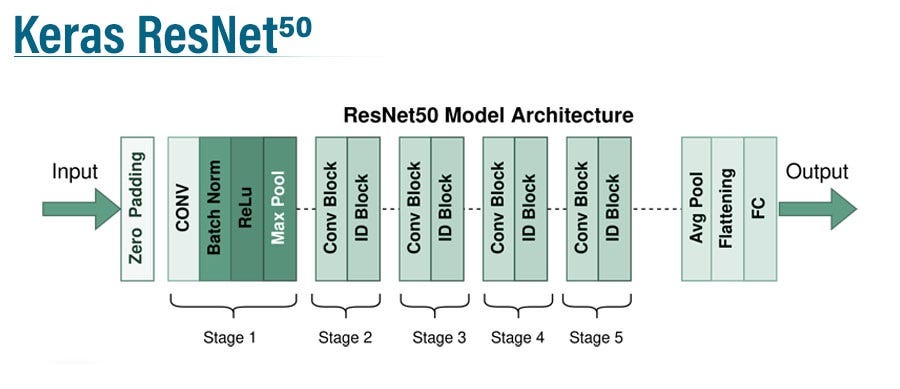
• This architechture contains (conv1) as first convolutional layer containing in channels as 3 which is due to RGB input tensor , (bn1) as batch normalization layer, followed by ReLU and MaxPooling and then it contains 4 main layers named layer1, layer2, layer3 and layer4 which contains further sub layers of convolution followed by batchnorm followed by relu followed by maxpooling , and then finally fc. • ReLU activation is used as it’s the most proven activation function for classification problems as it introduces good and right amount of non linearity with less chances of vanishing gradient problem ! • Batch normalization helped in making the network more stable and learning faster thereby faster convergence. • Maxpooling helped in downsampling high number of parameters created by producing higher dimensional feature maps after convolution operation and thus selecting only relevant features from the high dimensioned feature matrix. • I've replaced last layer of this architecture by fully connected layer containing two sub linear layers as follows : Linear(in_features=2048, out_features=512) Linear(in_features=512, out_features=133) with ReLU activations between the linears.
References:
So, before execution we have some pre-requisites that we need to download or install i.e., anaconda environment, python and a code editor. Anaconda: Anaconda is like a package of libraries and offers a great deal of information which allows a data engineer to create multiple environments and install required libraries easy and neat.
Download link:

Python: Python is a most popular interpreter programming language, which is used in almost every field. Its syntax is very similar to English language and even children and learning it nowadays, due to its readability and easy syntax and large community of users to help you whenever you face any issues.
Download link:

https://www.python.org/downloads/
Code editor: Code editor is like a notepad for a programming language which allows user to write, run and execute program which we have written. Along with these some code editors also allows us to debug, which usually allows users to execute the code line by line and allows them to see where and how to solve the errors. But I personally feel visual code is very good to work with any programming language and makes a great deal of attachment with user.
Download links:

Let us define an environment and why we need different environments. An environment is a collection of libraries that are required to run our project. When we already have an environment with the necessary libraries, why do we need a new environment? To avoid version mismatches, we create a new environment for each project. For example, in your previous project, you used "tf env" with tensorflow 2.4 and keras 2.4, but in your current project, you must use tensorflow 2.6 and keras 2.6. If you continue your project in the "tf env" environment, there will be a version mismatch and you will need to update tensorflow and keras, but this will cause problems with the previous project's execution. To avoid this, we create a new environment with tensorflow 2.6 and keras 2.6 and resume our project.
- Type “conda create –n <<name_of_your_env>>” example: conda create -n env
- It will ask to proceed with the environment location, type ‘y’ and press enter.
- When you press ‘y’, the environment will be created. To activate your environment type conda activate <<your_env_name>> . E.g., conda activate myenv.
- You can see that the environment got changed after conda activate myenv line. It changed from “base” to “myenv” which means you are now working in “myenv” environment.
- To install a library in your virtual environment type pip install <library_name>. e.g., pip install pandas
- Instead of installing libraries one by one you can even install by bunch, i.e., we have a txt file called requirements.tx which consists of all the libraries required to proceed with the project, so we can use it.
- so, before installing requirements.txt, make sure you are in the specific path where your requirements.txt is located, basically this file is located in the folder where our executable files are located, so we need to move to that directory by following command. cd C:\folder_name
- Here A -> drive, folder name -> path where your executable file is saved
- I go to that file path in anaconda using cd command
- Go to drive where your project file is.
- Go to the path of your project using cd
- Type pip install –r requirements.txt
- And all your required libraries will be downloaded and you can start your project.
- But if you want to use jupyter notebook on the new environment you have to set it up for the new environment.
- After you have installed all the libraries and created an environment, you need an editor to run the code, that is starting jupyter notebook, as soon as you enter jupyter notebook in the terminal you will definitely get this error. “Jupiter” is not recognized as an internal or external command. So, to solve it it we have 2 commands.
- conda install –c conda-forge jupyterlab
- conda install –c anaconda python Now you are ready to use jupyter on this environment and start with your project!

Note: Make sure you have added path while installing the software’s.(Supports Python==3.8 only)
- Install the prerequisites/software’s required to execute the code.
- Press windows key and type in anaconda prompt a terminal opens up.
- Before executing the code, we need to create a specific environment which allows us to install the required libraries necessary for our project. • Type conda create -name “env_name”, e.g.: conda create -name project_1 • Type conda activate “env_name, e.g.: conda activate project_1
- Make sure you are in the correct path in your terminal, where you have saved your executable file/folder. E.g.: cd A:\project\AI\Completed\project_name, then press enter.
- Install necessary libraries from requirements.txt file provided.
- Run pip install -r requirements.txt or conda install requirements.txt (Requirements.txt is a text file consisting of all the necessary libraries required for executing this python file. If it gives any error while installing libraries, you might need to install them individually.)
- If you want to build your own model for detection, you can go through “lstm.ipynb”. It takes time to build the model from scratch again.
-
Unzip The DataSet & kidney-50.rar Files then Paste the Location in the code file. -
Click on Kidney_stone_detection_Xresnet50.ipynb to get the results.
The dataset used is the ct scan images of kidney scans wher total of 1453 images are used of which 1163 images are used for traing and 290 images are used for validating the model and 346 images are used to test the model for different perfomence metrix.

- We might face an issue while installing specific libraries.
- Make sure you have the latest version of python or 3.8, since sometimes it might cause version mismatch.
- Adding path to environment variables in order to run python files and anaconda environment in code editor, specifically in visual studio code.
All the required data hasn't been provided over here. Please feel free to contact me for any issues. You can also download the dataset from the given link below.