This is the Python version of EduDraw, for the C# version, please see Edu Draw C#
This project is aimed to provide an interface that allows for a simplified experience when using basic 2D graphics in the Python language.
The general design of the interface is heavily (if not all) inspired by the P5.js library and the Processing library, and is intended to make simple graphical programs easy to do in the .NET environment in the shape of a Windows Forms app and/or in the Python language.
The details of installation and documentation of the respective versions are below.
-
1.0. Installation
-
2.0. Setting up
-
3.0. Documentation
-
3.1. State methods
-
3.1.1. EduDraw()
-
3.1.2. EduDraw.start()
-
3.1.3. EduDraw.rect_mode()
-
3.1.4. EduDraw.circle_mode()
-
3.1.5. EduDraw.fill()
-
3.1.6. EduDraw.no_fill()
-
3.1.7. EduDraw.font()
-
3.1.8. EduDraw.font_from_instance()
-
3.1.10. EduDraw.reset_font()
-
3.1.11. EduDraw.stroke()
-
3.1.12. EduDraw.no_stroke()
-
3.1.13. EduDraw.stroke_weight()
-
3.1.14. EduDraw.push()
-
3.1.15. EduDraw.pop()
-
3.1.16. EduDraw.mouse_pos()
-
3.1.17. EduDraw.rotate()
-
3.1.18. EduDraw.scale()
-
3.1.19. EduDraw.translate()
-
3.1.20. EduDraw.reset_transformations()
-
3.1.21. EduDraw.reset_scaling()
-
3.1.22. EduDraw.reset_translation()
-
3.1.23. EduDraw.reset_rotation()
-
3.1.25. EduDraw.set_controls()
-
3.1.26. EduDraw.toggle_antialiasing()
-
3.1.27. EduDraw.erase()
-
3.1.28. EduDraw.no_erase()
-
-
3.2. Drawing methods
-
3.2.1. EduDraw.point()
-
3.2.2. EduDraw.text()
-
3.2.3. EduDraw.background()
-
3.2.4. EduDraw.circle()
-
3.2.5. EduDraw.ellipse()
-
3.2.6. EduDraw.line()
-
3.2.7. EduDraw.rect()
-
3.2.8. EduDraw.square()
-
3.2.9. EduDraw.triangle()
-
3.2.10. EduDraw.polygon()
-
3.2.11. EduDraw.image()
-
3.2.12. EduDraw.bezier_curve()
-
3.2.13. EduDraw.arc_open()
-
3.2.14. EduDraw.arc_pie()
-
3.2.15. EduDraw.arc_closed()
-
-
3.3. Other methods
-
3.3.1. EduDraw.frame_rate()
-
3.3.2. EduDraw.use_max_frame_rate()
-
3.3.3. EduDraw.save()
-
3.3.4. EduDraw.quit()
-
3.3.5. EduDraw.load_sound()
-
3.3.6. EduDraw.play_sound()
-
3.3.7. EduDraw.remove_icon()
-
3.3.8. EduDraw.change_icon()
-
3.3.9. EduDraw.retrieve_frame()
-
3.3.10. EduDraw.lerp_color()
-
3.3.11. EduDraw.get_color_from_pos()
-
3.3.12. EduDraw.is_focused()
-
3.3.13. EduDraw.set_mouse_visibility()
3.4. Null mode
-
-
You can install the package using PIP by typing the following command: pip install edudraw, and import it in your code like any other library.
You'll need the pygame library as well, in case it doesn't get automatically installed.
In order to begin using the EduDraw class to make your drawings, you need to do a few steps first:
The only requirement for this library is pygame==2.1.2.
You can do this by adding this to your imports:
from EduDraw import edudraw
Make sure the file is in the same directory as the file from which you are using it from or that you properly add the path otherwise.
This can be done by simply creating a new EduDraw instance like this:
width, height = 500, 500  # Any size you want
s = edudraw.EduDraw(width, height)
These functions are the core of your drawing. setup() runs once and before draw(), and it is used to set up the environment for the drawings that you want to do. Some things (like the frame rate) must be set in here, before the drawing actually begins.
draw(), on the other hand, runs every frame, and is where you will give life to your graphics. Here is where shapes and elements will get drawn to the screen.
Once you run this method on the instance you made for the EduDraw class, the simulation will start and keep running until you give it a halt command or close the window.
You need to pass the setup() and draw() functions you made, and also a window_title to give the running window a name.
The general structure of your form code may look something like this:
from EduDraw import edudraw

def setup():
    # Setting up goes here...

def draw():
    # Drawing goes here...

s = edudraw.EduDraw(500, 500)
s.start(setup, draw, "My cool window")
And now you're ready to get onto some drawings :D
Now that you have your canvas ready for the show, it's time to actually draw something on the screen. To begin with,let's draw a circle on the screen with a white background. Our code might look something like this:
from EduDraw import edudraw

s = edudraw.EduDraw(500, 300)

def setup():
    pass

def draw():
    s.background((255, 255, 255))
    s.circle_mode('TOP_LEFT')
    s.circle(s.width // 2, s.height // 2, 24)

s.start(setup, draw, "My first drawing")
And our canvas looks like this:

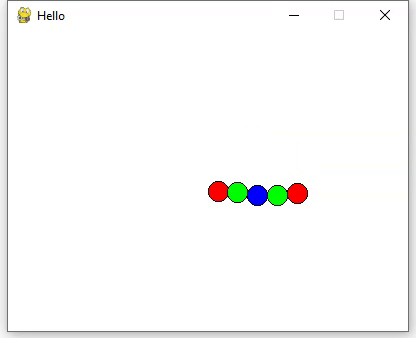
That's our circle! But this is not very interesting, so let's give it a red filling color, a blue outline and make it move around.
from EduDraw import edudraw

s = edudraw.EduDraw(500, 300)


def setup():
    pass


velocity = 5
ball_position = [50, 50]


def draw():
    global ball_position
    s.background((255, 255, 255))
    s.circle_mode('TOP_LEFT')
    s.fill((255, 0, 0))
    s.stroke((0, 0, 255))
    ball_position[0] += velocity
    ball_position[1] += velocity

    s.circle(ball_position[0], ball_position[1], 24)

s.start(setup, draw, "My first drawing")

Now we have a moving red ball :D, but it leaves the screen fairly quickly, so let's make it bounce around.
from EduDraw import edudraw

s = edudraw.EduDraw(500, 300)

width, height = 0, 0
velocity = [5, 5]
ball_position = [50, 50]


def setup():
    global width, height
    width = s.width
    height = s.height


def draw():
    global ball_position, velocity
    s.background((255, 255, 255))
    s.circle_mode('CENTER')
    s.fill((255, 0, 0))
    s.stroke((0, 0, 255))

    if ball_position[1] < 24 or ball_position[1] + 24 > height:
        velocity[1] *= -1

    if ball_position[0] < 24 or ball_position[0] + 24 > width:
        velocity[0] *= -1

    ball_position[0] += velocity[0]
    ball_position[1] += velocity[1]

    s.circle(ball_position[0], ball_position[1], 24)


s.start(setup, draw, "My first drawing")

And just like that, we've got a ball that bounces around like a DVD screensaver (I wonder when it'll hit the corners...), you should try for yourself.
This example was just to give you an idea of how you can work with this interface, and there is so much you can do with this, it's all up to you.
These methods don't directly draw onto the screen, but rather control aspects of the simulation.
Initializer for the EduDraw class.
Parameters:
width, height: The width and height of the window to be created
null_mode: Whether null mode should be used or not. Default: False. See more about null mode at the end.
Returns a new instance of the EduDraw class.
Starts the simulation.
Parameters:
setup: The setup() function written by the user
draw: The draw() function written by the user
window_title: A string to be used as a title for the window running the simulation. Note: This parameter is unused for null mode instances.
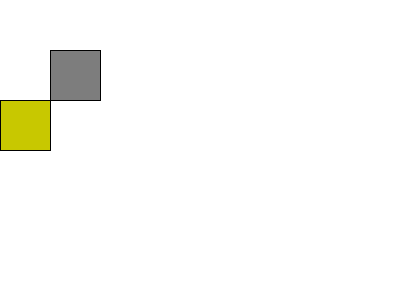
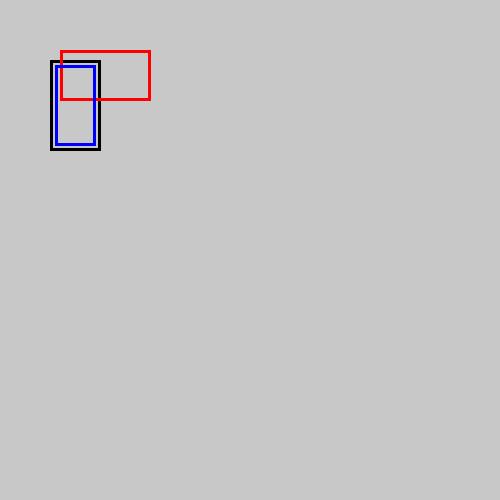
Changes the current mode for drawing squares, rectangles and images.
If mode is 'TOP_LEFT' (which is the default), the (X,Y) coordinates passed in for the rect() and square() methods will represent the top left coordinate of the rectangle.
On the other hand, if mode is 'CENTER', the (X,Y) coordinates passed in for the methods above will represent the position of the center of the rectangle and the resulting position will be calculated based on it.
Example:
    def draw():
        s.background((200, 200, 200))

        s.no_fill()

        s.stroke((255, 0, 0))
        s.rect(50, 25, 100, 50) # Rectangle with RECT_MODE as TOP_LEFT

        s.stroke((0, 0, 255))
        s.rect_mode('CENTER')
        s.rect(50, 25, 100, 50) # Same rectangle with RECT_MODE as CENTER

        s.stroke((0,0,0))
        s.stroke_weight(3)
        s.point(50, 25)  # Point at the (x,y) coordinates passed in for the rectangles above

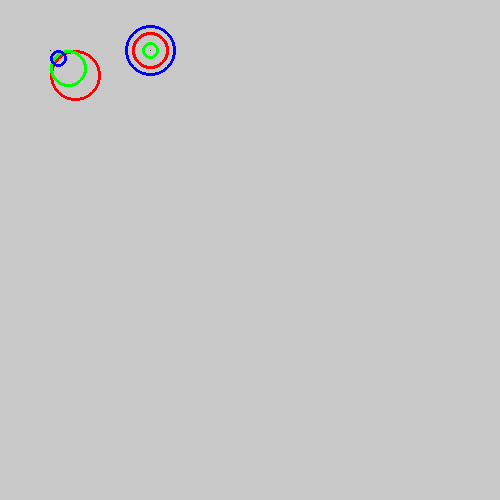
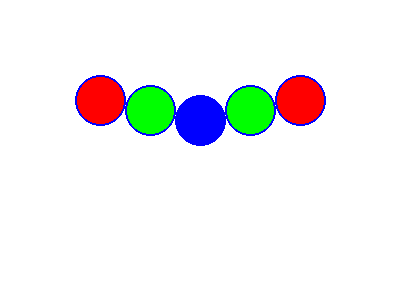
Changes the current mode for drawing circles and ellipses.
If mode is 'TOP_LEFT', the (X,Y) coordinates passed in for the circle() and ellipse() methods will represent the top left coordinate of the rectangle which contains the ellipse.
On the other hand, if mode is 'CENTER' (which is the default), the (X,Y) coordinates passed in for the methods above will represent the position of the center of the ellipse and the resulting position will be calculated based on it.
def draw():
    s.background((200, 200, 200))

    s.no_fill()
    s.stroke_weight(3)

    # Three circles at the same starting pos. with circle_mode as TOP_LEFT
    s.circle_mode('TOP_LEFT')

    s.stroke((255, 0, 0))
    s.circle(50, 50, 25)

    s.stroke((0, 255, 0))
    s.circle(50, 50, 18)

    s.stroke((0, 0, 255))
    s.circle(50, 50, 8)

    # Three circles at the same starting pos. with circle_mode as CENTER
    s.circle_mode('CENTER')

    s.circle(150, 50, 25)
    s.stroke((255, 0, 0))
    s.circle(150, 50, 18)
    s.stroke((0, 255, 0))
    s.circle(150, 50, 8)

    s.stroke((0, 0, 0))
    s.point(150, 50)
    s.point(50, 50)
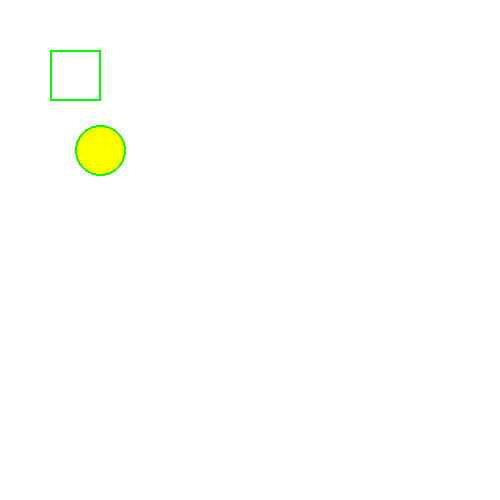
Makes all shapes drawn after this call to be filled in with a given color.
Parameters:
color: A tuple containing the (R, G, B) values of the color to fill the subsequent shapes.
Example:
    def draw():
        s.background((255, 255, 255))

        s.stroke_weight(2)
        s.no_fill()
        s.stroke((0, 255, 0))
        s.square(50, 50, 50)

        s.fill((255, 255, 0))
        s.circle(100, 150, 25)
Makes all shapes drawn after this call to not be filled in.
Changes the font to be used when writing text. When the font is changed, all text will have it's font size, so the parameter for size in the text() method is not used. Note: This is a costly method, if possible, it's recommended to use it once in setup() instead of every frame in draw(). If you need to change font mid-drawing, it's recommended to use font_from_instance() instead with a preloaded font.
Parameters:
new_font: The name of the font to be used. See Pygame fonts
font_size: The size of the font to be used.
bold: Whether the font should be bold or not. Default: False
italic: Whether the font should be italic or not. Default: False
underline: Whether the font should have an underline or not. Default: False
Sets the font to be used when writing text to a premade instance of a pygame.font.Font object. It is recommended that, if you need to change fonts mid-drawing, you preload those fonts once before in your program and use this method to change them, instead of using the normal font() method, since it's costly to keep creating new instances every frame and the effect this has on performance is noticeable.
Parameters:
new_font: A pygame.font.Font instance to be used for text.
EduDraw.change_default_font(new_font: str, font_size: int = 12, bold=False, italic=False, underline=False)
Changes the default font to be used. This method is meant to be called in setup(), and is the preferred way of changing the font.
The parameters are the same as font().
Resets the font used to the default one.
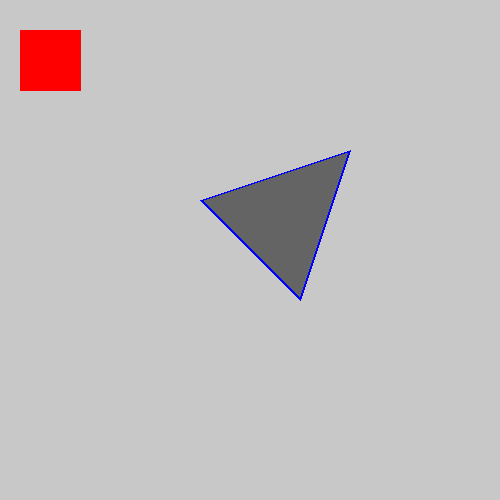
Makes all shapes drawn after this call to have their outlines drawn with a given color.
Parameters:
color: A tuple containing the (R, G, B) values of the color to draw the outlines of the subsequent shapes.
Example:
def draw():
    s.background((200, 200, 200))

    s.stroke_weight(2)

    s.fill((255, 0, 0))
    s.no_stroke()

    s.square(20, 30, 60)

    s.fill((100, 100, 100))
    s.stroke((0, 0, 255))

    s.triangle(200, 200, 300, 300, 350, 150)
Makes all subsequent shapes not have their outlines drawn.
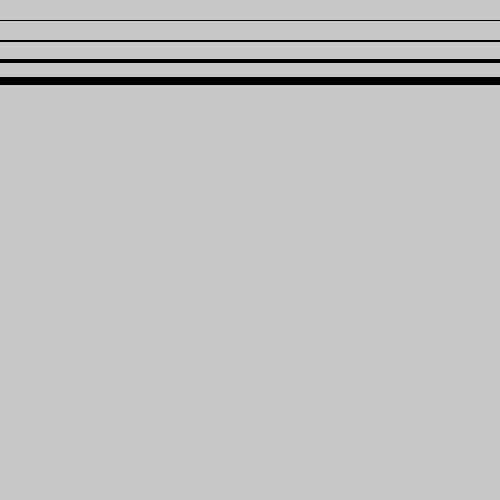
Changes how thick or thin the stroke lines are, smaller numbers means thinner outlines, bigger numbers mean thicker outlines.
Note: Due to the way antialiasing works with gfxdraw, the stroke weight has NO effect when drawing antialiased primitives and is always 1px.
Parameters:
new_weight: The size (in px) of the stroking line.
Example:
def draw():
    s.background((200, 200, 200))

    s.stroke_weight(1)
    s.line(0, 20, s.width, 20)

    s.stroke_weight(2)
    s.line(0, 40, s.width, 40)

    s.stroke_weight(4)
    s.line(0, 60, s.width, 60)

    s.stroke_weight(8)
    s.line(0, 80, s.width, 80)
Toggles the temporary state on. All color, font and weight changes made while this mode is on will be reverted once it is left.
Toggles the temporary state off.
Example:
    def draw():
        s.background((200, 200, 200))
        s.circle_mode('TOP_LEFT')

        s.stroke_weight(2)

        s.fill((255, 0, 0))
        s.stroke((0, 0, 255))

        s.square(50, 50, 50)
        s.circle(100, 50, 25)

        s.push()
        s.fill((255, 255, 0))
        s.square(100, 100, 50)
        s.pop()

        s.circle(50, 100, 25)

Example 2:
    def draw():
        # Setting up visuals
        s.circle_mode('TOP_LEFT')
        s.stroke_weight(2)
        s.background((255, 255, 255))
        s.translate(50, 0)
        s.stroke((0, 0, 255))

        # Main state: Red circle
        s.fill((255, 0, 0))
        s.circle(0, 50, 25)

        s.push()
        # Second state: Green circle, translated 10px below main state
        s.translate(0, 10)
        s.fill((0, 255, 0))
        s.circle(50, 50, 25)

        s.push()
        # Third state: Blue circle, translated 10px below second state (20px below main state - it's cumulative)
        s.translate(0, 10)
        s.fill((0, 0, 255))
        s.circle(100, 50, 25)

        s.pop()
        # Leave third state
        s.circle(150, 50, 25)

        s.pop()
        # Leave second state
        s.circle(200, 50, 25)
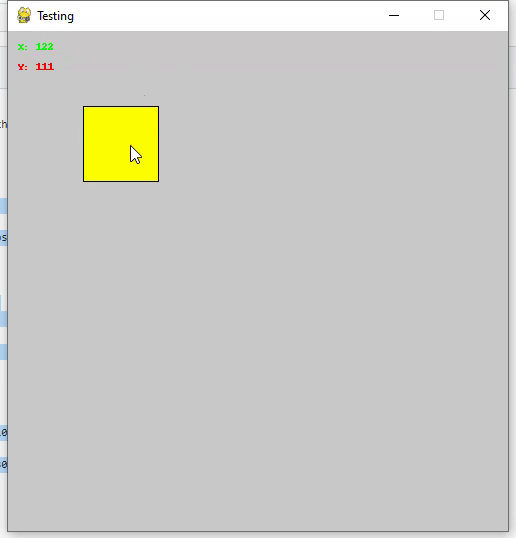
Gets the current mouse position (relative to the top left corner of the canvas). Returns a tuple with the X,Y position of the cursor.
Returns:
A tuple with the coordinates of the mouse relative to the canvas
Example 1:
def draw():
    s.background((200, 200, 200))

    mouse_x, mouse_y = s.mouse_pos()
    s.no_fill()

    if 75 <= mouse_x <= 150:
        if 75 <= mouse_y <= 150:
            s.fill((255, 255, 0))

    s.circle(mouse_x, mouse_y, 3)

    s.square(75, 75, 75)

    s.fill((0, 255, 0))
    s.text(f"X: {mouse_x}", 10, 10)
    s.fill((255, 0, 0))
    s.text(f"Y: {mouse_y}", 10, 30)
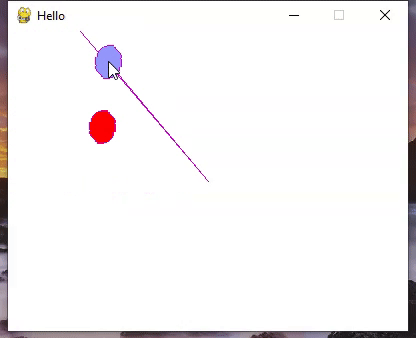
You can set whether this function should or not revert transformations to retrieve the perceived position by using
EduDraw.set_account_for_transformations(True), the example below illustrates the difference:
Example 2:
    def draw():
        s.set_account_for_transformations(False)
        s.background((255, 255, 255))
        s.stroke((200, 0, 200))

        s.scale(1.1, 1.4)
        s.rotate(s.frame_count)
        s.translate(s.width // 2, s.height // 2)

        # Line to illustrate rotation of the canvas
        s.line(s.width // 2, s.height // 2, 0, 0)

        no_account = s.mouse_pos()

        s.set_account_for_transformations(True)

        account = s.mouse_pos()

        # Light blue circle where the perceived mouse position is
        s.fill((150, 150, 255))
        s.circle(account[0], account[1], 12)

        # Red blue circle where the actual mouse position is
        s.fill((255, 0, 0))
        s.circle(no_account[0], no_account[1], 12)

        s.line(0, 0, account[0], account[1])
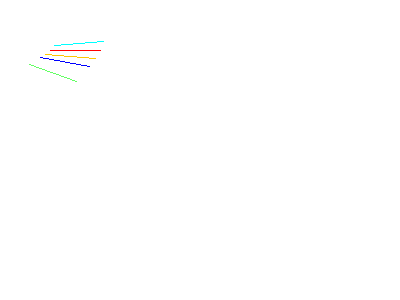
Rotates the drawing clockwise by the defined amount of degrees. Note: Is cumulative with other rotations.
Parameters:
angle: The angle (in degrees) to rotate the drawing
Example:
def draw():
    s.background((255, 255, 255))
    s.stroke((255, 0, 0))
    s.line(50, 50, 100, 50)

    s.rotate(10)
    # Current angle: 10 degrees

    s.stroke((0, 0, 255))
    s.line(50, 50, 100, 50)

    s.rotate(10)
    # Current angle: 20 degrees

    s.stroke((100, 255, 100))
    s.line(50, 50, 100, 50)

    s.rotate(-15)
    # Current angle: 5 degrees

    s.stroke((255, 200, 0))
    s.line(50, 50, 100, 50)

    s.rotate(-10)
    # Current angle: -5 degrees (355 degrees)

    s.stroke((0, 255, 255))
    s.line(50, 50, 100, 50)
Example 2:
def draw():
    s.background((255, 255, 255))
    s.fill((0, 0, 0))
    s.fill((255, 0, 0))
    s.circle_mode('CENTER')
    s.rotate(s.frame_count)
    s.translate(s.width // 2, s.height // 2)
    s.circle(0, 0, 10)
    s.push()
    s.fill((0, 255, 0))
    s.reset_translation()
    s.rotate(s.frame_count)
    s.translate(s.width // 2, s.height // 2)
    s.circle(20, 0, 10)
    s.push()
    s.fill((0, 0, 255))
    s.reset_translation()
    s.rotate(s.frame_count)
    s.translate(s.width // 2, s.height // 2)
    s.circle(40, 0, 10)
    s.pop()
    s.circle(60, 0, 10)
    s.pop()
    s.circle(80, 0, 10)
Scales the drawing's axis by the desired multipliers Note: Is cumulative with other scalars.
Parameters:
scale_x: The multiplier to apply in the x axis scale_y: The multiplier to apply in the y axis
Example:
 def draw():
    s.background((255, 255, 255))
    s.fill((200, 200, 0))

    s.square(50, 50, 25)

    s.scale(2, 0.5)

    s.fill((0, 0, 200))
    s.square(50, 50, 25)

    s.reset_scaling()
    s.scale(0.75, 1.25)

    s.fill((255, 0, 0))
    s.square(50, 50, 25)

    s.reset_scaling()

    s.fill((0, 255, 0))
    s.square(75, 75, 25)

Changes the origin of the plane of drawing. Note: Is cumulative with other translations.
Parameters:
translate_x: The amount to translate in the x axis translate_y: The amount to translate in the y axis
Example:
def draw():
    s.translate(0, 0)
    s.background((255, 255, 255))
    s.fill((125, 125, 125))
    s.square(50, 50, 50)

    s.translate(-50, 50)
    s.fill((200, 200, 0))
    s.square(50, 50, 50)
Resets all transformations applied.
Resets all scaling transformations applied.
Resets all translation transformations applied.
Resets all rotation transformations applied.
Changes wether mouse_pos() should yield the real or perceived position of the mouse.
Parameters:
state: The state to apply to this setting. True yields the perceived position, whereas False (the default) yields the real position.
EduDraw.set_controls(key_down=None, key_up=None, mouse_motion=None, mouse_button_up=None, mouse_button_down=None, mouse_wheel=None)
Sets functions to be ran on each specific Pygame event. None means that nothing will occur on those events.
Each function must have a parameter to receive a dictionary containing the data related to that event (such
as which key was pressed, where the mouse is, etc.)
Parameters:
key_down: The function to be ran when a key is pressed down
key_up: The function to be ran when a key is released
mouse_motion: The function to be ran when the mouse is moved
mouse_button_up: The function to be ran when a mouse button is released
mouse_button_down: The function to be ran when a mouse button is pressed
mouse_wheel: The function to be ran when the mouse wheel is scrolled
Example:
s = EduDraw(400, 400)

bg_color = (200, 200, 200)
text = ''

def setup():
    s.set_controls(mouse_button_down=do_stuff_on_click)

def draw():
    s.background(bg_color)
    s.text(text, s.width // 2, s.height // 2)

count = 0
def do_stuff_on_click(data: dict):
    global count, bg_color, text
    if count % 2 == 0:
        bg_color = (0, 0, 0)
        text = ''
    else:
        bg_color = (255, 255, 255)
        text = 'Clicked!'
    count += 1

s.start(setup, draw, 'Hello')
Example 2:
my_word = ''

def setup():
    s.set_controls(key_down=get_char)
    s.change_default_font('times new roman', 30, italic=True)

def draw():
    s.fill((255, 255, 255))
    s.background((0, 0, 0))
    s.rect_mode("CENTER")
    s.text(my_word, s.width // 2, s.height // 2)

def get_char(data: dict):
    global my_word
    print(data)
    unicode = data['unicode']
    if unicode == '\x08':
        my_word = my_word[:-1]
    else:
        my_word += data['unicode']

Toggles antialiasing on or off. It's off by default.
Note: Antialiasing needs more processing, especially when the number of shapes and their complexity is higher. Also, antialised shapes do not take into account the stroke weight of the lines, and all lines are drawn with the weight of 1px.
Makes drawings erase from the canvas instead of drawing normally. This has the same effect has drawing with the same colors as the background color.
Stops erasing shapes.
Example:
def draw():
    s.background((200, 200, 200))
    s.fill((255, 255, 100))
    s.triangle(0, s.height, s.width//2, 0, s.width, s.height)

    s.fill((255, 0, 0))
    s.erase()
    s.circle(s.width//2, s.height//2, 50)
    s.no_erase()

    s.circle(s.width//2, s.height//2 - 65, 15)

These methods draw onto the canvas.
Draws a point at coordinates (x,y)
Parameters:
x, y: The x,y coordinates to draw the point onto.
Writes a string of text onto the screen.
Parameters:
string: The text to be written
x, y: The coordinates of the top-left corner of the text if rect_mode is 'TOP_LEFT' or the middle of the text is rect_mode is 'CENTER'.
Sets a new background color and clears the canvas to it.
Parameters:
color: A tuple containing the (R, G, B) values of the desired color.
Draws a circle onto the screen.
Parameters:
x, y: The coordinates of the top-left part of the rectangle that contains the circle if circle_mode is 'TOP_LEFT', or the center of the circle if circle_mode is 'CENTER'.
r: The radius of the circle.
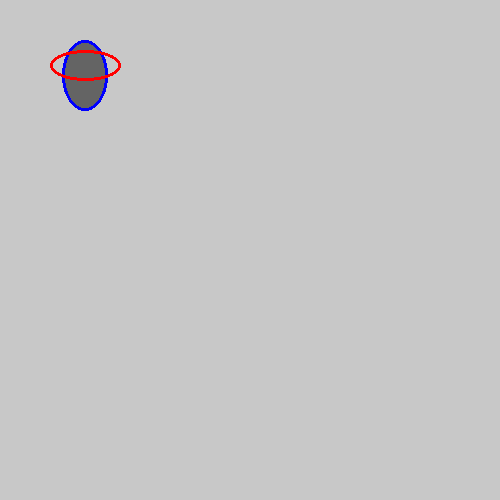
Draws an ellipse onto the screen.
Parameters:
x, y: The coordinates of the top-left part of the rectange that contains the ellipse if circle_mode is 'TOP_LEFT', or the center of the ellipse if circle_mode is 'CENTER'.
w, h: The width and height of the rectangle that contains the ellipse.
Example:
def draw():
    s.background((200, 200, 200))

    s.stroke_weight(3)
    s.circle_mode('TOP_LEFT')

    s.fill((100, 100, 100))
    s.stroke((0, 0, 255))
    s.ellipse(62, 40, 45, 70)

    s.no_fill()
    s.stroke((255, 0, 0))
    s.ellipse(50, 50, 70, 30)
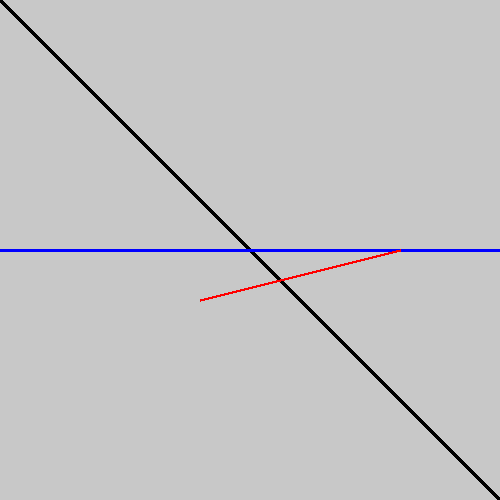
Draws a line between two points.
Parameters:
x1, y1: The coordinates of the first point.
x2, y2: The coordinates of the second point.
Example:
def draw():
    s.background((200, 200, 200))
    s.stroke_weight(3)

    s.line(0, 0, s.width, s.height)
    s.stroke((0, 0, 255))
    s.line(0, s.height // 2, s.width, s.height // 2)
    s.stroke((255, 0, 0))
    s.line(200, 300, 400, 250)
Draws a rectangle onto the screen.
Parameters:
x, y: The coordinates of the top-left corner of the rectangle if rect_mode is 'TOP_LEFT', or the center of the rectangle if rect_mode is 'CENTER'.
width, height: The width and height of the rectangle.
Example:
def draw():
    s.background((200, 200, 200))
    s.stroke_weight(3)

    x = 50
    y = 60

    dx = 5
    dy = 5

    s.no_fill()

    s.rect(x, y, 50, 90)

    s.stroke((255, 0, 0))
    s.rect(y, x, 90, 50)

    s.stroke((0, 0, 255))
    s.rect(x + dx, y + dy, 50 - dx * 2, 90 - dy * 2)
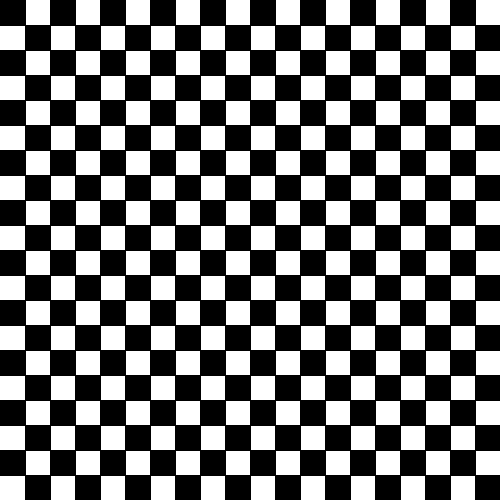
Draws a square onto the screen.
Parameters:
x, y: The coordinates of the top-left corner of the square if rect_mode is 'TOP_LEFT', or the center of the square if rect_mode is 'CENTER'.
side_size: The size of the sides of the square.
Example:
def draw():
    s.background((255, 255, 255))

    s.no_stroke()
    s.fill((0, 0, 0))

    for i in range(0, s.width, 25):
        for j in range(0, s.height, 25):
            if ((i + j) % 2) == 0:
                s.square(i, j, 25)
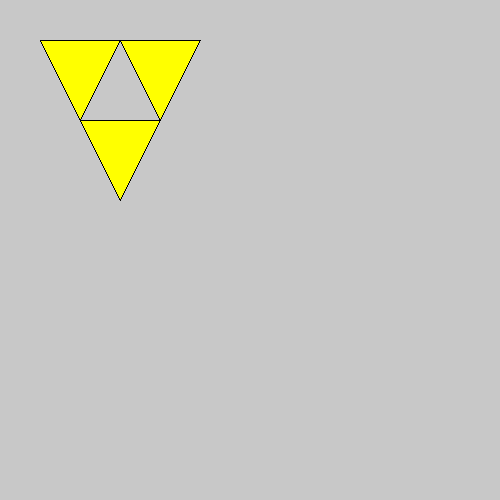
Draws a triangle onto the screen.
Parameters:
x1,y1: The coordinates of the first vertex of the triangle.
x2,y2: The coordinates of the second vertex of the triangle.
x3,y3: The coordinates of the third vertex of the triangle.
Example:
def draw():
    s.background((200, 200, 200))

    s.fill((255, 255, 0))

    s.triangle(40, 40, 120, 40, 80, 120)
    s.triangle(120, 40, 200, 40, 160, 120)
    s.triangle(80, 120, 160, 120, 120, 200)
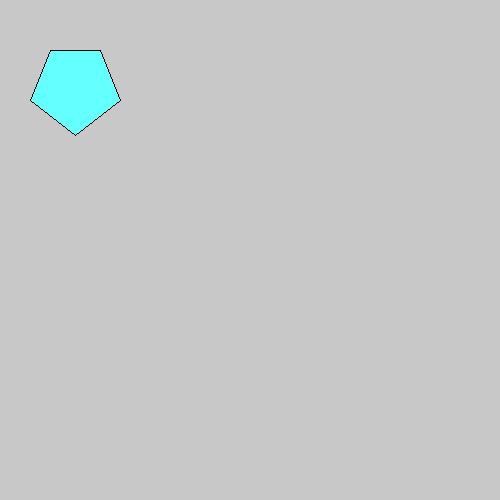
Draws any polygon onto the screen.
Parameters:
points: An array containing tuples with all of the vertices of the polygon.
Example:
def draw():
    s.background((200, 200, 200))

    s.fill((100, 255, 255))
    points = [
        (50, 50),
        (100, 50),
        (120, 100),
        (75, 135),
        (30, 100)
    ]

    s.polygon(points)
EduDraw.image(img: pygame.surface.Surface, x: int, y: int, width: int = None, height: int = None, force_transparency: bool = False):
Displays an image onto the screen on the (x,y) position. If specified a width or height, the image will be resized to those sizes, otherwise, the image will be drawn to it's original size.
Parameters:
img: The image to be drawn onto the canvas
x, y: The position to draw the image
(Optional) width, height: The sizes to set the image to
(Optional) force_transparency: Whether or not force transparency onto the image. See more details below:
my_image = pygame.image.load('testimage.jpeg')

def setup():
    pass

def draw():
    s.fill((255, 255, 255))
    s.background((0, 0, 0))
    s.rect_mode("CENTER")
    s.image(my_image, s.width // 2, s.height // 2, s.width // 2, s.height // 2)

Note that some images may not have transparency when transformed into pygame.Surface objects through the
pygame.image.load() method. Should this be the case, like the one below, you can use the force_transparency
parameter to force that.

Draws a bezier curve from a set of control points
Parameters:
control_points: A list of tuples containing the coordinates of the control points for the curve
num_points (optional): The number of points to be used as steps for the lines. Default: 30
Example:
control_points = [(100, 100), (150, 500), (450, 500), (500, 150)]

def draw():
    s.background((255, 255, 255))
    s.stroke((255, 0, 0))
    s.stroke_weight(3)
    s.bezier_curve(control_points, 70)

    # Drawing the control points for visibility
    for point in control_points:
        s.circle(point[0], point[1], 5)

Draws an open arc onto the canvas.
Parameters:
start_angle: The starting angle (in degrees) of the arc
stop_angle: The stopping angle (in degrees) of the arc
x: The x coordinate to draw the arc, if circle mode is top_left, it's the top left of the rectangle containing the ellipse, else it's the center of the ellipse
y: The y coordinate to draw the arc
width: The width of the ellipse to create the arc
height: The height of the ellipse to create the arc
def draw():
    s.background((200, 200, 200))
    s.stroke_weight(3)

    s.fill((255, 0, 0))
    # Circular red pie that starts at 60 degrees and ends at 300
    s.arc_open(60, 300, s.width // 4 + 5, s.height//2, s.width//2, s.height//2)

    s.fill((0, 255, 0))
    # Elliptical green pie that starts at 300 degrees and ends at 60
    s.arc_open(300, 60, int(s.width * 0.75) - 5, s.height//2, s.width//2, s.height)

EduDraw.arc_pie(start_angle: int, stop_angle: int, x: int, y: int, width: int, height: int, close_edges: bool = True)
Draws a pie-like arc in a counter-clockwise direction from the starting angle up to the stopping angle.
Parameters:
start_angle: The starting angle to draw the pie
stop_angle: The angle to stop the pie
x: The x coordinate to draw the ellipse of the pie
y: The y coordinate to draw the ellipse of the pie
width: The horizontal diameter of the ellipse
height: The vertical diameter of the ellipse
close_edges (optional): Whether the lines from the edges of the pie should be drawn. Default: True
Example:
def draw():
    s.background((200, 200, 200))
    s.stroke_weight(3)

    s.fill((255, 0, 0))
    # Circular red pie that starts at 60 degrees and ends at 300
    s.arc_pie(60, 300, s.width // 4 + 5, s.height//2, s.width//2, s.height//2)

    s.fill((0, 255, 0))
    # Elliptical green pie that starts at 300 degrees and ends at 60
    s.arc_pie(300, 60, int(s.width * 0.75) - 5, s.height//2, s.width//2, s.height)

EduDraw.arc_closed(start_angle: int, stop_angle: int, x: int, y: int, width: int, height: int, close_edges: bool = True)
Draws a closed arc between two angles in an ellipse
Parameters:
start_angle: The starting angle of the arc
stop_angle: The stopping angle of the arc
x: The x coordinate to place the arc's ellipse
y: The y coordinate to place the arc's ellipse
width: The width of the ellipse
height: The height of the ellipse
close_edges (optional): Whether the edges between the starting and stopping angles should be connected. Default: True
Example:
def draw():
    s.background((200, 200, 200))
    s.stroke_weight(3)

    s.fill((255, 0, 0))
    # Circular red arc that starts at 60 degrees and ends at 300
    s.arc_closed(60, 300, s.width // 4 + 5, s.height//2, s.width//2, s.height//2)

    s.fill((0, 255, 0))
    # Elliptical green arc that starts at 300 degrees and ends at 60
    s.arc_closed(300, 60, int(s.width * 0.75) - 5, s.height//2, s.width//2, s.height)

Changes the framerate of the simulation. To run the simulation as fast as possible use use_max_frame_rate() instead.
Parameters:
int frames: The number of FPS to set the simulation to.
Makes the simulation run as fast as possible, with the maximum frame rate being determined by computation speed.
Saves the current frame as an image file. If filename is empty, the name will be the frame count of when the photo was saved.
Quits the simulation.
Loads a sound from a file and turns it into a pygame.mixer.Sound instance.
Parameters:
file: A string with the path to the file to be loaded
Returns a new Sound class instance.
EduDraw.play_sound(sound: pygame.mixer.Sound, loops: int = 0, max_time: int = 0, fade_time: int = 0)
Plays a loaded sound.
Parameters:
sound: A loaded pygame.mixer.Sound instance to be played.
loops (optional): The amount of times to loop the audio
max_time (optional): The maximum time (ms) to play the audio
fade_time (optional): The fading time of the audio (in ms)
Removes the current icon from window
Changes icon to a user-defined image
Parameters:
image: The image to be used as icon
Retrieves the current frame of the simulation as a pygame Surface image.
Returns the currently drawn frame from when this method was called.
Mixes two color to find an intermediary color between them
Parameters:
color_1: The color to lerp from
color_2: The color to lerp to
amount (optional): How close the resulting color should be to the two colors to be mixed. Default: 0.5
Example:
def draw():
    s.stroke((255, 255, 255))
    s.background((51, 51, 51))
    color_a = (218, 165, 32)  # Starting color
    color_b = (72, 61, 139)  # Destination color
    inter_a = s.lerp_color(color_a, color_b, 0.33)
    inter_b = s.lerp_color(color_a, color_b, 0.66)
    s.fill(color_a)
    s.rect(10, 20, 20, 60)
    s.fill(inter_a)
    s.rect(30, 20, 20, 60)
    s.fill(inter_b)
    s.rect(50, 20, 20, 60)
    s.fill(color_b)
    s.rect(70, 20, 20, 60)

Retrieves the color from a given position in the current frame
Parameters:
x: The x coordinate to retrieve the color from
y: The y coordinate to retrieve the color from
Returns a (r,g,b,a) tuple with the color at that position
Gets whether the display is focused or not.
Returns True if display is focused, False if not
Changes the visibility of the cursor
Parameters:
visible: Whether the mouse should be visible or hidden
Null mode is a mode in which you can run an instance of a simulation without having it running directly onto the canvas. You can do this for many reasons, including using EduDraw in a different context or application, creating multiple drawings inside of one another, among other things.
To initialize an EduDraw instance in null mode, you can use the optional parameter for it in the start() method.
Example of null mode:
s = edudraw.EduDraw(500, 500) # Main instance
d = edudraw.EduDraw(250, 250, True) # Null mode ('inner') instance

def setup():
  {...}

def draw():
  {...}

def inner_setup():
  {...}

def inner_draw():
  {...}

s.start(setup, draw, "My window title")
d.start(inner_setup, inner_draw, "This text is not shown")
In order to be able to visualize instance of null mode, you'll have to retrieve the images (pygame.surface.Surface) and use those in your drawing or any other desired output (whether that be an icon, a display, a file, etc.).
You can retrieve the images with the EduDraw.screen variable. With that Surface object retrieved, you can use it wherever it's necessary, and you have much more flexibility for what to do with it.
A good example of this is to run two instances of EduDraw, one normal and one null, and use the retrieved images from the null instance as an argument for EduDraw.image(), essentially creating a drawing inside of a drawing, like the example below:
s = edudraw.EduDraw(200, 200)
d = edudraw.EduDraw(100, 100, True)

position = [d.width/2, d.height//2]
velocity = [3, 4]

# We don't need to setup anything in this case
def setup():
    pass

def inner_drawing():
    global position, velocity
    if position[0] < 0 or position[0] > d.width:
        velocity[0] *= -1

    if position[1] < 0 or position[1] > d.height:
        velocity[1] *= -1

    position[0] += velocity[0]
    position[1] += velocity[1]

    d.fill((255, 0, 0))
    d.stroke((0, 0, 255))
    d.circle(position[0], position[1], 5)

def draw():
    s.background((200, 200, 200))
    s.rotate(s.frame_count)
    s.rect_mode("CENTER")
    s.translate(s.width // 2, s.height // 2)
    s.image(d.screen, 0, 0)

d.start(setup, inner_drawing, "This does not appear")
s.start(setup, draw, "My drawing :D")
