
ROS Packages for CHAMP Quadruped Controller.
CHAMP is an open source development framework for building new quadrupedal robots and developing new control algorithms. The control framework is based on "Hierarchical controller for highly dynamic locomotion utilizing pattern modulation and impedance control : implementation on the MIT Cheetah robot".
Core Features:
- Fully Autonomous (using ROS navigation Stack).
- Setup-assistant to configure newly built robots.
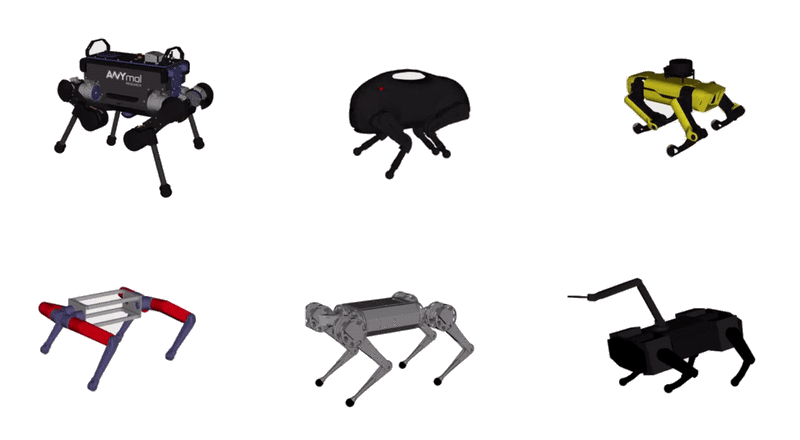
- Collection of pre-configured URDFs like Anymal, MIT Mini Cheetah, Boston Dynamic's Spot and LittleDog.
- Gazebo simulation environment.
- Compatible with DIY quadruped projects like SpotMicroAI and OpenQuadruped.
- Demo Applications like TOWR and chicken head stabilization.
- Lightweight C++ header-only library that can run on both SBC and micro-controllers.
Tested on:
- Ubuntu 16.04 (ROS Kinetic)
- Ubuntu 18.04 (ROS Melodic)
sudo apt install -y python-rosdep
cd <your_ws>/src
git clone --recursive https://github.com/chvmp/champ
git clone https://github.com/chvmp/champ_teleop
cd ..
rosdep install --from-paths src --ignore-src -r -y
If you want to use any of the pre-configured robots like Anymal, Mini Cheetah, or Spot, follow the instructions here.
cd <your_ws>
catkin_make
source <your_ws>/devel/setup.bash
You don't need a physical robot to run the following demos. If you're building a physical robot, you can find out more how to configure and run a new robot in step 3.
roslaunch champ_config bringup.launch rviz:=true
roslaunch champ_teleop teleop.launch
If you want to use a joystick add joy:=true as an argument.
roslaunch champ_config gazebo.launch
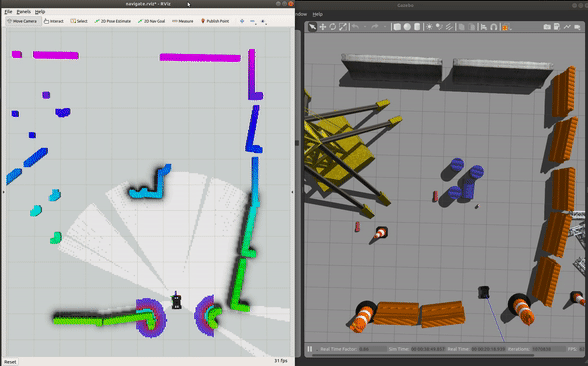
roslaunch champ_config slam.launch rviz:=true
To start mapping:
-
Click '2D Nav Goal'.
-
Click and drag at the position you want the robot to go.
-
Save the map by running:
roscd champ_config/maps
rosrun map_server map_saver
roslaunch champ_config gazebo.launch
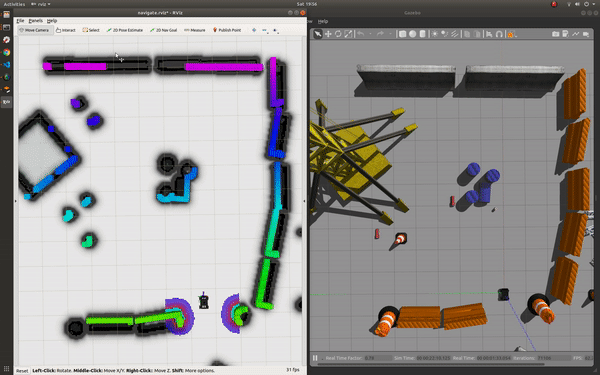
roslaunch champ_config navigate.launch rviz:=true
To navigate:
-
Click '2D Nav Goal'.
-
Click and drag at the position you want the robot to go.
There are two ways to run CHAMP on a real robot:
Linux Machine
- Use this ROS package to calculate the joint angles and send it to a hardware interface to control your actuators. You can follow these guidelines to create your actuators' interface.
Lightweight Version
- Run CHAMP's lightweight version on Teensy series microcontrollers and use it to directly control your actuators.
-
First generate a configuration package using champ_setup_assistant. Follow the instructions in the README to configure your own robot. The generated package contains:
- URDF path to your robot.
- Joints and Links map to help the controller know the semantics of the robot.
- Gait parameters.
- Hardware Drivers.
- Navigation parameters (move_base, amcl and gmapping).
- Microcontroller header files for gait and lightweight robot description. This only applies to robot builds that use microcontroller to run the quadruped controller.
As a reference, you can check out the collection of robots that have been pre-configured here. In the list are some of the popular quadruped robots like Anymal, MIT Mini Cheetah, Boston Dynamic's LittleDog, and SpotMicroAI. Feel free to download the configuration packages in your catkin workspaces 'src' directory to try.
-
Next, build your workspace so your newly generated package can be found:
cd <your_ws>
catkin_make
This will run the quadruped controller and all sensor/hardware drivers:
roslaunch <myrobot_config> bringup.launch
Available Parameters:
-
rviz - Launch together with RVIZ. Default: false
-
lite - Always set this to true if you're using a microcontroller to run the algorithms. Default false.
Example Usage:
View your newly configured robot:
roslaunch <myrobot_config> bringup.launch rviz:true
Run real robot with a microcontroller:
roslaunch <myrobot_config> bringup.launch lite:=true
The base driver described in 3.2 must be running to run gmapping and move_base.
Run gmapping package and move_base:
roslaunch <myrobot_config> slam.launch
To open RVIZ and view the map:
roscd champ_navigation/rviz
rviz -d navigate.rviz
To start mapping:
-
Click '2D Nav Goal'.
-
Click and drag at the position you want the robot to go.
-
Save the map by running:
roscd <myrobot_config>/maps
rosrun map_server map_saver
The base driver described in 3.2 must be running to run amcl and move_base.
Run amcl and move_base:
roslaunch <myrobot_config> navigate.launch
To open RVIZ and view the map:
roscd champ_navigation/rviz
rviz -d navigate.rviz
To navigate:
-
Click '2D Nav Goal'.
-
Click and drag at the position you want the robot to go.
Run Gazebo and the base driver in simulation mode:
roslaunch <myrobot_config> gazebo.launch
-
Take note that in order for this to work, the URDF has to be Gazebo compatible and has ros_control capability. The controllers have been set-up so all you need is to add the transmission of the actuators. You also need to get the physics parameters right like your mass, inertia, and foot friction.
Some useful resources on getting these parameters right:
-
Inertial Calculation - https://github.com/tu-darmstadt-ros-pkg/hector_models/blob/indigo-devel/hector_xacro_tools/urdf/inertia_tensors.urdf.xacro
-
List of Moment of Inertia - https://en.wikipedia.org/wiki/List_of_moments_of_inertia
-
Gazebo inertial parameters - http://gazebosim.org/tutorials?tut=inertia&cat=build_robot#Overview
-
You can also check out this pull request as an example.
Run Gazebo and default simulation world:
roslaunch champ_gazebo spawn_world.launch
You can also load your own world file by passing your world's path to 'gazebo_world' argument:
roslaunch champ_gazebo spawn_world.launch gazebo_world:=<path_to_world_file>
Spawning a robot:
roslaunch champ_config spawn_robot.launch robot_name:=<unique_robot_name> world_init_x:=<x_position> world_init_y:=<y_position>
- Every instance of the spawned robot must have a unique robot name to prevent the topics and transforms from clashing.
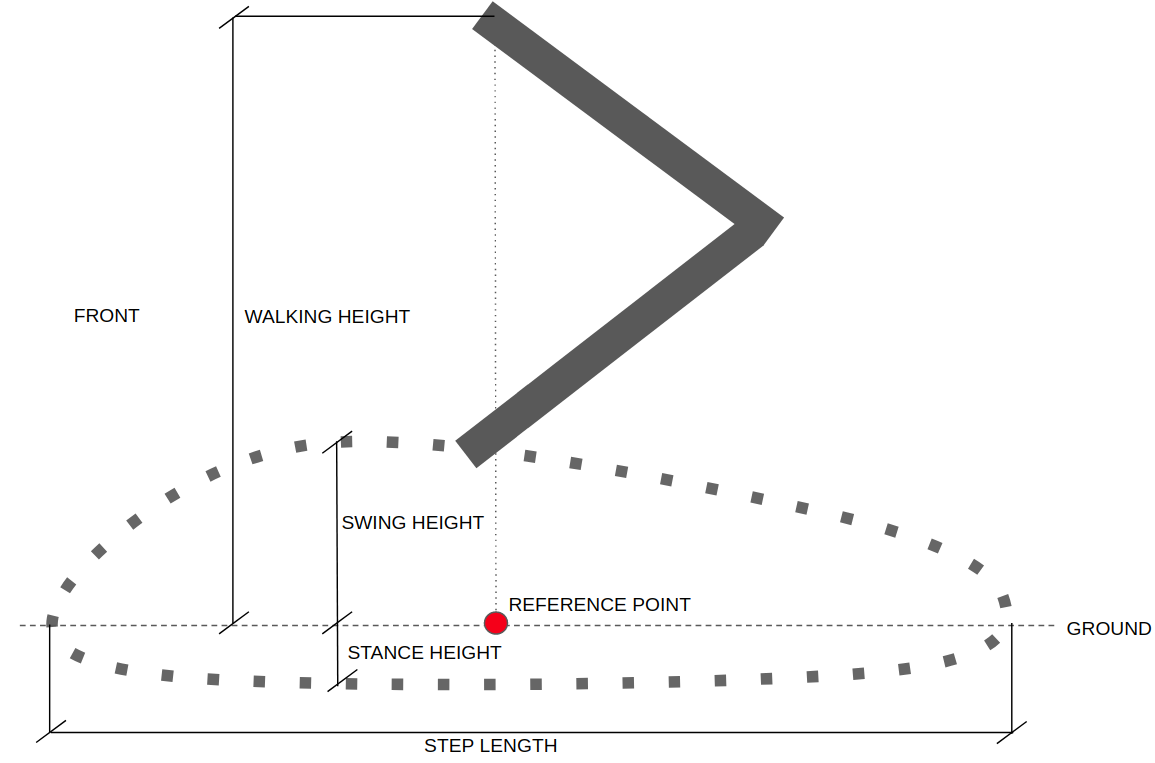
The gait configuration for your robot can be found in <my_robot_config>/gait/gait.yaml.
-
Knee Orientation - How the knees should be bent. You can can configure the robot to follow the following orientation .>> .>< .<< .<> where dot is the front side of the robot.
-
Max Linear Velocity X (meters/second) - Robot's maximum forward/reverse speed.
-
Max Linear Velocity Y (meteres/second) - Robot's maximum speed when moving sideways.
-
Max Angular Velocity Z (radians/second)- Robot's maximum rotational speed.
-
Stance Duration (seconds)- How long should each leg spend on the ground while walking. You can set this to default(0.25) if you're not sure. The higher the stance duration the further the displacement is from the reference point.
-
Leg Swing Height (meters)- Trajectory height during swing phase.
-
Leg Stance Height (meters)- Trajectory depth during stance phase.
-
Robot Walking Height (meters) - Distance from hip to the ground while walking. Take note that setting this parameter too high can get your robot unstable.
-
CoM X Translation (meters) - You can use this parameter to move the reference point in the X axis. This is useful when you want to compensate for the weight if the center of mass is not in the middle of the robot (from front hip to rear hip). For instance, if you find that the robot is heavier at the back, you'll set a negative value to shift the reference point to the back.
-
Odometry Scaler - You can use this parameter as a multiplier to the calculated velocities for dead reckoning. This can be useful to compensate odometry errors on open-loop systems. Normally this value ranges from 1.0 to 1.20.