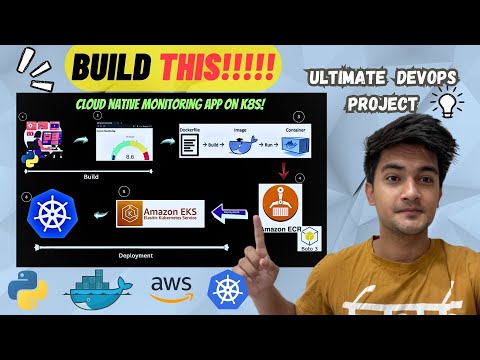
- Python and How to create Monitoring Application in Python using Flask and psutil
- How to run a Python App locally.
- Learn Docker and How to containerize a Python application
- Creating Dockerfile
- Building DockerImage
- Running Docker Container
- Docker Commands
- Create ECR repository using Python Boto3 and pushing Docker Image to ECR
- Learn Kubernetes and Create EKS cluster and Nodegroups
- Create Kubernetes Deployments and Services using Python!
(Things to have before starting the projects)
- AWS Account.
- Programmatic access and AWS configured with CLI.
- Python3 Installed.
- Docker and Kubectl installed.
- Code editor (Vscode)
Clone the code from the repository:
git clone <repository_url>
The application uses the psutil and Flask, Plotly, boto3 libraries. Install them using pip:
pip3 install -r requirements.txt
To run the application, navigate to the root directory of the project and execute the following command:
python3 app.py
This will start the Flask server on localhost:5000. Navigate to http://localhost:5000/ on your browser to access the application.
Create a Dockerfile in the root directory of the project with the following contents:
# Use the official Python image as the base image
FROM python:3.9-slim-buster

# Set the working directory in the container
WORKDIR /app

# Copy the requirements file to the working directory
COPY requirements.txt .

RUN pip3 install --no-cache-dir -r requirements.txt

# Copy the application code to the working directory
COPY . .

# Set the environment variables for the Flask app
ENV FLASK_RUN_HOST=0.0.0.0

# Expose the port on which the Flask app will run
EXPOSE 5000

# Start the Flask app when the container is run
CMD ["flask", "run"]
To build the Docker image, execute the following command:
docker build -t <image_name> .
To run the Docker container, execute the following command:
docker run -p 5000:5000 <image_name>
This will start the Flask server in a Docker container on localhost:5000. Navigate to http://localhost:5000/ on your browser to access the application.
Create an ECR repository using Python:
import boto3

# Create an ECR client
ecr_client = boto3.client('ecr')

# Create a new ECR repository
repository_name = 'my-ecr-repo'
response = ecr_client.create_repository(repositoryName=repository_name)

# Print the repository URI
repository_uri = response['repository']['repositoryUri']
print(repository_uri)
Push the Docker image to ECR using the push commands on the console:
docker push <ecr_repo_uri>:<tag>
Create an EKS cluster and add node group
Create a node group in the EKS cluster.
from kubernetes import client, config

# Load Kubernetes configuration
config.load_kube_config()

# Create a Kubernetes API client
api_client = client.ApiClient()

# Define the deployment
deployment = client.V1Deployment(
    metadata=client.V1ObjectMeta(name="my-flask-app"),
    spec=client.V1DeploymentSpec(
        replicas=1,
        selector=client.V1LabelSelector(
            match_labels={"app": "my-flask-app"}
        ),
        template=client.V1PodTemplateSpec(
            metadata=client.V1ObjectMeta(
                labels={"app": "my-flask-app"}
            ),
            spec=client.V1PodSpec(
                containers=[
                    client.V1Container(
                        name="my-flask-container",
                        image="568373317874.dkr.ecr.us-east-1.amazonaws.com/my-cloud-native-repo:latest",
                        ports=[client.V1ContainerPort(container_port=5000)]
                    )
                ]
            )
        )
    )
)

# Create the deployment
api_instance = client.AppsV1Api(api_client)
api_instance.create_namespaced_deployment(
    namespace="default",
    body=deployment
)

# Define the service
service = client.V1Service(
    metadata=client.V1ObjectMeta(name="my-flask-service"),
    spec=client.V1ServiceSpec(
        selector={"app": "my-flask-app"},
        ports=[client.V1ServicePort(port=5000)]
    )
)

# Create the service
api_instance = client.CoreV1Api(api_client)
api_instance.create_namespaced_service(
    namespace="default",
    body=service
)
make sure to edit the name of the image on line 25 with your image Uri.
- Once you run this file by running “python3 eks.py” deployment and service will be created.
- Check by running following commands:
kubectl get deployment -n default (check deployments)
kubectl get service -n default (check service)
kubectl get pods -n default (to check the pods)
Once your pod is up and running, run the port-forward to expose the service
kubectl port-forward service/<service_name> 5000:5000