This is a project demonstrating how to use a laser pointer to control the cursor on the projection screen.
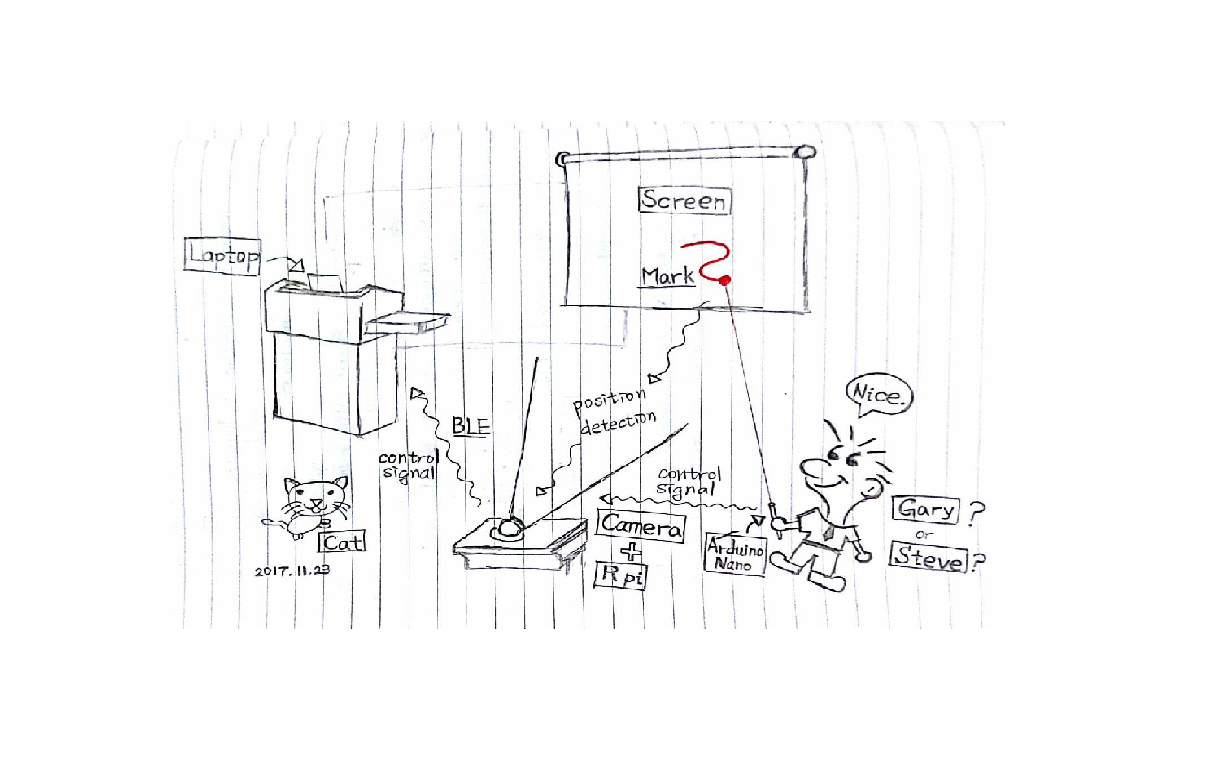
Most of the time, like in a class or meeting, the most comment and convenient way to present is to project the screen of the speecher's computer(or some other devices like iPad) to a projection screen and using a mouse or touching on the host computer(or a pad) to control the cursor. Often, there's a need for writing on the screen. An obvious limitation for presenting while writing on the screen is that you need to stay in front of the computer's screen. Now, imagine that you can just use a laser pointer, walk around the stage, present with gestures, and control the cursor with the pointer right in your hand! And that what NoPenNoGain want to do for you.
- A Windows device.
- Two Raspberry Pi computer :
- one with RPI camera module installed,
- the other with a two switches connecting on pin 11 and 13.
- A compiled OpenCV module on the Pi with camera.
- Both Pis need to install nodejs.
- The Windows device need to be able to run nodejs files.
The main part of this project is an Raspberry Pi with a camera, detecting the light point in the screen, and returning the position to the host computer. There's another Raspberry Pi with two button binded with the laser pointer. The second Raspberry Pi return the right or left click of a mouse to the fisrt Pi for it to pack the position and click information into a package to transfer to the host computer. All the communications mentioned aboved are Bluetooth Low Energy(ble).
There are three seperated parts in the whole project. One in /camera, another in /pen, the other in /toolbar.
This part is where the image detection taking place. Once executed, the Pi will first connect to the host computer and the pen(the second Pi), and request the user to manually configure the four vertexes of the screen starting from up-left side counter-clockwisely. After configuration, the cursor controll starts.
The /camera/main.py has three threads: one is the main thread, which handles the establishment of the ble connection, initialization of the image processor, and an infinite while loop for detecting and computing the right position of the light point; the other two threads deal with the read/write operations to pen/computer respectively.
The part use nodejs for higher speed, using rpi-gpio-buttons to detect button switch and bleno to implement ble.
This part use QT creator to compile the code. There are some functions in the toolbar, such as red/black/blue pen, eraser, choosing size of brush, page up/down, minimizing/closing the window. You can use the toolbar to paint on your screen. The file /toolbar/toolbar.pro is a project file for QT creator. In /toolbar/ui, there are two ui file for QT creator. In /toolbar/sourcecode, toolbar.cpp controls the main window, and paint.cpp controls the window for painting, the paintscene.cpp controls a scene on paint window. In /toolbar/image_qrc, there are some pictures we used and a qrc file for QT creator.
The way we receive the ble and control the curser is by a nodejs file, which will be mentioned in the installation part.
On the Pi with camera,
-
Compile and install OpenCV on your Pi.(https://www.pyimagesearch.com/2016/04/18/install-guide-raspberry-pi-3-raspbian-jessie-opencv-3/)
-
Check your camera on Pi is in operation.(https://www.raspberrypi.org/documentation/usage/camera/)
-
Place this folder in the working space of your Pi with camera, and execute
python3 main.py
On the second Pi,
-
Set up the two switches.(link: https://www.cl.cam.ac.uk/projects/raspberrypi/tutorials/robot/buttons_and_switches/)
-
Install nodejs in your second Pi.(link: https://nodejs.org/en/download/package-manager/)
-
git clone bleno and replace all the files in
bleno/examples/echo/withNoPenNoGain/pen/main.js. -
Implement
sudo node main
- Compile and install QT creator on your PC. (link: https://www.qt.io/)
- When you compile it, you should put the all .cpp/.h/.qrc/.ui/.pro file in the same folder and remake the qrc file again.
- Download the ble_mouse and place it into your Visual Studio(2017 recommended).