Upgrading bladeRF firmware
This page describes how to update the firmware on the bladeRF.
Upgrading from v1.0 is a little trickier than upgrading from more recent firmware images. If you received your unit before September 10th, you might encounter some issues on Windows; the troubleshooting ideas below should provide enough methods to flash any v1.0 bladeRF.
- Ensure you've installed all libraries and utilities, per the ''Getting Started'' guides
- Download the latest FX3 image and flash it:
wget http://nuand.com/fx3/latest.img && bladeRF -f latest.img
- Some xHCIs have problems identifying bladeRFs running older firmware versions. Repeating the upgrade instructions with the bladeRF plugged into a USB2.0 port should make it visible to the OS.
- Try forcing into Cypress Bootloader (see below for instructions) and use bladeRF-flash to upgrade the device.
YouTube video HOWTO explaining how to force bladeRF into the Cypress FX3 bootloader
Pre-compiled bladeRF utilities can be installed from http://nuand.com/downloads/bladerf_win_installer.exe or they can built from source following the instructions at https://github.com/Nuand/bladeRF/wiki/Getting-Started%3A-Windows .
- Acquire bladeRF-cli and bladeRF libraries either from the installer or source code (see previous paragraph)
- Download the latest FX3 image and flash it:
wget http://nuand.com/fx3/latest.img ; bladeRF -f latest.img
- Unplug and plug the bladeRF
bladerf_winflasher uses CyUSB so the unsigned driver is required for it to work. The flasher can run during the installer, but it can be run directly from
C:\Program Files (x86)\bladeRF\bladerf_winflasher.exe.
- Optionally plug the bladeRF into a USB2.0 port. In case only USB3.0 ports exist, use a USB2.0 micro cable.
- Download and run http://nuand.com/downloads/bladerf_win_installer.exe
- Check the "Yes, upgrade bladeRF firmware" checkbox
- Finish running the installer
- Unplug and plug the bladeRF

-
Some xHCIs have problems identifying bladeRFs running older firmware versions. Repeating the upgrade instructions with the bladeRF plugged into a USB2.0 port should make it visible to the OS.
-
Follow the "Force Cypress Bootloader" instruction below. Once the jumper is removed you can use the Cypress USB control center utility from the SDK to SPI flash the device. The FX3 SDK that installs with the Cypress USB control center can be downloaded from http://www.cypress.com/?rID=57990 .
This is the foolproof way of flashing your bladeRF by forcing the unit to boot to the Cypress bootloader.
-
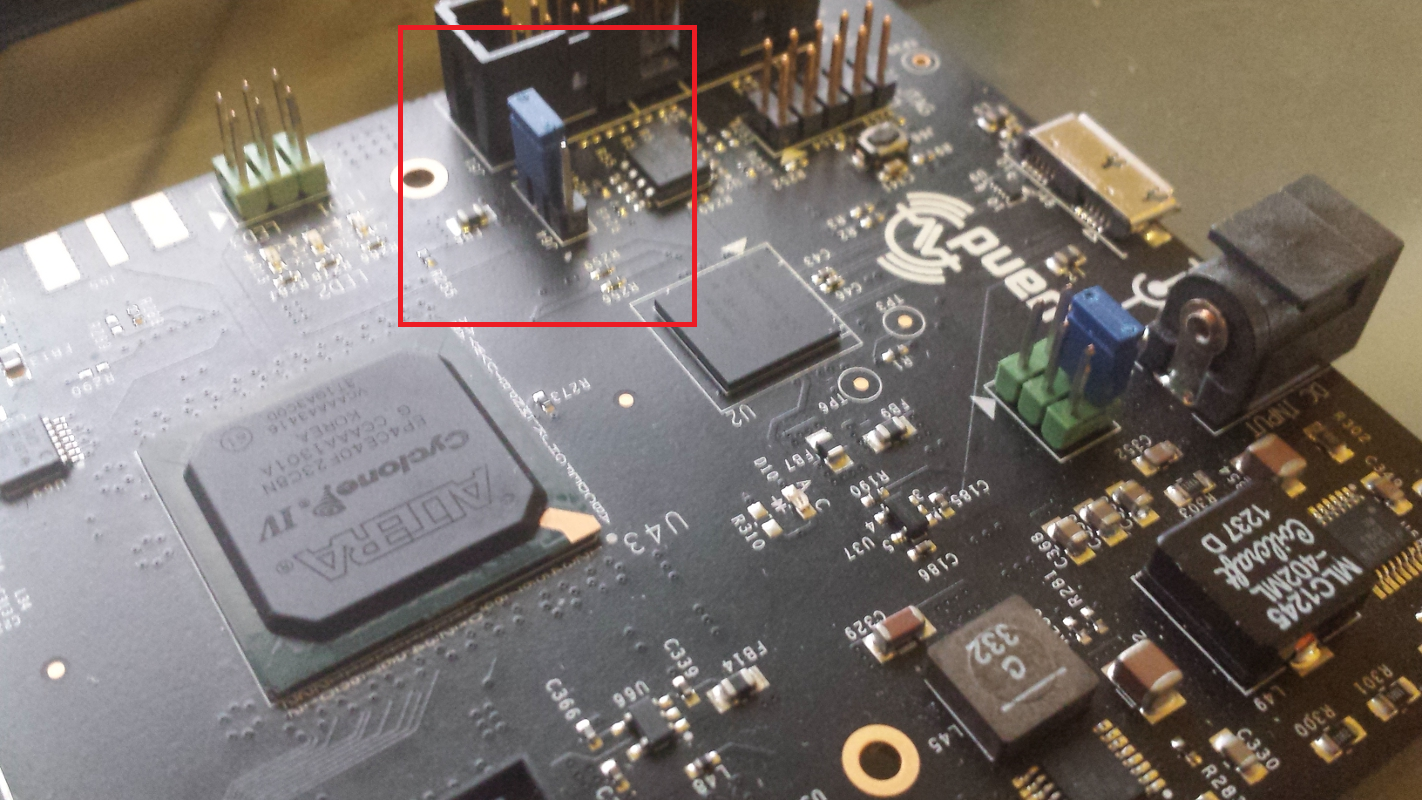
First you have to take one of the power jumpers, it doesn't matter which, and short the two outer pins on J64 (shown below). This causes the FX3 to not see the SPI flash and boot into the cypress bootloader.
-
Plug the device in at this point.
-
IMPORTANT: Once the device is plugged in, and recognized as a Cypress bootloader remove the jumper from J64. If you forget to remove the jumper, the device will not be able to write to the SPI flash.
If you're stuck in the bootloader or having trouble flashing the image, don't fret! Join the #bladerf channel on Freenode or visit the Nuand troubleshooting forum. There's generally a number of folks around who have experience with flashing the device.