
Small and compact led cube powered by usb that is (kinda) easy to build.I decided to make this project for my own amusement and to train smd soldering and pcb design. Code and program are not made by me all credit goes to: http://www.instructables.com/id/LED-CUBE-CODE-4x4x4-Arduino/ .
- Intro
- Table of contents
- Bill of materials
- Making boards
- Soldering components
- Burning Arduino bootloader
- Code
- Case
in GBRLS folder there are all grbl files needed to make boards for led cube.
you will need to make 2 boards ,one top one on wich you will place your led cube and one bottom one that has all electronics.
There are also Eagle schematic and board files for both pcbs . I ordered them JLC pcb and they came fine.

Well you will need to have some skills with soldering iron and solder all those smd components. Hardest part is soldering leds .You will need to cut 16 3mm holes that are 1.5 mm one from another on peace of cardboard. This will keep all leds at exact distance and make soldering easier.you will need to solder all 4 led planes with magnet wire to pcb board.
Maybe you can find those smd atmega 328 with already burnt bootloader or you can burn it yourself. I made a mistake on board and didnt want to redo it so to burn bootloader follow these instructions.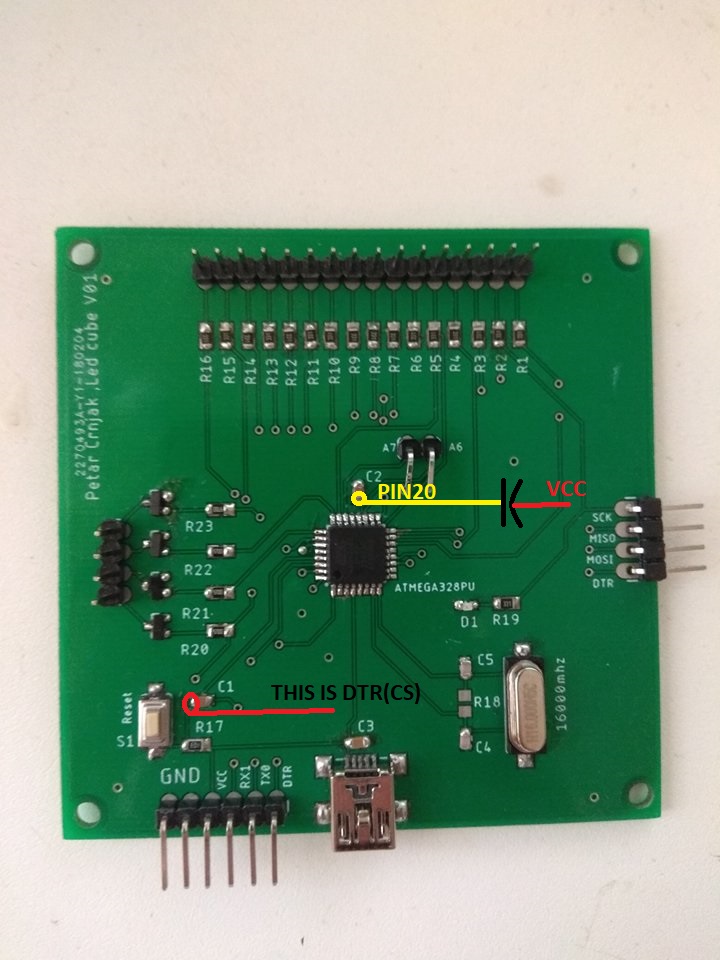 solder wires like shown in picture , and connect them to ftdi programmer .
Miso to miso , mosi to mosi , sck to sck , gnd to gnd ,vcc to vcc,DTR ON LED BOARD is not dtr .
Connect dtr from ftdi programmer to wire that is shown on picture.Cap on picture is 47 uF.
solder wires like shown in picture , and connect them to ftdi programmer .
Miso to miso , mosi to mosi , sck to sck , gnd to gnd ,vcc to vcc,DTR ON LED BOARD is not dtr .
Connect dtr from ftdi programmer to wire that is shown on picture.Cap on picture is 47 uF.
Once again code is not written by me. There are 2 example programs LEDFADE and shooting star.LCCG.exe is program used to generate patterns in wich cube will light up. To upload code you will need FTDI usb to TTL serial converter that connects to corresponding pins on board.
STL file. Printed on cheap chinese prusa clone with 0.2 mm layer height.