Windows Installation Guide
Only the host must install the Portal 2: Multiplayer Mod. The Portal 2: Multiplayer Mod for Windows is only supported on 64-bit versions of Windows 10 and Windows 11.

Installing for Windows is as follows:
- Download The Launcher Executable
- Setup Network Or Software to Allow Clients To Connect
- Running the Launcher and Configuring The Portal 2: Multiplayer Mod
- Starting The Portal 2: Multiplayer Mod and Inviting Players
After Installation Information:
This guide will break down each step into more detail for you to understand how to set up and use the mod. You need to get the latest version of Portal 2: Multiplayer Mod, as it is the most optimized version, and currently the only one thats working. The Portal 2: Multiplayer Mod will be referred to as P2:MM in this guide.
Download the launcher here for your Windows system. P2:MM for Windows works only on 64-bit versions of Windows 10 and 11.
If you want to compile or run directly from the source code instead, please follow the start of our Contributions wiki guide.

Before starting the launcher, you should set up your network to allow clients to access your P2:MM play session. Setting up your network can be done in two ways: port forwarding through your router’s configuration interface or using a networking tool like Hamachi or something similar. You do not need to do both.
Port forwarding is the easiest method but challenging for those who are not experienced with network configuration. Every router has a different GUI and configuration menu, so we do not have an exact guide on how to port forward. Looking up your router’s model with "port forwarding" should help you figure out what to do with your router. Typically, the port forwarding menu is in the advanced setting sections of the router’s configuration menu.
Once you’ve found the menu, you must get your local IPv4 address. Open Command Prompt by pressing Win + X then clicking on "Command Prompt". A Command Prompt window should now be open. Next, type in ipconfig and press enter. Find the network adapter you’re using for your internet connection and get your IPv4 Address from that device. An example of this is in the image below.

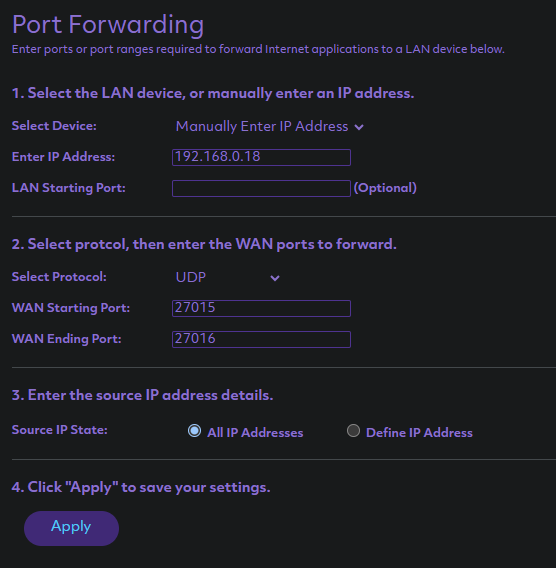
Take your local IP address and stick it to where you give your local IP address that needs to be port forwarded. The ports Portal 2 uses are 27015 and 27016, and the protocol used is UDP. Below is an example of a port forwarding configuration for P2:MM.
playit.gg, Radmin VPN, and Hamachi are some networking tools for Windows we recommend that can help simplify this process if you do not know how, don’t have the will, or are uncomfortable opening your router port for people to connect. We won’t involve instructions on how to each set these up as those programs are either straightforward or have their own guides on how to set them up. All you need to know is that the ports Portal 2 uses are 27015 and 27016, and the protocol used is UDP.
Pros and Cons With Each Recommended Networking Tool:
-
playit.gg: We recommend this networking tool for P2MM for easy setup and its in-general reliability.
- Pros: Easy setup and has connections go through their secure servers before connecting to you.
- Cons: You must download a separate application and can only configure settings on their website. Because a connection goes through their servers before getting to you, there might be lag or more latency than a more direct connection.
-
Radmin VPN: We recommend this networking tool with P2MM if you want a secure P2MM server.
- Pros: Works seamlessly with P2:MM and lets you create private network lobbies connected through a password.
- Cons: Unfortunately, it's only for Windows, and everyone needs it installed to join your private network.
-
Hamachi:
- Pros: Been around for a while, well known, and works when set up correctly.
- Cons: Not updated too often, can be complicated to set up if you're not too experienced with setting these things up.
Once you’ve set up your networking, it’s finally time to start the P2:MM launcher. Double-click the .exe file, and it should launch. You may receive a warning from Windows Defender or SmartScreen that this file might be malicious. This warning happens because we don’t have the funding to pay for a certificate to verify our executable. You will need to add an exception to the executable to run it if your system still doesn’t allow you to execute it. If you’re skeptical of the warnings your Windows system may give you, all our code is open-source for you to view in our repository.
If the executable runs, you will be presented with an update dialogue if you’ve never run the mod. Click yes, and the launcher will download the latest ModFiles from the main branch of the P2:MM repository. If this ever fails, please refer to this question in our FAQ. After it has finished you should now be presented with the Portal 2: Multiplayer Mod launcher main menu.

Here is a breakdown of the P2:MM launcher main menu and a more in-depth explanation of some settings.
-
Start Game: This button starts up P2:MM; it proceeds to mount the mod onto your Portal 2 installation and then automatically launches Portal 2. We recommend checking out the other options before starting the mod, though.
-
Settings: Where the settings for both the launcher and the mod itself are. Here are some of the settings in more detail. These aren’t all the settings you can customize. More on that in Deeper Configuration of Portal 2: Multiplayer Mod.
- Custom Launch Options: Used to customize the launch options ran with Portal 2. This option can change the initial starting map and add other launch options. Currently, the Source launch options programmed to run with Portal 2 are
-novid -allowspectators -nosixense +clear -conclearlog -usercon (Custom-Launch-Options). Not all Source launch options work for Portal 2, so use the VDC’s Command line options page for reference. - Portal 2 Path: Where your path to Portal 2 is defined for the launcher to use. The launcher should be able to automatically grab the path of your Portal 2 installation (check this info if not). You can alter this if needed, but if it fails to find your manually set path, it will automatically try to locate the right path again.
- The Admins Menu: This menu allows you to add yourself and other players as admins in your P2:MM play session. As the host, you will be given the highest permission level by default, but a prompt saying this will occur on every map load. You can add yourself if you want to turn off that message. You must input your username and Steam account Steam3 ID, only the last number part. You can get your ID using SteamDB’s Account Calculator.
- Custom Launch Options: Used to customize the launch options ran with Portal 2. This option can change the initial starting map and add other launch options. Currently, the Source launch options programmed to run with Portal 2 are
-
Update: Use this to check for any ModFiles or launcher client updates.
-
Manual Mounting: This is your go-to if you need to test mounting the mod but not running it.
-
Workshop: Here, you can get the
changelevelconsole command for a workshop map. That way, you don’t need to find the workshop map that is locally downloaded on your system. You are required to have the workshop map downloaded for this to work. -
Resources: Menu to access links for our GitHub repository, Discord server, and wiki home page.
-
Exit: No clue what this button does. Why don’t you try it out? :)
As the Settings menu breakdown mentions, those aren’t the only options you can customize. One additional file in the ModFiles directory, located in C:\Users\(current user)\Documents\p2mm. The ModFiles folder will only be there if you said "Yes" to the update prompt when starting the launcher to download the ModFiles. If not, press the "Update" main menu button to download the ModFiles.
If you go deeper into the ModFiles directory, you can find all the files which the launcher mounts onto Portal 2. The additional file you can customize is ModFiles\Portal 2\install_dlc\scripts\vscripts\multiplayermod\config.nut.

The config file contains many options that allow you to turn many mod features on or off, enable debugging options, and customize the music that plays in the cooperative lobby (mp_coop_lobby_3 only). You can also manually set the Admins if you don’t do it in the launcher. Each config option has comments that go into detail about what it does.
Congrats if you made it this far! Now it’s time for the moment you’ve been waiting for! It’s time to start the Portal 2: Multiplayer Mod! Go ahead and click the "Start Game" button on the main menu, and the mod will automatically mount its files onto Portal 2 and start up the game. You should soon see our custom loading screen as you load into the main coop lobby unless you have changed which map it starts on in the "Custom Launch Options" setting.
Once you’re in the hub, you can now invite your clients. If you followed the Port Forwarding section, you only need to give your public IP to your clients. You can get your public IP from your router’s configuration menu or go to What Is My IP to see your public IP. The clients must connect to your server through the Portal 2 console with connect (your public IP). If you followed the Networking Tool section instead, give your clients the IP assigned to you with the networking tool you are using. The clients must connect to your server through the Portal 2 console with connect (your assigned IP). If everything goes correctly, you should see players joining your P2:MM server!

Now that you’re in with your clients, what’s there to do in the Portal 2: Multiplayer Mod?
Chat Commands:
P2:MM gives the host and clients access to a range of chat commands that can be executed by typing into chat starting with !. To see what commands you can access, type !help into the chat (press "T" to access it) and press enter. There will be a list of commands as well as what they do. Type !help (command name) if you want info on a specific command. These commands give you control over certain things, from changing your player model color to slapping players across the map to kicking any pesky players giving you trouble. Some of these commands also use targeting parameters, just like Minecraft. "@a" targets all players, "@b" targets all Atlas/Blue team players, "@o" targets all P-Body/Orange/Red team players, and "@s" targets all single-player team players.

Starting The Multiplayer Gameplay:
Assuming you started in the main lobby (mp_coop_lobby_3), you can do the regular cooperative campaign courses from there. But if you want to do the single-player campaign, you can use the chat command !spchapter to select a chapter in the single-player campaign to begin in. You can also use changelevel in the Portal 2 console instead to change to a specific map in the single-player campaign or any map in general. Using changelevel is also how you play workshop maps and that obscure extra map Valve made as a teaser for the movie Super 8 (e1912). Please look at these FAQ questions for single-player and workshop content for more information.

If you ever decide to add the launcher as a Non-Steam game on Steam in order to execute it from there, you'll most likely notice the blandness of it without any Steam art. Don't worry though we got you covered with our own Steam artwork which you can download and set in Steam. Below are links and previews of each piece of Steam artwork, there are six backgrounds but only one is shown. You can view all our artwork assets in our P2:MM Art repository on GitHub.
Grid Vertical Thank you Simmyono on Discord for this!


Background 1 More backgrounds in the P2:MM art repository.

Logo/Icon Logo located at bottom left of the background and icon shown in game list. Changing the icon in Steam doesn't effect the icon of the launcher.
Please go check out the FAQ if you are having trouble before heading over to the #mod-help forum channel of our Discord server. You can also hang out to talk and see what other stuff we have cooking up. If you find any bugs or issues with the mod, please post an issue post in this GitHub Repository’s Issue section.
We also plan to have a new instructional setup video for the Portal 2: Multiplayer mod, which will primarily focus on only the latest version of P2:MM and also go over the specific Steam Deck setup steps.
Wish to contribute to the Portal 2: Multiplayer Mod? Please go check out our Contributions wiki page!
