
The 'old' Buster OS is still available.
Regularly, we get the question if we have an image of our Raspberry Pi with some frameworks and our deep-learning examples. We are happy to comply with this request.
- Get a 32 GB SD-card which will hold the image.
- Download the image Rpi_Bullseye_64_DNN.xz (4 GByte !) from Sync.
- Flash the image on the SD-card with the Imager or balenaEtcher.
- Insert the SD-card in your Raspberry Pi 4.
- Wait a few minutes, while the image will expand to the full size of your SD card.
- No WiFi installed. Password: 3.14
- Default, the Raspberry Pi is been overclocked to 1850 MHz. See overclock the Raspberry Pi for more information.
- If you are in need of extra space, you can delete the opencv and the opencv_contrib folder from the SD-card. There are no longer needed since all libraries are placed in the /usr/local directory.
Clicking on the links below will direct you to our GitHub repo.
- OpenCV
- Classification
- SSD
- Segmentation
- Segmentation YoloV5
- Pose
- Face detection
- Face recognition
- YoloV5
- YoloX
- PaddleOCR
- Background substraction
- Libcamera
- LVVC

Clicking on the links below will direct you to our installation guide.
- OpenCV 4.7.0
- TensorFLow 2.10.0
- TensorFlow-Lite 2.10.0
- TensorFlow-Lite-Python 2.10.0
- Pytorch 1.13.0
- TorchVision 0.14.0
- ncnn 20230517
- MNN 2.5.0
- Paddle 2.4.2
- Paddle-Lite 2.12

You can connect a camera to the given C++ examples. With Buster, it was simple. You replaced the filename with a zero (0) and got the images from the RaspiCam instead of a file. Those days are gone with the introduction of Bullseye.
Nowadays you have two options. You can either use Gstreamer or LVVC. An example of both can be found in this SD image.
You can also find both methods implemented in the YoloX example.

Since everyone has a unique password on their WiFi connection, we have not activated the WiFi.
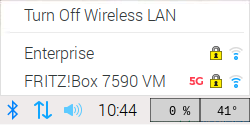
To enable the wireless LAN follow the next steps:
- Left click on the Ethernet symbol.
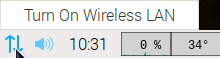
- Click "Turn on wireless LAN", and wait a few seconds. Your RPi will scan for available networks.
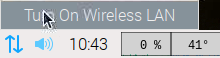
- Left click again on the Ethernet symbol and choose your network.
- Give your key, and wait a couple of seconds to let the RPi establish the connection.
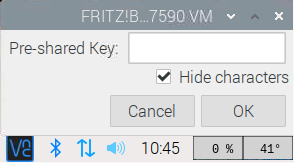
- Success!

Tensorflow-Lite is aimed at small, lightweight devices, such as the Raspberry Pi. Hence the use of a single C++ library.
Since version 2.7, the Tensorflow team has decided to focus on Python for its Lite version. The single large C++ library has since expired.
Now you only have small separate libraries. When programming you will have to specify all the necessary files separately. And these are quite a few.
To make working with Tensorflow-Lite easier, we have packed everything in one package.

In addition, it is now also possible to use Tensorflow-Lite in Python.

from tflite_runtime.interpreter import Interpreter
from PIL import Image
import numpy as np
import time

def load_labels(path): # Read the labels from the text file as a Python list.
  with open(path, 'r') as f:
    return [line.strip() for i, line in enumerate(f.readlines())]

def set_input_tensor(interpreter, image):
  tensor_index = interpreter.get_input_details()[0]['index']
  input_tensor = interpreter.tensor(tensor_index)()[0]
  input_tensor[:, :] = image

def classify_image(interpreter, image, top_k=1):
  set_input_tensor(interpreter, image)

  interpreter.invoke()
  output_details = interpreter.get_output_details()[0]
  output = np.squeeze(interpreter.get_tensor(output_details['index']))

  scale, zero_point = output_details['quantization']
  output = scale * (output - zero_point)

  ordered = np.argpartition(-output, 1)
  return [(i, output[i]) for i in ordered[:top_k]][0]

data_folder = "/home/pi/software/TensorFlow_Lite_Classification_RPi_64-bits/"

model_path = data_folder + "mobilenet_v1_1.0_224_quant.tflite"
label_path = data_folder + "labels.txt"

interpreter = Interpreter(model_path)
print("Model Loaded Successfully.")

interpreter.allocate_tensors()
_, height, width, _ = interpreter.get_input_details()[0]['shape']
print("Image Shape (", width, ",", height, ")")

# Load an image to be classified.
image = Image.open(data_folder + "tabby.jpeg").convert('RGB').resize((width, height))

# Classify the image.
time1 = time.time()
label_id, prob = classify_image(interpreter, image)
time2 = time.time()
classification_time = np.round(time2-time1, 3)
print("Classificaiton Time =", classification_time, "seconds.")

# Read class labels.
labels = load_labels(label_path)

# Return the classification label of the image.
classification_label = labels[label_id]
print("Image Label is :", classification_label, ", with Accuracy :", np.round(prob*100, 2), "%.")Importing both TensorFlow and OpenCV in Python can throw the error: cannot allocate memory in static TLS block.
This behaviour only occurs on an aarch64 system and is caused by the OpenMP memory requirements not being met.
For more information, see GitHub ticket #14884.

There are a few solutions. The easiest is to import OpenCV at the beginning, as shown above.
The other is disabling OpenMP by setting the -DBUILD_OPENMP and -DWITH_OPENMP flags OFF.
Where possible, OpenCV will now use the default pthread or the TBB engine for parallelization.
We don't recommend it. Not all OpenCV algorithms automatically switch to pthread.
Our advice is to import OpenCV into Python first before anything else.
