Skip to content
New issue

Have a question about this project? Sign up for a free GitHub account to open an issue and contact its maintainers and the community.

By clicking “Sign up for GitHub”, you agree to our terms of service and privacy statement. We’ll occasionally send you account related emails.

Already on GitHub? Sign in to your account

Add refactored support for Sparkfun Pro Micro #178

Merged
merged 8 commits into from
May 1, 2021

Conversation

explicite
Copy link
Contributor

@explicite explicite commented Apr 25, 2021

Support for Diecimila

  • arduino-hal
  • examples
    • blink
    • adc
    • usart
    • i2c
    • spi
  • ravedude

@explicite
Copy link
Contributor Author

@Rahix can you please review if new module is ok?

@Rahix
Copy link
Owner

Rahix commented Apr 25, 2021

Hm, I'm not a fan of having a separate crate from arduino-hal for this, when the boards are so similar... This will just lead to fragmentation again and more maintainer effort in the end to keep all the different crates in sync. I would prefer adding this board to arduino-hal as well, even if it isn't strictly an Arduino...

@Rahix
Copy link
Owner

Rahix commented Apr 26, 2021

Looking good so far! Don't forget to add the board to CI as well :)

@explicite
Copy link
Contributor Author

Leaving in draft until end of the week. I do not have to much time for testing examples. Tomorrow I will raise draft PR for Trinket.

@Rahix Rahix added the mcu-support Support for a new Microcontroller label Apr 26, 2021
@Rahix Rahix self-requested a review April 27, 2021 15:16
Copy link
Owner

@Rahix Rahix left a comment

Choose a reason for hiding this comment

The reason will be displayed to describe this comment to others. Learn more.

LGTM, though of course I also cannot run tests. @cecton added this board originally, maybe they can give this a spin?

@cecton
Copy link
Contributor

cecton commented Apr 27, 2021

I'll give it a try this weekend 👍

@Rahix
Copy link
Owner

Rahix commented Apr 28, 2021

@cecton, that would be great! Since there isn't much documentation yet on how to use the new stuff, here's a short version:

  1. Check out this PR (git fetch origin pull/178/head; git switch --detach FETCH_HEAD)
  2. Go to the ravedude/ directory and cargo install --path .
  3. Go to the examples/sparkfun-promicro dir and run the examples using cargo run --bin <example-name>

Note that there is no USB-serial support yet so for any example that outputs something to the serial console you need an external USB-to-Serial converter connected to D0 and D1. If you don't have one, don't worry, I do not think this matters too much - If we know that it is generally working, this is good enough for now. Most of the underlying driver code was already verified against Arduino Leonardo anyway.

@cecton
Copy link
Contributor

cecton commented May 1, 2021

  1. I had to do this. It's probably worth adding it to the README:
[0] [07:54:17] ~/r/a/e/sparkfun-promicro sparkfun-pro-micro > cargo run --bin promicro-blink
error: "/home/cecile/.rustup/toolchains/nightly-2021-01-07-x86_64-unknown-linux-gnu/lib/rustlib/src/rust/Cargo.lock" does not exist, unable to build with the standard library, try:
        rustup component add rust-src
[101] [07:54:34] ~/r/a/e/sparkfun-promicro sparkfun-pro-micro > rustup component add rust-src
info: downloading component 'rust-src'
info: installing component 'rust-src'
info: using up to 500.0 MiB of RAM to unpack components
  1. The message is not accurate:
Press the reset-button and then ENTER here: 

On the Sparkfun Pro Micro you actually need to press twice rapidly. We could write something more generic like "follow the reset procedure of your board, check the doc for that". But on the other hand if ravedude does know exactly which board we are running against, then we could give the appropriate error message.

  1. I got inspired by the cargo runner thing you do and I made wasm-run. I took a slightly different approach by adding wasm-run to the dependencies of the project itself. Because of that you don't need to install an external tool like you do with ravedude. I'm not sure if this is feasible here and also I don't know if it is relevant in embedded development. Though it is very useful for CIs as you can simplify the process.

  2. promicro-i2cdetect uses 57600 bauds. Most of the time I see everything on tutorials and examples running at 115200. Maybe it really varies a lot... I don't know, I'm a beginner in embedded development.

  3. You said to connect the serial to D0 and D1 which is probably correct but actually on the board it's written very clearly TX, RX and GND. So if you write documentation/comments on that specifically for the Sparkfun Pro Micro you should probably use this terminology.

  4. promicro-spi-feedback: on the comments it says to connect the pins 11 and 12. There is no 11 and 12 on the board itself so I checked the schematics to see what it is and it's actually the one labeled at 16 and 14 on the board.

image

(I know my arcade stick is dirty but that just means I'm using it OKAY?!!)

  1. The example promicro-adc doesn't do carriage returns:
[0] [08:22:50] ~ > serial-monitor -p /dev/ttyUSB0 -b 57600
Connected to /dev/ttyUSB0
Press Control-X to exit
A0: 304 A1: 291 A2: 296 A3: 288 
                                A0: 306 A1: 293 A2: 298 A3: 290 
                                                                A0: 302 A1: 288 A2: 292 A3: 284 
                                                                                                A0: 302 A1: 288 A2: 292 A3: 285 

I'm not sure how to test it further. I'm not even sure if I have the hardware components for it...

  1. Every other example I didn't mention anything worked well and smoothly! 🤗 🍨

@cecton
Copy link
Contributor

cecton commented May 1, 2021

I would prefer adding this board to arduino-hal as well, even if it isn't strictly an Arduino...

My 2 cents on this matter: beginner like me thought that "Arduino" meant microcontroller board 😁 so I'm really fine about looking for "Arduino" when I actually meant "board with AVR microchips". Though there are 2 points on that:

  1. It's worth keeping a list of hardwares that is known to be tested and working
  2. The PIN's numbers, leds, etc... don't always match at 100%. (Though the ProMicro is kinda of an exception because it matches perfectly (I think?) except for the reset button behavior which is explained here.)

@cecton
Copy link
Contributor

cecton commented May 1, 2021

Ah and you can also actually symlink source code. Example here.

@Rahix
Copy link
Owner

Rahix commented May 1, 2021

Hi,

I had to do this. It's probably worth adding it to the README:

Good point, will keep this in mind when updating the instructions for the new version.

On the Sparkfun Pro Micro you actually need to press twice rapidly. We could write something more generic like "follow the reset procedure of your board, check the doc for that". But on the other hand if ravedude does know exactly which board we are running against, then we could give the appropriate error message.

ACK, we should make ravedude emit concrete instructions here. It should be quite easy to do this, and it would make the user experience much better...

I took a slightly different approach by adding wasm-run to the dependencies of the project itself.

Not sure I understand? As a dependency the tool won't be available as a binary, you just gain a library your code could link against.

From looking at wasmbl, it seems you're actually compiling the crate for the host and the target and injecting the runner code into the host version?

Though it is very useful for CIs as you can simplify the process.

No hardware connected to CI yet, so ravedude is not needed there ;)

promicro-i2cdetect uses 57600 bauds. Most of the time I see everything on tutorials and examples running at 115200. Maybe it really varies a lot... I don't know, I'm a beginner in embedded development.

Yeah, there were some issues in the past with 115200 baud because the clock calculation was off a bit. It should be stable now though, so I guess we can update it...
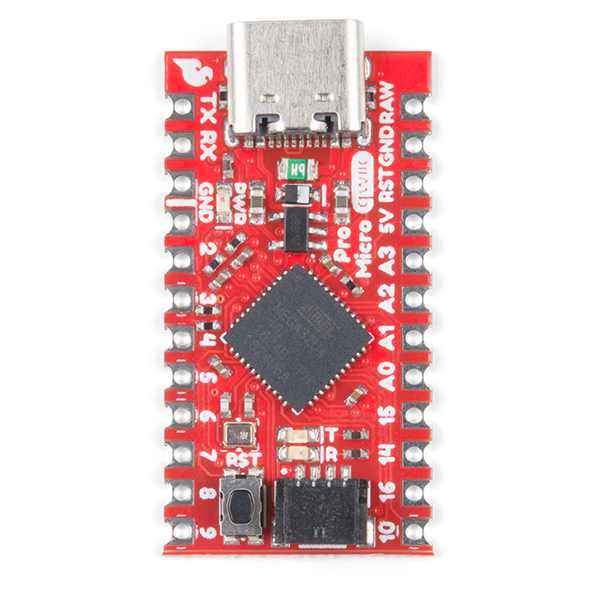
You said to connect the serial to D0 and D1 which is probably correct but actually on the board it's written very clearly TX, RX and GND. So if you write documentation/comments on that specifically for the Sparkfun Pro Micro you should probably use this terminology.

I see... We could rename the pins to tx and rx in the code, but then this would of course loose a bit of compatibility with the official Arduino boards. Not sure what's more important... Maybe just documenting that d0 and d1 are actually labelled differently is also an option.

Relevant part of this MR:

/// `D0` / `RX`
///
/// * `RX` (UART)
/// * `INT2`: External Interrupt
pub d0: atmega_hal::port::PD2 = pd2,
/// `D1` / `TX`
///
/// * `TX` (UART)
/// * `INT3`: External Interrupt
pub d1: atmega_hal::port::PD3 = pd3,

promicro-spi-feedback: on the comments it says to connect the pins 11 and 12. There is no 11 and 12 on the board itself so I checked the schematics to see what it is and it's actually the one labeled at 16 and 14 on the board.

@explicite, I think this means we should fix the pin names in arduino-hal. Right now you added

/// `SCLK`
///
/// ICSP SCLK pin
pub sck: atmega_hal::port::PB1 = pb1,
/// `MOSI`
///
/// ICSP MOSI pin
pub mosi: atmega_hal::port::PB2 = pb2,
/// `MISO`
///
/// ICSP MISO pin
pub miso: atmega_hal::port::PB3 = pb3,

but I guess this should really be

        /// `D15`, `SCK`
        ///
        /// ICSP SCLK pin
        pub d15: atmega_hal::port::PB1 = pb1,
        /// `D14`, `MOSI`
        ///
        /// ICSP MOSI pin
        pub d14: atmega_hal::port::PB2 = pb2,
        /// `D16`, `MISO`
        ///
        /// ICSP MISO pin
        pub d16: atmega_hal::port::PB3 = pb3,

Maybe also recheck the rest of the pins against the schematic and pinout:

promicro pinout

The example promicro-adc doesn't do carriage returns:

So far we've been adding the \r to each example explicitly but that's quite ugly and error prone. Doing it automagically in avr-hal is problematic when people want to send binary data... I think it is okay to not send it and instead have the user do the conversion. That's what Arduino is doing as well and ravedude also takes care of it. In case you use another terminal emulator you have to enable line-ending conversion, e.g. for picocom that's the --imap lfcrlf flag.

It's worth keeping a list of hardwares that is known to be tested and working

Yeah, I intend to add that to the README once I update everything else.

The PIN's numbers, leds, etc... don't always match at 100%.

That's why each board has its own pin-renaming module in arduino-hal. We should strive to keep the names as close to what is on the board as possible. This way examples will only compile for multiple boards if all pin names are the same.

Ah and you can also actually symlink source code.

Learned the hard way not to use symlinks in public projects: #29 (It's always windows ruining the nice things...)

@Rahix
Copy link
Owner

Rahix commented May 1, 2021

Going to merge this as it is now and let's do the remaining tweaks on top.

@Rahix Rahix marked this pull request as ready for review May 1, 2021 09:27
@Rahix Rahix merged commit 8c1b351 into Rahix:next May 1, 2021
Sign up for free to join this conversation on GitHub. Already have an account? Sign in to comment
Labels
mcu-support Support for a new Microcontroller
Projects
None yet
Development

Successfully merging this pull request may close these issues.

None yet

3 participants