![]()
This guide is tested with archlinux-2024.06.01-x86_64.iso with an Ethernet connection. For WiFi setups, additional steps involving iwctl are necessary, as they require a different set of commands.
-
LUKS (Linux Unified Key Setup): Using LUKS for disk encryption is particularly beneficial if you're using a laptop. It encrypts your entire drive, meaning your data is secure even if your computer is lost or stolen.
-
Data Protection: With LUKS, there's no need to overwrite your data before selling or disposing of your computer. The encryption ensures that your data remains inaccessible without the correct passphrase.
-
Snapshots with Btrfs: Btrfs (B-tree File System) allows you to create snapshots of your system. This feature is very good for backing up and restoring your system state, making system updates and changes less risky.
-
Advanced Features: Btrfs supports features like volume management, error detection, and self-repair capabilities, adding layers of robustness to your system.
-
Tailored for Arch Linux: Arch Linux is known for its simplicity, efficiency, and customization capabilities. This guide leverages these strengths to provide you with a powerful and personalized computing experience.
-
Step-by-Step Instructions: Whether you're an old Linux user or new to Arch, this guide walks you through every step of the installation and setup process.
This guide intentionally does not include a swap partition or swap file as part of the installation process. The primary reason for this is simplicity, aiming to provide a basic and straightforward installation experience.
In addition to not setting up swap, this guide also simplifies the installation process by not configuring locales and other detailed system settings. The focus is on delivering a streamlined and basic setup, ideal for users who prefer a minimal installation or for those new to Arch Linux.
Users with specific needs can always add swap space and other things post-installation.
Caution
Instead of /dev/sda use the proper disk. You can list your disks by using fdisk -l
ALWAYS DOUBLE CHECK BEFORE ANY COMMAND IF YOU HAVE MULTIPLE DISKS
For my install for example it is /dev/sda
Disk /dev/sda: 55.9 GiB, 60022480896 bytes, 117231408 sectors
Disk model: KINGSTON SV300S3
fdisk /dev/sda
n
p
1
[Press Enter]
+512M
t
0c (W95 FAT 32 LBA)
a
n
[Press Enter]
[Press Enter]
[Press Enter]
[Press Enter]
w
mkfs.fat -F32 /dev/sda1
cryptsetup luksFormat /dev/sda2
cryptsetup open /dev/sda2 cryptroot
Tip
You can use lvs command to list all logical volumes.
You need to start by initializing physical storage devices (like hard drives or partitions) as Physical Volumes. This is done using the pvcreate command.
Volume Group (VG) with vgcreate: Once you have one or more Physical Volumes, you can create a Volume Group. This is a pool of storage made from the Physical Volumes, and it's created using the vgcreate command.
Logical Volume (LV) with lvcreate: Finally, within the Volume Group, you can create Logical Volumes. These are the volumes that your operating system and applications will use, and they are created with the lvcreate command.
- Physical Volume Create:
pvcreate /dev/mapper/cryptroot - Volume Group Create:
vgcreate vgname /dev/mapper/cryptroot - Logical Volume Create:
lvcreate -l 100%FREE vgname -n root
mkfs.btrfs /dev/mapper/vgname-root
mount /dev/mapper/vgname-root /mnt
btrfs subvolume create /mnt/@
btrfs subvolume create /mnt/@home
umount /mnt
Tip
Alternatively you can just use
mount -o subvol=@ /dev/mapper/vgname-root /mnt and configure it later.
Also mount -o subvol=@home /dev/mapper/vgname-root /mnt/home
mount -o subvol=@,rw,noatime,autodefrag,ssd,compress=zstd /dev/mapper/vgname-root /mnt
mkdir /mnt/home
mount -o subvol=@home,rw,noatime,autodefrag,ssd,compress=zstd /dev/mapper/vgname-root /mnt/home
mkdir /mnt/boot
mount /dev/sda1 /mnt/boot
pacstrap /mnt base linux linux-firmware btrfs-progs base-devel nano
Tip
If you installed any software before pacstrap (termux, or byobu for example) you may need to use
pacman -Sy archlinux-keyring
genfstab -U /mnt >> /mnt/etc/fstab
arch-chroot /mnt
pacman -Syy lvm2
nano /etc/mkinitcpio.conf
HOOKS=(encrypt btrfs lvm2) <- Add these to the uncommented hooks line.
mkinitcpio -P
Tip
With this command and using ctrl + K and ctrl + U with nano you can easily copy the correct UUID. Go to the bottom of the file and copy it (ctrl+k) then paste where the UUID needed. If you are installing on SSH you can copy paste it more easily.
pacman -S grub
grub-install /dev/sda
blkid -s UUID -o value /dev/sda2 >> /etc/default/grub

nano /etc/default/grub
now scroll down the document and copy the UUID by pressing ctrl + K
GRUB_ENABLE_CRYPTODISK=y (Uncomment this)
Tip
GRUB_TIMEOUT=0 (Default is 5, but for faster boot you can change it to 0)
Caution
Now this is the most important line!
GRUB_CMDLINE_LINUX="cryptdevice=UUID=[PASTE UUID HERE]:cryptroot root=/dev/mapper/vgname-root rootfstype=btrfs rootflags=subvol=@"
For example: GRUB_CMDLINE_LINUX="cryptdevice=UUID=0d02ca7d-b4bd-47a8-8df8-70c972be025f:cryptroot root=/dev/mapper/vgname-root rootfstype=btrfs rootflags=subvol=@"
grub-mkconfig -o /boot/grub/grub.cfg

passwd (Don't forget to set your root password)
Pacman -S networkmanager
systemctl enable NetworkManager < Capital letters
Note
From now you can exit chroot by typing exit and restart the computer by typing reboot. Don't forget to set up networkmanager. You can only login as root user for now.
useradd -m test (m is creating home directory)
passwd test
pacman -S sudo
EDITOR=nano visudo
test ALL=(ALL) ALL <-- Add this to the end of the file, or the beginning.

# For testing
su - test
sudo ls /root
Note
If you want to use SDDM you first need to create one user. So it displays it automatically.
Tip
If you want a minimal installation, you can just install plasma-desktop.
pacman -S xorg
pacman -S plasma kde-applications
pacman -S sddm
systemctl enable sddm
nano /etc/sddm.conf
[Autologin]
User=test
Session=plasma
nano /etc/vconsole.conf
KEYMAP=hu

In KDE Konsole for examle: setxkbmap hu
or in tty: loadkeys hu
pacman -S timeshift
systemctl enable --now cronie
systemctl start cronie
Example:
UUID=[Your UUID] / btrfs subvol=@,rw,noatime,autodefrag,ssd,compress=zstd 0 1
UUID=[Your UUID] /home btrfs subvol=@home,rw,noatime,autodefrag,ssd,compress=zstd 0 2
UUID=[Your UUID]: Replace[Your UUID]with the UUID of your Btrfs partition.subvol=@: Specifies the subvolume to mount. Replace@with your specific subvolume name if it's different.rw: Mounts the filesystem in read-write mode.noatime: Disables updating the access time on files to improve performance.autodefrag: Enables automatic defragmentation of the filesystem.ssd: Optimizes for SSD usage (change tonosddif not on an SSD).compress=zstd: Uses Zstandard compression for efficient file storage.0 1: Sets the dump and fsck order. Typically0 1for the root filesystem.
To check subvolumes
sudo btrfs subvolume list /
To manage space efficiently, first enable quotas on the Btrfs filesystem:
sudo btrfs quota enable /Initiate a rescan of the quotas. This ensures that the quota information is up to date:
sudo btrfs quota rescan -s /Display the quota groups (qgroups) to see space usage:
sudo btrfs qgroup show -pcre /To find out which backup is using the most space, sort the qgroups by their exclusive space usage:
sudo btrfs qgroup show -pcre / | awk '{print $3, $0}' | sort -h | cut -d' ' -f2-This command sequence does the following:
awk '{print $3, $0}': Extracts the exclusive size and prints it alongside the entire line.sort -h: Sorts the output in human-readable format.cut -d' ' -f2-: Removes the exclusive size field, leaving the rest of the data.
If you want to delete a subvolume by its ID, use the following command. Replace [Your ID] with the actual subvolume ID:
sudo btrfs subvolume delete --subvolid [Your ID]Note: Be cautious with this operation, as deleting a subvolume is irreversible and can lead to data loss if performed incorrectly.
If you have an SSH server installed, it is advisable to use SSH keys for authentication and also enable fail2ban.
First, install fail2ban:
sudo pacman -S fail2banThen, go to the /etc/fail2ban folder and make a file called jail.local:
nano jail.localThis is a very basic fail2ban configuration. You can configure it further. Here's an example configuration:
[sshd]
enabled = true
port = ssh
filter = sshd
logpath = /var/log/sshd_auth.log
maxretry = 2
findtime = 300000
bantime = -1
This configuration allows 2 login attempts before banning the IP address.
Restart and check the status of fail2ban:
systemctl restart fail2ban
systemctl status fail2banYou can view the log at /var/log/fail2ban.log or check the status of a specific jail like sshd:
fail2ban-client status sshdA list of some of my favorite terminal applications and how to install and use them on systems using pacman package manager (like Arch Linux).
ttyd is a program that allows you to share your terminal over the internet.
-
Installation:
sudo pacman -S ttyd
-
Usage:
The default mode is readonly. For example, if you want to share your
topcommand:ttyd top
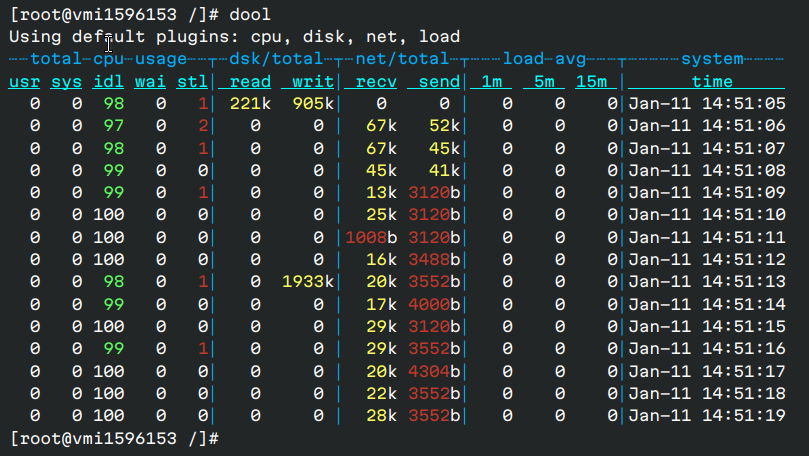
dool is great software for checking server status, CPU usage, etc., with a nice format.
-
Installation:
sudo pacman -S dool
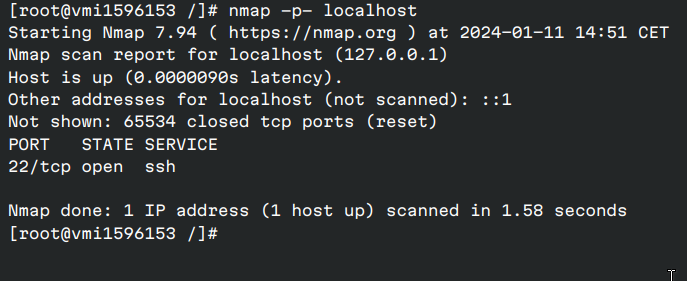
While there are simpler ways to check open ports on your computer, I just love nmap for checking open ports.
-
Usage:
nmap -p- localhost