This quickstart will get you up and running on PowerVM server managed using HMC.
This playbook will set up an "all-in-one" node (called ocp4-helpernode), that has all the infrastructure/services in order to install OpenShift 4. This playbook will also install an OpenShift 4 cluster with 3 master nodes and 2 worker nodes. After you run the playbook, you'll be ready to logon to the OpenShift cluster.
A lot of OpenShift 4 specific jargon is used throughout this doc, so please visit the official documentation page to get familiar with OpenShift 4.
This playbook assumes the following:
- You're on a Network that has access to the internet.
- The network you're on does NOT have DHCP (or you can block your existing DHCP from responding to the MAC addresses used for the OpenShift LPARs).
- The ocp4-helpernode will be your Load Balancer/DHCP/TFTP/DNS/HTTP and NFS server for the OpenShift cluster.
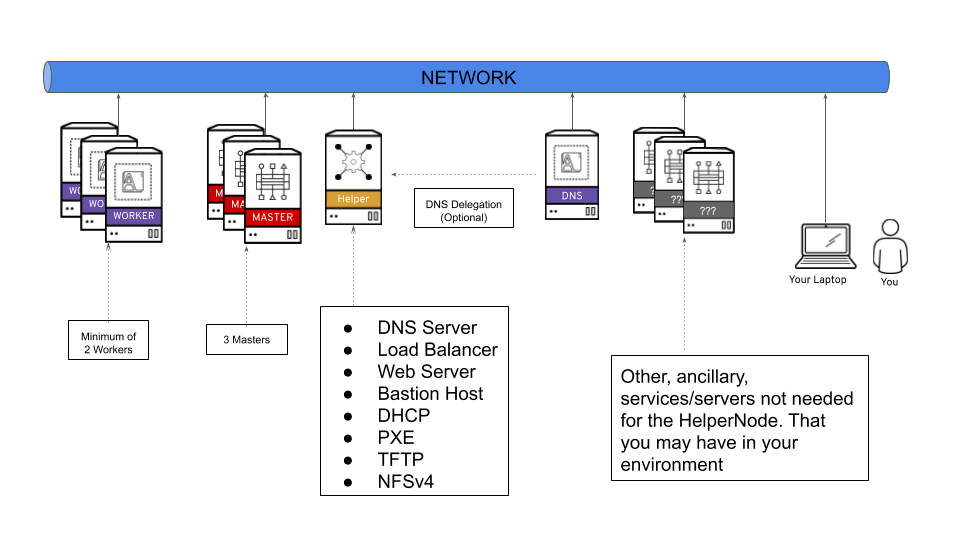
It's important to note that you can delegate DNS to the ocp4-helpernode if you don't want to use it as your main DNS server. You will have to delegate $CLUSTERID.$DOMAIN to this helper node.
For example; if you want a $CLUSTERID of ocp4, and you have a $DOMAIN of example.com. Then you will delegate ocp4.example.com to this ocp4-helpernode.
Create helper LPAR using the HMC GUI or HMC mksyscfg command. To start, ssh to your HMC host to use the CLI. You can also use the HMC GUI. The steps in these guide are specific to CLI.
- 2 vCPUs (desired_procs)
- 32 GB of RAM (desired_mem)
- 120 GB HD (OS) + 880 GB HD (NFS)
$ mksyscfg -r lpar -m <managed_system> -i name=ocp4-helper, profile_name=default_profile, lpar_env=aixlinux, shared_proc_pool_util_auth=1, min_mem=8192, desired_mem=32768, max_mem=32768, proc_mode=shared, min_proc_units=0.2, desired_proc_units=0.4, max_proc_units=4.0, min_procs=1, desired_procs=2, max_procs=2, sharing_mode=uncap, uncap_weight=128, max_virtual_slots=64, boot_mode=norm, conn_monitoring=1
NOTE Make sure you attach the LPAR to the appropriate network and add storage (HMC GUI or chsyscfg command) after successful LPAR creation.
Install RHEL 8 in this PowerVM LPAR.
After helper is up and running, configure it with correct network configurations based on your network:
- IP - <helper_ip>
- NetMask - 255.255.255.0
- Default Gateway - <default_gateway>
- DNS Server - <default_DNS>
Create 6 LPARs using the HMC GUI or HMC mksyscfg command.
Bootstrap
Create one bootstrap LPAR.
- 2 vCPUs (desired_procs)
- 32 GB of RAM (desired_mem)
- 120 GB HD (OS)
$ mksyscfg -r lpar -m <managed_system> -i name=ocp4-bootstrap, profile_name=default_profile, lpar_env=aixlinux, shared_proc_pool_util_auth=1, min_mem=8192, desired_mem=32768, max_mem=32768, proc_mode=shared, min_proc_units=0.2, desired_proc_units=0.4, max_proc_units=4.0, min_procs=1, desired_procs=2, max_procs=4, sharing_mode=uncap, uncap_weight=128, max_virtual_slots=64, boot_mode=norm, conn_monitoring=1
NOTE Make sure you attach the LPAR to the appropriate network and add storage (HMC GUI or HMC chsyscfg command) after successful LPAR creation. NOTE No OS installation is needed at this point.
Masters
Create the three master LPARs.
- 2 vCPUs (desired_procs)
- 32 GB of RAM (desired_mem)
- 120 GB HD (OS)
$ for i in master{0..2}
do
  mksyscfg -r lpar -m <managed_system> -i name="ocp4-${i}", profile_name=default_profile, lpar_env=aixlinux, shared_proc_pool_util_auth=1, min_mem=32768, desired_mem=32768, max_mem=16384, proc_mode=shared, min_proc_units=0.2, desired_proc_units=0.2, max_proc_units=4.0, min_procs=2, desired_procs=2, max_procs=2, sharing_mode=uncap, uncap_weight=128, max_virtual_slots=64, boot_mode=norm, conn_monitoring=1
done
NOTE Make sure you attach the LPARs to the appropriate network and add storage (HMC GUI or HMC chsyscfg command) after successful LPAR creation. NOTE No OS installation is needed at this point.
Workers
Create the two worker LPARs.
- 4 vCPUs (desired_procs), more depending on the workload
- 32 GB of RAM (desired_mem), more depending on the workload
- 120 GB HD (OS), more depending on the workload
$ for i in worker{0..1}
do
  mksyscfg -r lpar -m <managed_system> -i name="ocp4-${i}", profile_name=default_profile, lpar_env=aixlinux, shared_proc_pool_util_auth=1, min_mem=16384, desired_mem=32768, max_mem=262144, proc_mode=shared, min_proc_units=0.2, desired_proc_units=0.8, max_proc_units=4.0, min_procs=1, desired_procs=4, max_procs=16, sharing_mode=uncap, uncap_weight=128, max_virtual_slots=64, boot_mode=norm, conn_monitoring=1
done
NOTE Make sure you attach the LPARs to the appropriate network and add storage (HMC GUI or HMC chsyscfg command) after successful LPAR creation. NOTE No OS installation is needed at this point.
$ for i in <managed_systems>
do
  lshwres -m $i -r virtualio --rsubtype eth --level lpar -F lpar_name,mac_addr
done
Or if using SRIOV's then run the following command:
$ for i in <managed_systems>
do
  lshwres -m $i -r sriov --rsubtype logport --level eth -F lpar_name,mac_addr
done
After the helper node OS is installed; login to it
$ ssh root@<helper_ip>
NOTE For RHEL 8 you will need to enable
rhel-8-for-ppc64le-baseos-rpms,rhel-8-for-ppc64le-appstream-rpms, andansible-2.9-for-rhel-8-ppc64le-rpms
Install EPEL
$ yum -y install https://dl.fedoraproject.org/pub/epel/epel-release-latest-$(rpm -E %rhel).noarch.rpm
Install ansible and git
$ yum -y install ansible git
Install firefox and X11 forwarding libs
$ yum -y install firefox xorg-x11-xauth dbus-x11
Change SELinux to permissive. The OpenShift installation fails if SELinux is disabled.
$ vi /etc/selinux/config # change "SELINUX=disabled" to "SELINUX=permissive"
$ setenforce Permissive
$ vi /etc/default/grub  # change "selinux=0" to "selinux=1"
$ grub2-mkconfig
$ reboot
$ getenforceCreate a place to store your pull-secret
$ mkdir -p ~/.openshift
Visit try.openshift.com and select "Run on Power". Download your pull secret and save it under ~/.openshift/pull-secret
$ ls -1 ~/.openshift/pull-secret
/root/.openshift/pull-secret
NOTE Do not manual download the OpenShift client or installer packages from this Web Page, The required packages are downloaded automatically later by the playbook.
You can use ssh-keygen to create the users ssh public key (change "user@sample.com" to the users eMail address).
$ ssh-keygen -t rsa -b 4096 -N '' -C "<user@sample.com>"
$ eval "$(ssh-agent -s)"
$ ssh-add ~/.ssh/id_rsa
$ ls -1 ~/.ssh/id_rsa
/root/.ssh/id_rsagit clone https://github.com/redhat-cop/ocp4-helpernode
cd ocp4-helpernodecp docs/examples/vars-ppc64le.yaml vars.yamlEdit the vars.yaml:
- Update
helpersection for your helper node info - Update
dnsanddhcpbased on your network setup - Update
bootstrap,mastersandworkerswith IP and MAC address of the LPARs.
NOTE See the
vars.yamldocumentation page for more info about what it does.
Run the playbook to setup your helper node
ansible-playbook -e @vars.yaml tasks/main.yml
After it is done run the following to get info about your environment and some install help
/usr/local/bin/helpernodecheck
Now you can start the installation process. Create an install dir.
mkdir ~/ocp4
cd ~/ocp4
⚠️ Make sure you update if your filenames or paths are different.
cat <<EOF > install-config.yaml
apiVersion: v1
baseDomain: example.com
compute:
- hyperthreading: Enabled
  name: worker
  replicas: 0
controlPlane:
  hyperthreading: Enabled
  name: master
  replicas: 3
metadata:
  name: ocp4
networking:
  clusterNetworks:
  - cidr: 10.254.0.0/16
    hostPrefix: 24
  networkType: OpenShiftSDN
  serviceNetwork:
  - 172.30.0.0/16
platform:
  none: {}
pullSecret: '$(< ~/.openshift/pull-secret)'
sshKey: '$(< ~/.ssh/helper_rsa.pub)'
EOF
NOTE The baseDomain and metadata.name have to be the same as defined in
dnssection ofvars.yaml.
openshift-install create manifests
Edit the manifests/cluster-scheduler-02-config.yml Kubernetes manifest file to prevent Pods from being scheduled on the control plane machines by setting mastersSchedulable to false.
🚨 Skip this step if you're installing a compact cluster
$ sed -i 's/mastersSchedulable: true/mastersSchedulable: false/g' manifests/cluster-scheduler-02-config.ymlIt should look something like this after you edit it.
$ cat manifests/cluster-scheduler-02-config.yml
apiVersion: config.openshift.io/v1
kind: Scheduler
metadata:
  creationTimestamp: null
  name: cluster
spec:
  mastersSchedulable: false
  policy:
    name: ""
status: {}
NOTE This is only apply to the cluster with worker nodes, don't make above change if the cluster setup is the minimum 3 nodes.
openshift-install create ignition-configs
Finally, copy the ignition files in the ignition directory for the websever
cp ~/ocp4/*.ign /var/www/html/ignition/
restorecon -vR /var/www/html/
chmod o+r /var/www/html/ignition/*.ign
After helper node is setup with all the services for OCP, now it is time to boot it up to install RHCOS on to LPAR's disk and complete the OCP installation. The following command HMC CLI can be used to boot the LPAR with bootp, it need to be run on HMC system:
lpar_netboot -f -t ent -m <macaddr> -s auto -d auto <lpar_name> <profile_name> <managed_system>
NOTE The format is fad38e3ca520, which does not contain
:.
Boot the LPARs in the following order
- Bootstrap
- Masters
- Workers
On your laptop/workstation visit the status page
firefox http://<helper_ip>:9000
You'll see the bootstrap turn "green" and then the masters turn "green", then the bootstrap turn "red". This is your indication that you can continue.
Also you can check all cluster node LPAR status in HMC's partition list view.
The boostrap LPAR actually does the install for you; you can track it with the following command.
openshift-install wait-for bootstrap-complete --log-level debug
Once you see this message below...
DEBUG OpenShift Installer v4.2.0-201905212232-dirty
DEBUG Built from commit 71d8978039726046929729ad15302973e3da18ce
INFO Waiting up to 30m0s for the Kubernetes API at https://api.ocp4.example.com:6443...
INFO API v1.13.4+838b4fa up
INFO Waiting up to 30m0s for bootstrapping to complete...
DEBUG Bootstrap status: complete
INFO It is now safe to remove the bootstrap resources
...you can continue....at this point you can delete the bootstrap server.
Note: If the LPARs are using SEA (ibmveth driver), then the following settings need to be applied to all the OCP nodes to avoid install failures due to packet drop issues. SSH to the OCP nodes from helpernode and apply the settings.
sudo sysctl -w net.ipv4.route.min_pmtu=1450
sudo sysctl -w net.ipv4.ip_no_pmtu_disc=1
echo 'net.ipv4.route.min_pmtu = 1450' | sudo tee --append /etc/sysctl.d/88-sysctl.conf > /dev/null
echo 'net.ipv4.ip_no_pmtu_disc = 1' | sudo tee --append /etc/sysctl.d/88-sysctl.conf > /dev/null
First, login to your cluster
export KUBECONFIG=/root/ocp4/auth/kubeconfig
Set the registry for your cluster
First, you have to set the managementState to Managed for your cluster
oc patch configs.imageregistry.operator.openshift.io cluster --type merge --patch '{"spec":{"managementState":"Managed"}}'
For PoCs, using emptyDir is ok (to use PVs follow this doc)
oc patch configs.imageregistry.operator.openshift.io cluster --type merge --patch '{"spec":{"storage":{"emptyDir":{}}}}'
If you need to expose the registry, run this command
oc patch configs.imageregistry.operator.openshift.io/cluster --type merge -p '{"spec":{"defaultRoute":true}}'
Note: You can watch the operators running with
oc get clusteroperators
Watch your CSRs. These can take some time; go get come coffee or grab some lunch. You'll see your nodes' CSRs in "Pending" (unless they were "auto approved", if so, you can jump to the wait-for install-complete step)
watch oc get csr
To approve them all in one shot...
oc get csr --no-headers | awk '{print $1}' | xargs oc adm certificate approve
Check for the approval status (it should say "Approved,Issued")
oc get csr | grep 'system:node'
Once Approved; finish up the install process
openshift-install wait-for install-complete
The OpenShift 4 web console will be running at https://console-openshift-console.apps.{{ dns.clusterid }}.{{ dns.domain }} (e.g. https://console-openshift-console.apps.ocp4.example.com)
- Username: kubeadmin
- Password: the output of
cat /root/ocp4/auth/kubeadmin-password
If you didn't install the latest release, then just run the following to upgrade.
oc adm upgrade --to-latest
If you're having issues upgrading you can try adding --force to the upgrade command.
oc adm upgrade --to-latest --force
See issue #46 to understand why the --force is necessary and an alternative to using it.
Scale the router if you need to
oc patch --namespace=openshift-ingress-operator --patch='{"spec": {"replicas": 3}}' --type=merge ingresscontroller/default
Your install should be done! You're a OCP master!