The project uses a live EEG from the user to control a simplified keyboard using steady state visually evoked potentials.
On start-up, the user should stare at one of the checker boxes to record a baseline EEG. Once the checkerboxes start flashing, the user can start making selections. There are five flashing checkerboxes, each flashing at a different frequency. Each box also has some comma separated options above them, which can be selected By the user looking and concentrating on it. The box will be highlighted and the options sub-divided between the checker boxes. This repeats until a single option is selected. If the option is a letter/number it will be displayed in the text box.
The SSVEP BCI is not reliable right now
In the circuit folder is a ltspice schematic for a single channel EEG measuring circuit which is measured by a Nucleo F303K8. The values are sent to the brain-computer interface which processes the data.
A video overview of the circuit can be seen below

A simple Alpha wave BCI can be found in the Alpha BCI folder and a video demonstrating can be seen below
This was my final year project for my Electrical/Electronic Engineering Degree
-
Build the circuit as shown in the circuit schematic
-
Import and build the Nucleo code to whichever ARM compatible IDE you wish. I used SW4STM32.
-
Flash it to the Nucleo
-
Run eegBCI.py, you may need to change the serial port in this file.
-
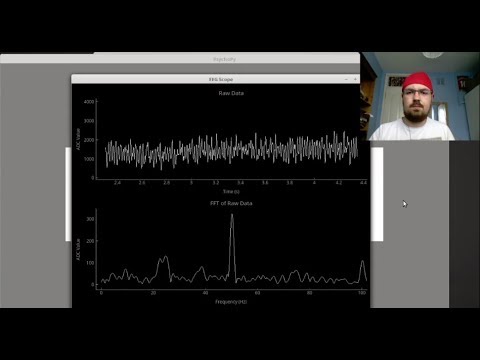
See that the EEGScope window is receiving data.
-
If it is, you can close the windows and connect up the electrodes.
The following instructions are for connecting the measurement electrodes between 0z and the right/left mastoid and the Driven right leg (DRL) to the left/right mastoid
- Connect an EEG cup electrode to the positive electrode lead (instructions for making the Low-Cost EEG cup electrodes I used can be found in the Electrodes Folder)
- Connect an ECG electrode to the negative electrode and DRL lead
- Remove the pads from the ECG pad electrodes and place one behind either ear (mastoid)
- (Optional) Apply Abrasive gel to Oz (I used Nuprep), this may improve signal quality
- Fill the electrode cup up with conductive gel (I used Signa Electrode Gel)
- Place the electrode cup on Oz and put on a swimming cap to hold it in place
- Start eegBCI.py and follow the instructions on screen
The BCI uses Python3 and all of the dependencies are listed in requirments.txt in the BCI folder. Run "pip install -r requirements.txt" within the folder
Nucleo code was created with STM32CubeMX and edited in SW4STM32 but can be imported into other ARM based IDE
The thesis documenting the design and testing of the project can be found in the Thesis folder
TODO
This project is licensed under the Apache 2 License - see the LICENSE.md file for details
- Dr Ted Burke for supervising the project and providing endless help and ideas
The designs for the EEG hardware and software shown in this repository have not been tested to comply with any medical device standards such as IEC 601. Therefore, any user which builds or uses the designs from this repository does so at their own risk.
As of writing, the BCI designs in this repository are not very reliable so the software/hardware should not be modified to control dangerous machinery or provide a valid means of communication.