A Udacity Full Stack Web Developer II Nanodegree Project.
This tutorial will guide you through the steps to take a baseline installation of a Linux server and prepare it to host your Web applications. You will then secure your server from a number of attack vectors, install and configure a database server, and deploy one of your existing Flask-based Web applications onto it.
In this project, I have set up an Ubuntu 18.04 image on a DigitalOcean droplet. The technical details of the server as well as the steps that have been taken to set it up can be found in the succeeding sections.
- Server IP Address:
- SSH server access port: 2200
- SSH login username: grader
- Application URL: http://206.189.151.124.xip.io
- Udacity - Linux Server Configuration Project
- About
- Table of Contents
- Steps to Set up the Server
- 1. Creating the RSA Key Pair
- 2. Setting Up a DigitalOcean Droplet
- 3. Logging In as
rootvia SSH and Updating the System - 4. Changing the SSH Port from 22 to 2200
- 5. Configure Timezone to Use UTC
- 6. Setting Up the Firewall
- 7. Creating the User
graderand Adding it to thesudoGroup - 8. Adding SSH Access to the user
grader - 9. Disabling Root Login
- 10. Installing Apache Web Server
- 11. Installing
pip - 12. Installing and Configuring Git
- 13. Installing and Configuring PostgreSQL
- 14. Setting Up Apache to Run the Flask Application
- Debugging
- References
On your local machine, first set up the public and private key pair. This key pair will be used to authenticate yourself while securely logging in to the server via SSH. The private key will be kept with you in your local machine, and the public key will be stored in the server.
To generate a key pair, run the following command:
$ ssh-keygenWhen it asks to enter a passphrase, you may either leave it empty or enter some passphrase. A passphrase adds an additional layer of security to prevent unauthorized users from logging in.
The whole process would look like this:
Generating public/private rsa key pair.
Enter file in which to save the key (/home/subhadeep/.ssh/id_rsa): /home/subhadeep/.ssh/udacity_project
Created directory '/home/subhadeep/.ssh'.
Enter passphrase (empty for no passphrase):
Enter same passphrase again:
Your identification has been saved in /home/subhadeep/.ssh/udacity_project.
Your public key has been saved in /home/subhadeep/.ssh/udacity_project.pub.
The key fingerprint is:
SHA256:JnpV8vpIZqstoTm8aaDAqVmGSF/tGhtDfXAfL2fs/U8 subhadeep@subhadeep-VirtualBox
The key's randomart image is:
+---[RSA 2048]----+
|                 |
|       . . .     |
|      o + o +    |
| .   o o = o =   |
|+.o o o S . = .  |
|+o+. =.= .   . . |
|o= o.oB.=       E|
|+   *=.= +     ..|
|   .oo.o+ .     o|
+----[SHA256]-----+
You now have a public and private key pair that you can use to authenticate. The public key is called udacity_project.pub here and the corresponding private key is called udacity_project. The key pair is stored inside the ~/.ssh/ directory.
-
Log in or create an account on DigtalOcean.
-
Go to the Dashboard, and click Create Droplet.
-
Choose Ubuntu 18.04 x64 image from the list of given images.
-
Choose a preferred size. In this project, I have chosen the 1GB/1 vCPU/25GB configuration.
-
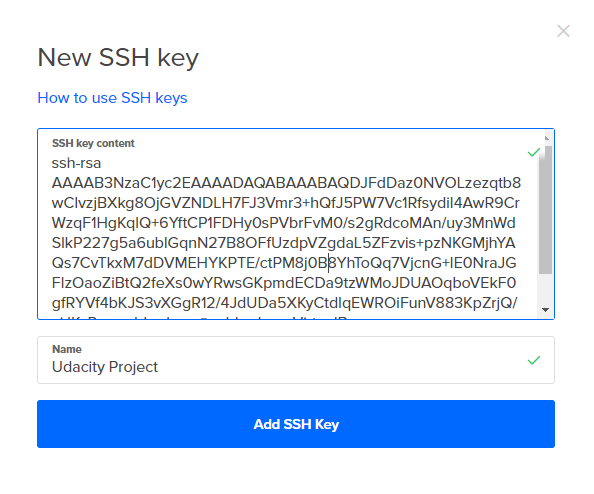
In the section Add Your SSH Keys, paste the content of your public key,
udacity_project.pub:This step will automatically create the file
~/.ssh/authorized_keyswith appropriate permissions and add your public key to it. It would also add the following rule in the/etc/ssh/sshd_configfile automatically:PasswordAuthentication noThis rule essentially disables password authentication on the
rootuser, and rather enforces SSH logins only. -
Click Create to create the droplet. This will take some time to complete. After the droplet has been created successfully, a public IP address will be assigned. In this project, the public IPv4 address that I have been assigned is
206.189.151.124.
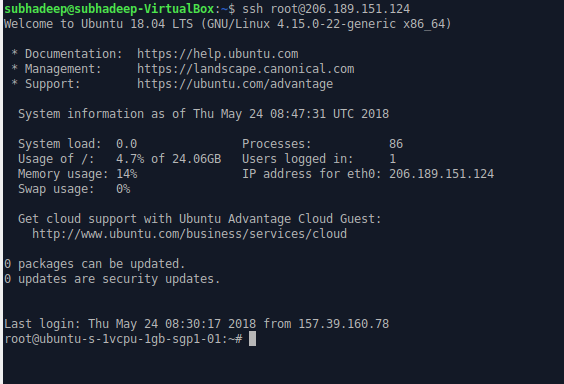
As the droplet has been successfully created, you can now log into the server as root user by running the following command in your host machine:
$ ssh root@206.189.151.124
This will look for the private key in your local machine and log you in automatically if the corresponding public key is found on your server. After you are logged in, you might see something similar to this:
Run the following command to update the virtual server:
# apt update && apt upgrade
This will update all the packages. If the available update is a kernel update, you might need to reboot the server by running the following command:
# reboot
-
Open the
/etc/ssh/sshd_configfile withnanoor any other text editor of your choice:# nano /etc/ssh/sshd_config -
Find the line
#Port 22(would be located around line 13) and change it toPort 2200, and save the file. -
Restart the SSH server to reflect those changes:
# service ssh restart -
To confirm whether the changes have come into effect or not, run:
# exitThis will take you back to your host machine. After you are back to your local machine, run:
$ ssh root@206.189.151.124 -p 2200You should now be able to log in to the server as
rooton port 2200. The-poption explicitly tells at what port the SSH server operates on. It now no more operates on port number 22.
To configure the timezone to use UTC, run the following command:
# sudo dpkg-reconfigure tzdata
It then shows you a list. Choose None of the Above and press enter. In the next step, choose UTC and press enter.
You should now see an output like this:
Current default time zone: 'Etc/UTC'
Local time is now:      Thu May 24 11:04:59 UTC 2018.
Universal Time is now:  Thu May 24 11:04:59 UTC 2018.
Now we would configure the firewall to allow only incoming connections for SSH (port 2200), HTTP (port 80), and NTP (port 123):
# ufw allow 2200/tcp
# ufw allow 80/tcp
# ufw allow 123/udp
To enable the above firewall rules, run:
# ufw enable
To confirm whether the above rules have been successfully applied or not, run:
# ufw status
You should see something like this:
Status: active

To                         Action      From
--                         ------      ----
2200/tcp                   ALLOW       Anywhere
80/tcp                     ALLOW       Anywhere
123/udp                    ALLOW       Anywhere
2200/tcp (v6)              ALLOW       Anywhere (v6)
80/tcp (v6)                ALLOW       Anywhere (v6)
123/udp (v6)               ALLOW       Anywhere (v6)
While being logged into the virtual server, run the following command and proceed:
# adduser grader
The output would look like this:
  Adding user `grader' ...
  Adding new group `grader' (1000) ...
  Adding new user `grader' (1000) with group `grader' ...
  Creating home directory `/home/grader' ...
  Copying files from `/etc/skel' ...
  Enter new UNIX password:
  Retype new UNIX password:
  passwd: password updated successfully
  Changing the user information for grader
  Enter the new value, or press ENTER for the default
	  Full Name []: Grader
	  Room Number []:
	  Work Phone []:
	  Home Phone []:
	  Other []:
  Is the information correct? [Y/n]
Note: Above, the UNIX password I have entered for the user grader is, root.
Run the following command to add the user grader to the sudo group to grant it administrative access:
# usermod -aG sudo grader
To allow SSH access to the user grader, first log into the account of the user grader from your virtual server:
# su - grader
You should see a prompt like this:
grader@ubuntu-s-1vcpu-1gb-sgp1-01:~$Now enter the following commands to allow SSH access to the user grader:
$ mkdir .ssh
$ chmod 700 .ssh
$ cd .ssh/
$ touch authorized_keys
$ chmod 644 authorized_keys
After you have run all the above commands, go back to your local machine and copy the content of the public key file ~/.ssh/udacity_project.pub. Paste the public key to the server's authorized_keys file using nano or any other text editor, and save.
After that, run exit. You would now be back to your local machine. To confirm that it worked, run the following command in your local machine:
subhadeep@subhadeep-VirtualBox:~$ ssh grader@206.189.151.124 -p 2200You should now be able to log in as grader and would get a prompt to enter commands.
Next, run exit to go back to the host machine and proceed to the following step to disable root login.
-
Run the following command on your local machine to log in as
rootin the server:$ ssh root@206.189.151.124 -p 2200 -
After you are logged in, open the file
/etc/ssh/sshd_configwithnano:# nano /etc/ssh/sshd_config -
Find the line
PermitRootLogin yesand change it toPermitRootLogin no. -
Restart the SSH server:
# service ssh restart -
Terminate the connection:
# exit -
After you are back to the host machine, when you try to log in as
root, you should get an error:subhadeep@subhadeep-VirtualBox:~$ ssh root@206.189.151.124 -p 2200 root@206.189.151.124: Permission denied (publickey).
To install the Apache Web Server, run the following command after logging in as the grader user via SSH:
$ sudo apt update
$ sudo apt install apache2
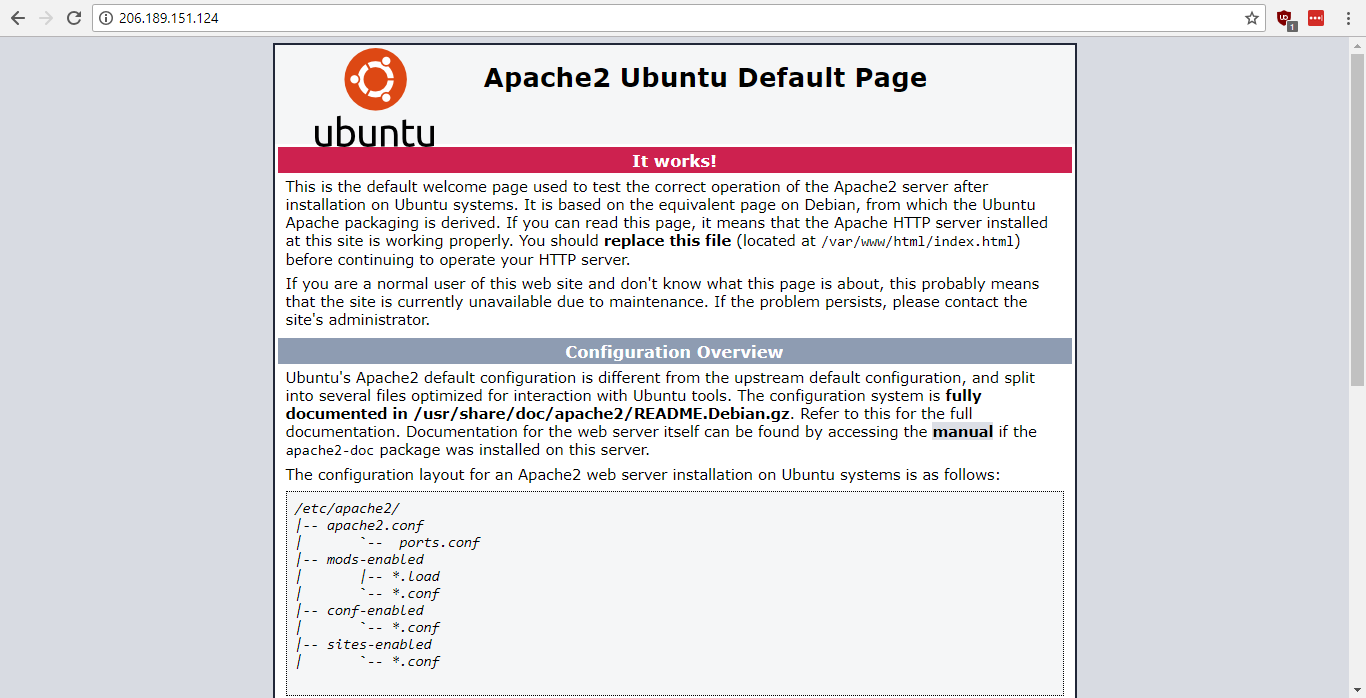
To confirm whether it successfully installed or not, enter the URL http://206.189.151.124 in your Web browser:
If the installation has succeeded, you should see the following Webpage:
The package pip or pip3 will be required to install certain packages.
If you are using Python 2, to install it, run:
$ sudo apt install python-pip
If you are using Python 3, to install it, run:
$ sudo apt install python3-pip
To confirm whether or not it has been successfully installed, run:
$ pip --version
Or
$ pip3 --version
(Run either depending upon the Python version you'd want to use.)
You should see something like this if it has been successfully installed:
pip 9.0.1 from /usr/lib/python3/dist-packages (python 3.6)
In Ubuntu 18.04, git might already be pre-installed. If it isn't, run the following commands:
$ sudo add-apt-repository ppa:git-core/ppa
$ sudo apt update
$ sudo apt install git
To continue using git, you will have to configure a username and an email:
$ git config --global user.name "Subhadeep Dey"

$ git config --global user.email "myemail@domain.com"
-
Create the file
/etc/apt/sources.list.d/pgdg.list:$ nano /etc/apt/sources.list.d/pgdg.listAnd, add the following line to it:
deb http://apt.postgresql.org/pub/repos/apt/ bionic-pgdg main -
Import the repository signing key, and update the package lists:
$ wget --quiet -O - https://www.postgresql.org/media/keys/ACCC4CF8.asc | sudo apt-key add - $ sudo apt update -
Install PostgreSQL:
$ sudo apt install postgresql-10
-
Log in as the user
postgresthat was automatically created during the installation of PostgreSQL Server:$ sudo su - postgres -
Open the
psqlshell:$ psql -
This will open the
psqlshell. Now type the following commands one-by-one:postgres=# CREATE DATABASE catalog; postgres=# CREATE USER catalog; postgres=# ALTER ROLE catalog WITH PASSWORD 'yourpassword'; postgres=# GRANT ALL PRIVILEGES ON DATABASE catalog TO catalog;
Then exit from the terminal by running
\qfollowed byexit.
The module mod_wsgi will allow your Python applications to run from Apache server.
If you are running Python 2, install it by running the following command:
$ sudo apt install libapache2-mod-wsgi
If you are running Python 3, run this:
$ sudo apt install libapache2-mod-wsgi-py3
This would also enable wsgi. So, you don't have to enable it manually.
After the installation has succeeded, restart the Apache server:
$ sudo service apache2 restart
-
Change the current working directory to
/var/www/:$ cd /var/www/ -
Create a directory called
FlaskAppand change the working directory to it:$ sudo mkdir FlaskApp $ cd FlaskApp/ -
Clone your GitHub repository of your Item Catalog application project (Flask project) as the directory
FlaskApp. For example:$ sudo git clone https://github.com/SDey96/Udacity-Item-Catalog-Project.git FlaskApp -
Change the current working directory to the newly created directory:
$ cd FlaskApp/The directory tree should now look like this:
FlaskApp └── FlaskApp ├── LICENSE ├── README.md ├── __init__.py ├── client_secrets.json ├── database_setup.py ├── drop_tables.py ├── fake_db_populator.py ├── static │ └── style.css └── templates ├── delete.html ├── delete_category.html ├── edit_category.html ├── index.html ├── items.html ├── layout.html ├── login.html ├── new-category.html ├── new-item-2.html ├── new-item.html ├── update-item.html └── view-item.html -
Install required packages:
$ sudo pip install --upgrade Flask SQLAlchemy httplib2 oauth2client requests psycopg2 psycopg2-binaryOr
$ sudo pip3 install --upgrade Flask SQLAlchemy httplib2 oauth2client requests psycopg2 psycopg2-binary(Choose either of above depending on the Python version you're using.)
-
Run the following command in terminal to set up a file called
FlaskApp.confto configure the virtual hosts:$ sudo nano /etc/apache2/sites-available/FlaskApp.conf -
Add the following lines to it:
<VirtualHost *:80>
   ServerName 206.189.151.124
   ServerAlias 206.189.151.124.xip.io
   ServerAdmin youremail@domain.com
   WSGIScriptAlias / /var/www/FlaskApp/FlaskApp/flaskapp.wsgi
   <Directory /var/www/FlaskApp/FlaskApp/>
       Require all granted
   </Directory>
   Alias /static /var/www/FlaskApp/FlaskApp/static
   <Directory /var/www/FlaskApp/FlaskApp/static/>
       Require all granted
   </Directory>
   ErrorLog ${APACHE_LOG_DIR}/error.log
   LogLevel warn
   CustomLog ${APACHE_LOG_DIR}/access.log combined
</VirtualHost>
Note: Kindly change the IP address to your own server's public IP and the email to yours.
-
Enable the virtual host:
$ sudo a2ensite FlaskApp -
Restart Apache server:
$ sudo service apache2 restart -
Creating the .wsgi File
Apache uses the
.wsgifile to serve the Flask app. Move to the/var/www/FlaskApp/directory and create a file namedflaskapp.wsgiwith following commands:$ cd /var/www/FlaskApp/FlaskApp/ $ sudo nano flaskapp.wsgiAdd the following lines to the
flaskapp.wsgifile:import sys import logging logging.basicConfig(stream=sys.stderr) sys.path.insert(0, "/var/www/FlaskApp/FlaskApp/") from application import app as application
In the above code, replace
applicationwith the name of the main module. -
Restart Apache server:
$ sudo service apache2 restartNow you should be able to run the application at http://206.189.151.124.xip.io/.
Note: You might still see the default Apache page despite setting everything up correctly. To resolve it and see your Flask app running, run the following commands in order:
$ sudo a2dissite 000-default.conf
$ sudo service apache2 restart
If you are getting an Internal Server Error or any other error(s), make sure to check out Apache's error log for debugging:
$ sudo cat /var/log/apache2/error.log
[1] https://www.digitalocean.com/community/tutorials/initial-server-setup-with-ubuntu-18-04
[2] http://terokarvinen.com/2016/deploy-flask-python3-on-apache2-ubuntu
[3] https://www.digitalocean.com/community/tutorials/how-to-deploy-a-flask-application-on-an-ubuntu-vps