This software brews beer. Well, it controls the mashing process. You can run it on a Raspberry Pi, connected to a DS18B20 temperature sensor and any relay, preferably a solid state relay. The relay connects to the heating in your mashing kettle. In this repository, you will find the server that provides all necessary REST services to control the mashing process. You can find a suitable client in the BrewControlClient repository.
Perform these tasks in sequence to get everything up and running:
- Prepare the hardware
- Prepare the operating system
- Download or compile the server
- Launch the server
- Launch the server automatically (optional)
- Launch the client
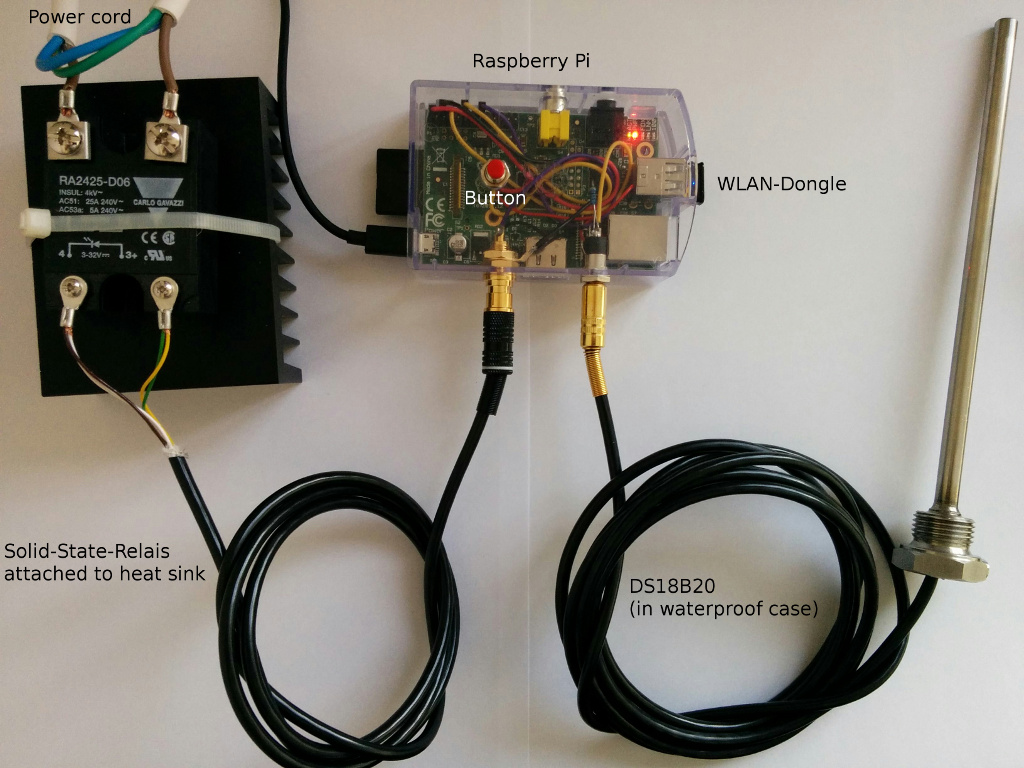
Before you can start using this software, you need to set up the hardware. You need:
- a Raspberry Pi,
- a DS18B20 1-wire Temperature Sensor and a 4.7 kOhm resistor
- any type of a relay (preferably Solid State)
- a button
To connect the devices:
- Connect the button to GPIO1 and Ground.
- Connect the Relay to GPIO4 and Ground.
- Connect the DS18B10 to the Raspberry Pi:
- Pin1 GROUND to 0V/Ground
- Pin2 DATA to GPIO7
- Pin3 POWER to 3V3
- Connect the 4k7 resistor between Pin3/3V3 and DATA/GPIO7
See the pi4j website for a pin layout.
Install the current Raspbian operating system to an SD card and boot the RaspberryPi. For more information, see the installation instructions on the Raspberry Pi website.
Next ssh into your RaspberryPi and launch raspi-config:
ssh pi@raspberrypi
sudo raspi-config
Hint: Password is 'raspberry'. Expand the file system and quit the tool.
Edit the /boot/config.txt file and add the following line at the end:
dtoverlay=w1-gpio
Edit the /etc/modules file and the following two lines at the end:
w1-gpio
w1-therm
Install java on your Raspberry Pi.
sudo apt-get install oracle-java8-jdk
If you have a supported WiFi dongle and want to set up WiFi, follow the instructions at the Raspberry Pi Documentation. This document however lacks DHCP-support which you might need. Check the documentation from Oliver Marriott for more details.
Reboot your Raspberry Pi
sudo reboot
Download the binary and copy it to your Raspberry Pi
ssh pi@raspberrypi
wget http://sebigo.github.io/BrewControlServer/target/brewcontrol-0.1.2-SNAPSHOT-executable.jar
mv brewcontrol-0.1.2-SNAPSHOT-executable.jar brewcontrol.jar
Optionally, you can build the package yourself. You need a machine with Git, Java and Maven in your PATH environment.
git clone git@github.com:SebiGo/BrewControlServer.git
cd BrewControlServer
mvn package
scp target/brewcontrol-0.1.2-SNAPSHOT-executable.jar pi@raspberrypi:~/brewcontrol.jar
Execute the jar file by running:
sudo java -jar brewcontrol.jar gpio
on the Raspberry Pi. This launches the standalone brewcontrol server. You should get something like this:
556 [main] INFO ch.goodrick.brewcontrol.BrewControl - Einmaischen at 57.0?C for 1 min (don't continue automatically).
566 [main] INFO ch.goodrick.brewcontrol.BrewControl - Eiweissrast at 55.0?C for 15 min (continue automatically).
568 [main] INFO ch.goodrick.brewcontrol.BrewControl - Maltoserast at 62.0?C for 50 min (continue automatically).
570 [main] INFO ch.goodrick.brewcontrol.BrewControl - Verzuckerungsrast at 72.0?C for 25 min (don't continue automatically).
573 [main] INFO ch.goodrick.brewcontrol.BrewControl - Abmaischen at 78.0?C for 1 min (don't continue automatically).
9340 [main] INFO org.apache.cxf.endpoint.ServerImpl - Setting the server's publish address to be http://10.31.0.40:8080/
10565 [main] INFO org.eclipse.jetty.util.log - Logging initialized @13536ms
11255 [main] INFO org.eclipse.jetty.server.Server - jetty-9.2.z-SNAPSHOT
11531 [main] WARN org.eclipse.jetty.server.handler.AbstractHandler - No Server set for org.apache.cxf.transport.http_jetty.JettyHTTPServerEngine$1@34e239
11945 [main] INFO org.eclipse.jetty.server.ServerConnector - Started ServerConnector@128bd63{HTTP/1.1}{10.31.0.40:8080}
11954 [main] INFO org.eclipse.jetty.server.Server - Started @14984ms
12054 [main] WARN org.eclipse.jetty.server.handler.ContextHandler - Empty contextPath
12227 [main] INFO org.eclipse.jetty.server.handler.ContextHandler - Started o.e.j.s.h.ContextHandler@3869f4{/,null,AVAILABLE}
12249 [main] INFO ch.goodrick.brewcontrol.sensor.SensorDS18B20 - Found and using sensor DS18B20 with ID: 28-0000067b69f6
Note the server's publish address string to enter for your client later Setting the server's publish address to be ....
Rather than gpio you may also specify:
- gpio: This really is what you want. (GPIO-Pins are used.)
- piface: This uses the Piface extension board Relay1 and Button1.
- simulate: Simulate doesn't use any physical buttons, sensors or relays, it just simulates these devices.
Note that brewcontrol requires sudo as it uses Pi4J which uses WiringPi. WiringPi requires superuser rights.
If you want the BrewControlServer to launch automatically, you have to create a start script.
Create a file as root: /etc/init.d/brewcontrol
#!/bin/bash
# /etc/init.d/brewcontrol

### BEGIN INIT INFO
# Provides:          brewcontrol
# Required-Start:    $remote_fs
# Required-Stop:     $remote_fs
# Default-Start:     2 3 4 5
# Default-Stop:      0 1 6
# Short-Description: BrewControl
# Description:       This service is used to brew beer.
### END INIT INFO

PATH=/bin:/usr/bin:/sbin:/usr/sbin
DESC="brewcontrol server"
NAME=brewcontrol
PIDFILE=/var/run/brewcontrol.pid
SCRIPTNAME=/etc/init.d/"$NAME"

test -f $DAEMON || exit 0

. /lib/lsb/init-functions


case "$1" in
        start)  log_daemon_msg "Starting BrewControlServer" "brewcontrol"
                /usr/bin/sudo /usr/bin/nohup /usr/bin/java -jar /home/pi/brewcontrol.jar gpio >> /home/pi/brewcontrol.log 2>&1 &
                echo $! > $PIDFILE
                log_end_msg $?
                ;;
        stop)   log_daemon_msg "Stopping BrewControlserver" "brewcontrol"
                killproc -p $PIDFILE $DAEMON
                RETVAL=$?
                [ $RETVAL -eq 0 ] && [ -e "$PIDFILE" ] && rm -f $PIDFILE
                log_end_msg $RETVAL
                ;;
        restart) log_daemon_msg "Restarting Brewcontrol" "brewcontrol"
                $0 stop
                $0 start
                ;;
        reload|force-reload) log_daemon_msg "Reloading BrewControlServer" "brewcontrol"
                # there is no reload method
                log_end_msg 0
                ;;
        status)
                status_of_proc -p $PIDFILE $DAEMON $NAME && exit 0 || exit $?
                ;;
        *)      log_action_msg "Usage: /etc/init.d/brewcontrol {start|stop|status|restart|reload|force-reload}"
                exit 2
                ;;
esac

exit 0
You need to make the script executable and add it to runlevel 2:
sudo chmod 755 /etc/init.d/brewcontrol
update-rc.d brewcontrol defaults
Start the client or have a look at the BrewControlClient repository for more options including a smart phone app.
Please use GitHub Issues for bugs and feature requests.
Travis CI:

coveralls.io: