React Native Push Notifications support with OneSignal integration.


- React Native OneSignal
- Breaking Change
- Note Regarding 0.39 <= React Native >= 0.40 Support
- Running Example project
- Installation
- Android Installation
- iOS Installation
- Usage
- API
- Handling Notifications
- Sending and Getting OneSignal Tags
- Getting Player ID and Push Token
- Set Email for Better Targeting
- Enable Vibration
- Enable Sound
- Set In App Focus Behavior
- Change User Subscription Status
- Check Push Notification and User Subscription Status
- Post Notification (Peer-to-Peer Notifications)
- Prompt Location
- Clear Notifications (Android Only)
- Cancel Notifications (Android Only)
- Check Push Notification Permissions (iOS Only)
- Request Push Notification Permissions (iOS Only)
- Register For Push Notifications (iOS Only)
- FAQ / Repeating Issues
- CREDITS
- TODO
Make sure you read this documentation carefully, as the usage instructions had been changed since react-native-onesignal v3.0.2.
TL;DR - Install the latest version, doesn't matter on what RN version you are.
Since version 3.0.2, this module supports backwards compatibiltiy with React Native 0.39 and below, without installing a custom version. Everyone should now update to the latest version available for this module.
For your convenience, we created an example project, based on React Native 0.41.2. You can run this project to test configurations, debug, and build upon it.
git clone https://github.com/geektimecoil/react-native-onesignalcd react-native-onesignal && cd examples && cd RNOneSignalyarn && cd ios && pod update && cd ..- Running the iOS example app:
react-native run-ios - Running the Android example app:
react-native run-android
- Add library to project
yarn add react-native-onesignal- OR
npm install --save react-native-onesignal
- Link library to project
react-native link react-native-onesignal
- Follow OneSignal's instructions on generating a Google Server API Key: https://documentation.onesignal.com/docs/generate-a-google-server-api-key
In your AndroidManifest.xml
.....

<!-- Optional - Add the necessary permissions (Choose one of those) -->

<uses-permission android:name="android.permission.ACCESS_COARSE_LOCATION"/> <!-- Approximate location - If you want to use promptLocation for letting OneSignal know the user location. -->
<uses-permission android:name="android.permission.ACCESS_FINE_LOCATION"/> <!--  Precise location If you want to use promptLocation for letting OneSignal know the user location. -->

<!-- End optional permissions -->

<application ....>
    <activity
        android:launchMode="singleTop"> <!-- Add this parameter -->
    .....
In android/gradle/wrapper/gradle-wrapper.properties
...

distributionBase=GRADLE_USER_HOME
distributionPath=wrapper/dists
zipStoreBase=GRADLE_USER_HOME
zipStorePath=wrapper/dists
distributionUrl=https://services.gradle.org/distributions/gradle-2.14.1-all.zip
In android/build.gradle
...

dependencies {
    classpath 'com.android.tools.build:gradle:2.2.2' // Upgrade gradle

    // NOTE: Do not place your application dependencies here; they belong
    // in the individual module build.gradle files
}
In android/app/build.gradle
...

android {
    ...
    buildToolsVersion "23.0.2" // NOT REQUIRED BUT RECOMMENDED - This is good for in-process dex (faster)
    ...
    defaultConfig {
        ...
        manifestPlaceholders = [onesignal_app_id: "YOUR_ONESIGNAL_ID",
                                onesignal_google_project_number: "REMOTE"]
    }
}- Open OneSignal account here: https://onesignal.com/
- Follow OneSignal's instructions on generating an iOS Push Certificate: https://documentation.onesignal.com/docs/generate-an-ios-push-certificate
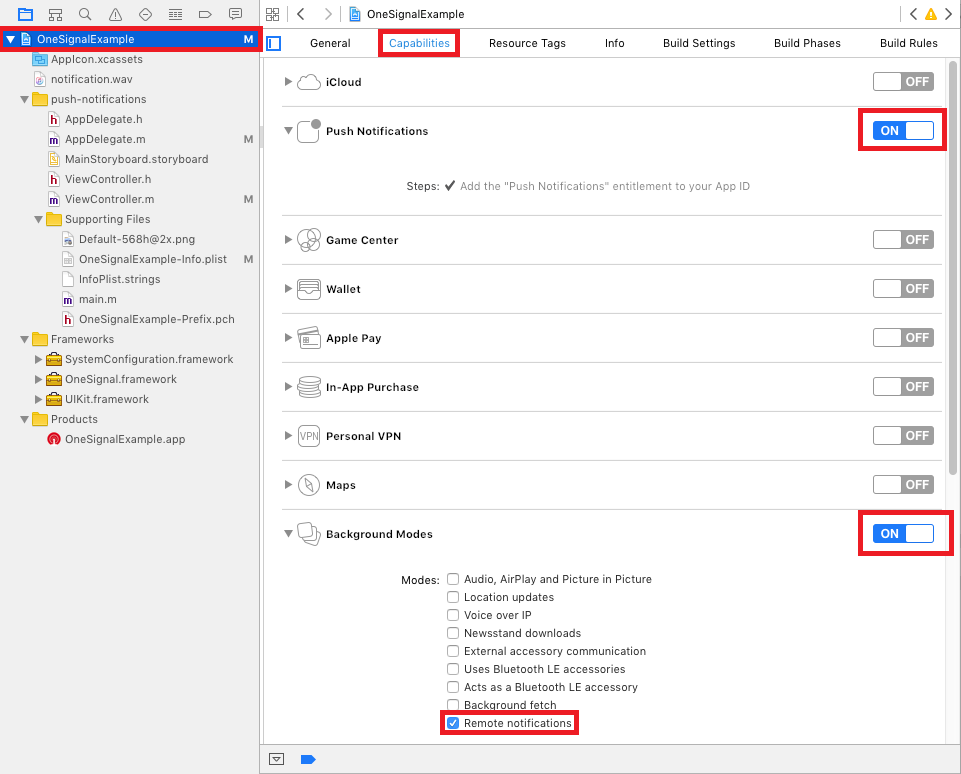
- Select the root project and Under Capabilities Enable "Push Notifications".
- Next Enable "Background Modes" and check "Remote notifications".
- Select your root project and go to
Build Settings. - Search for
Header Search Paths. - Add
$(SRCROOT)/../node_modules/react-native-onesignal/iosand set it asrecursive.
Objective-C
-
in
AppDelegate.h:-
Import
RCTOneSignal.h:#import <RCTOneSignal.h>
-
Declare the
RCTOneSignalproperty:@property (strong, nonatomic) RCTOneSignal* oneSignal;
-
-
in
AppDelegate.m:-
Synthesize
oneSignalafter@implementation AppDelegate@synthesize oneSignal = _oneSignal;
-
On the
application didFinishLaunchingWithOptionsmethod, insert the following code (replace YOUR_ONESIGNAL_APP_ID with your OneSignal app ID):self.oneSignal = [[RCTOneSignal alloc] initWithLaunchOptions:launchOptions appId:@"YOUR_ONESIGNAL_APP_ID"];
-
You can also pass settings to OneSignal to control various effects, such as whether OneSignal automatically asks for permission to send push notifications shortly after launch or not.
self.oneSignal = [[RCTOneSignal alloc] initWithLaunchOptions:launchOptions
                                                       appId:@"YOUR_ONESIGNAL_APP_ID"
                         settings:@{kOSSettingsKeyAutoPrompt: @false}];
-
Swift
- If you don't already have one, create an Objective-C Bridging header for your project (
YourProjectName-Bridging-Header.h) and import the React-Native-Onesignal library:
#import <RCTOneSignal.h>- In your AppDelegate, add the following property:
var oneSignal : RCTOneSignal!- On the
application didFinishLaunchingWithOptionsmethod, insert the following code (replace YOUR_ONESIGNAL_APP_ID with your OneSignal app ID):
func application(_ application: UIApplication, didFinishLaunchingWithOptions launchOptions: [UIApplicationLaunchOptionsKey : Any]? = nil) -> Bool {

    self.oneSignal = RCTOneSignal(launchOptions: launchOptions, appId: "YOUR_ONESIGNAL_APP_ID");
}- You can also pass settings to OneSignal to control various effects, such as whether OneSignal automatically asks for permission to send push notifications shortly after launch or not.
func application(_ application: UIApplication, didFinishLaunchingWithOptions launchOptions: [UIApplicationLaunchOptionsKey : Any]? = nil) -> Bool {

    self.oneSignal = RCTOneSignal(launchOptions: launchOptions, appId: "YOUR_ONESIGNAL_APP_ID", settings: [kOSSettingsKeyAutoPrompt : false])
}This step is optional but highly recommended. The OneSignalNotificationServiceExtension allows your application (in iOS) to receive rich notifications with images and/or buttons. If you do not follow this step, your application will not be able to show images in push notifications, and won't be able to add action buttons to notifications either.
Even if you do not have immediate plans to send push notifications containing images/action buttons, it is still recommended to follow these steps in case you ever decide to change your mind in the future.
- In Xcode, select
File>New>Target - Select
Notification Service Extensionand pressNext

- Enter the product name as
OneSignalNotificationServiceExtensionand pressFinish
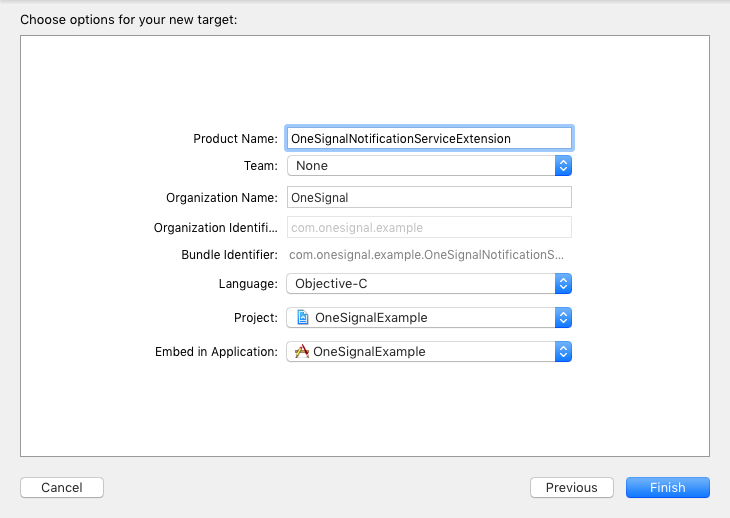
- Press
Cancelon the Activate Scheme prompt

By cancelling, you are telling Xcode to continue debugging your application, instead of debugging just the extension. If you activate by accident, you can always switch back to debug your app in Xcode by selecting your application's target (next to the Play button)
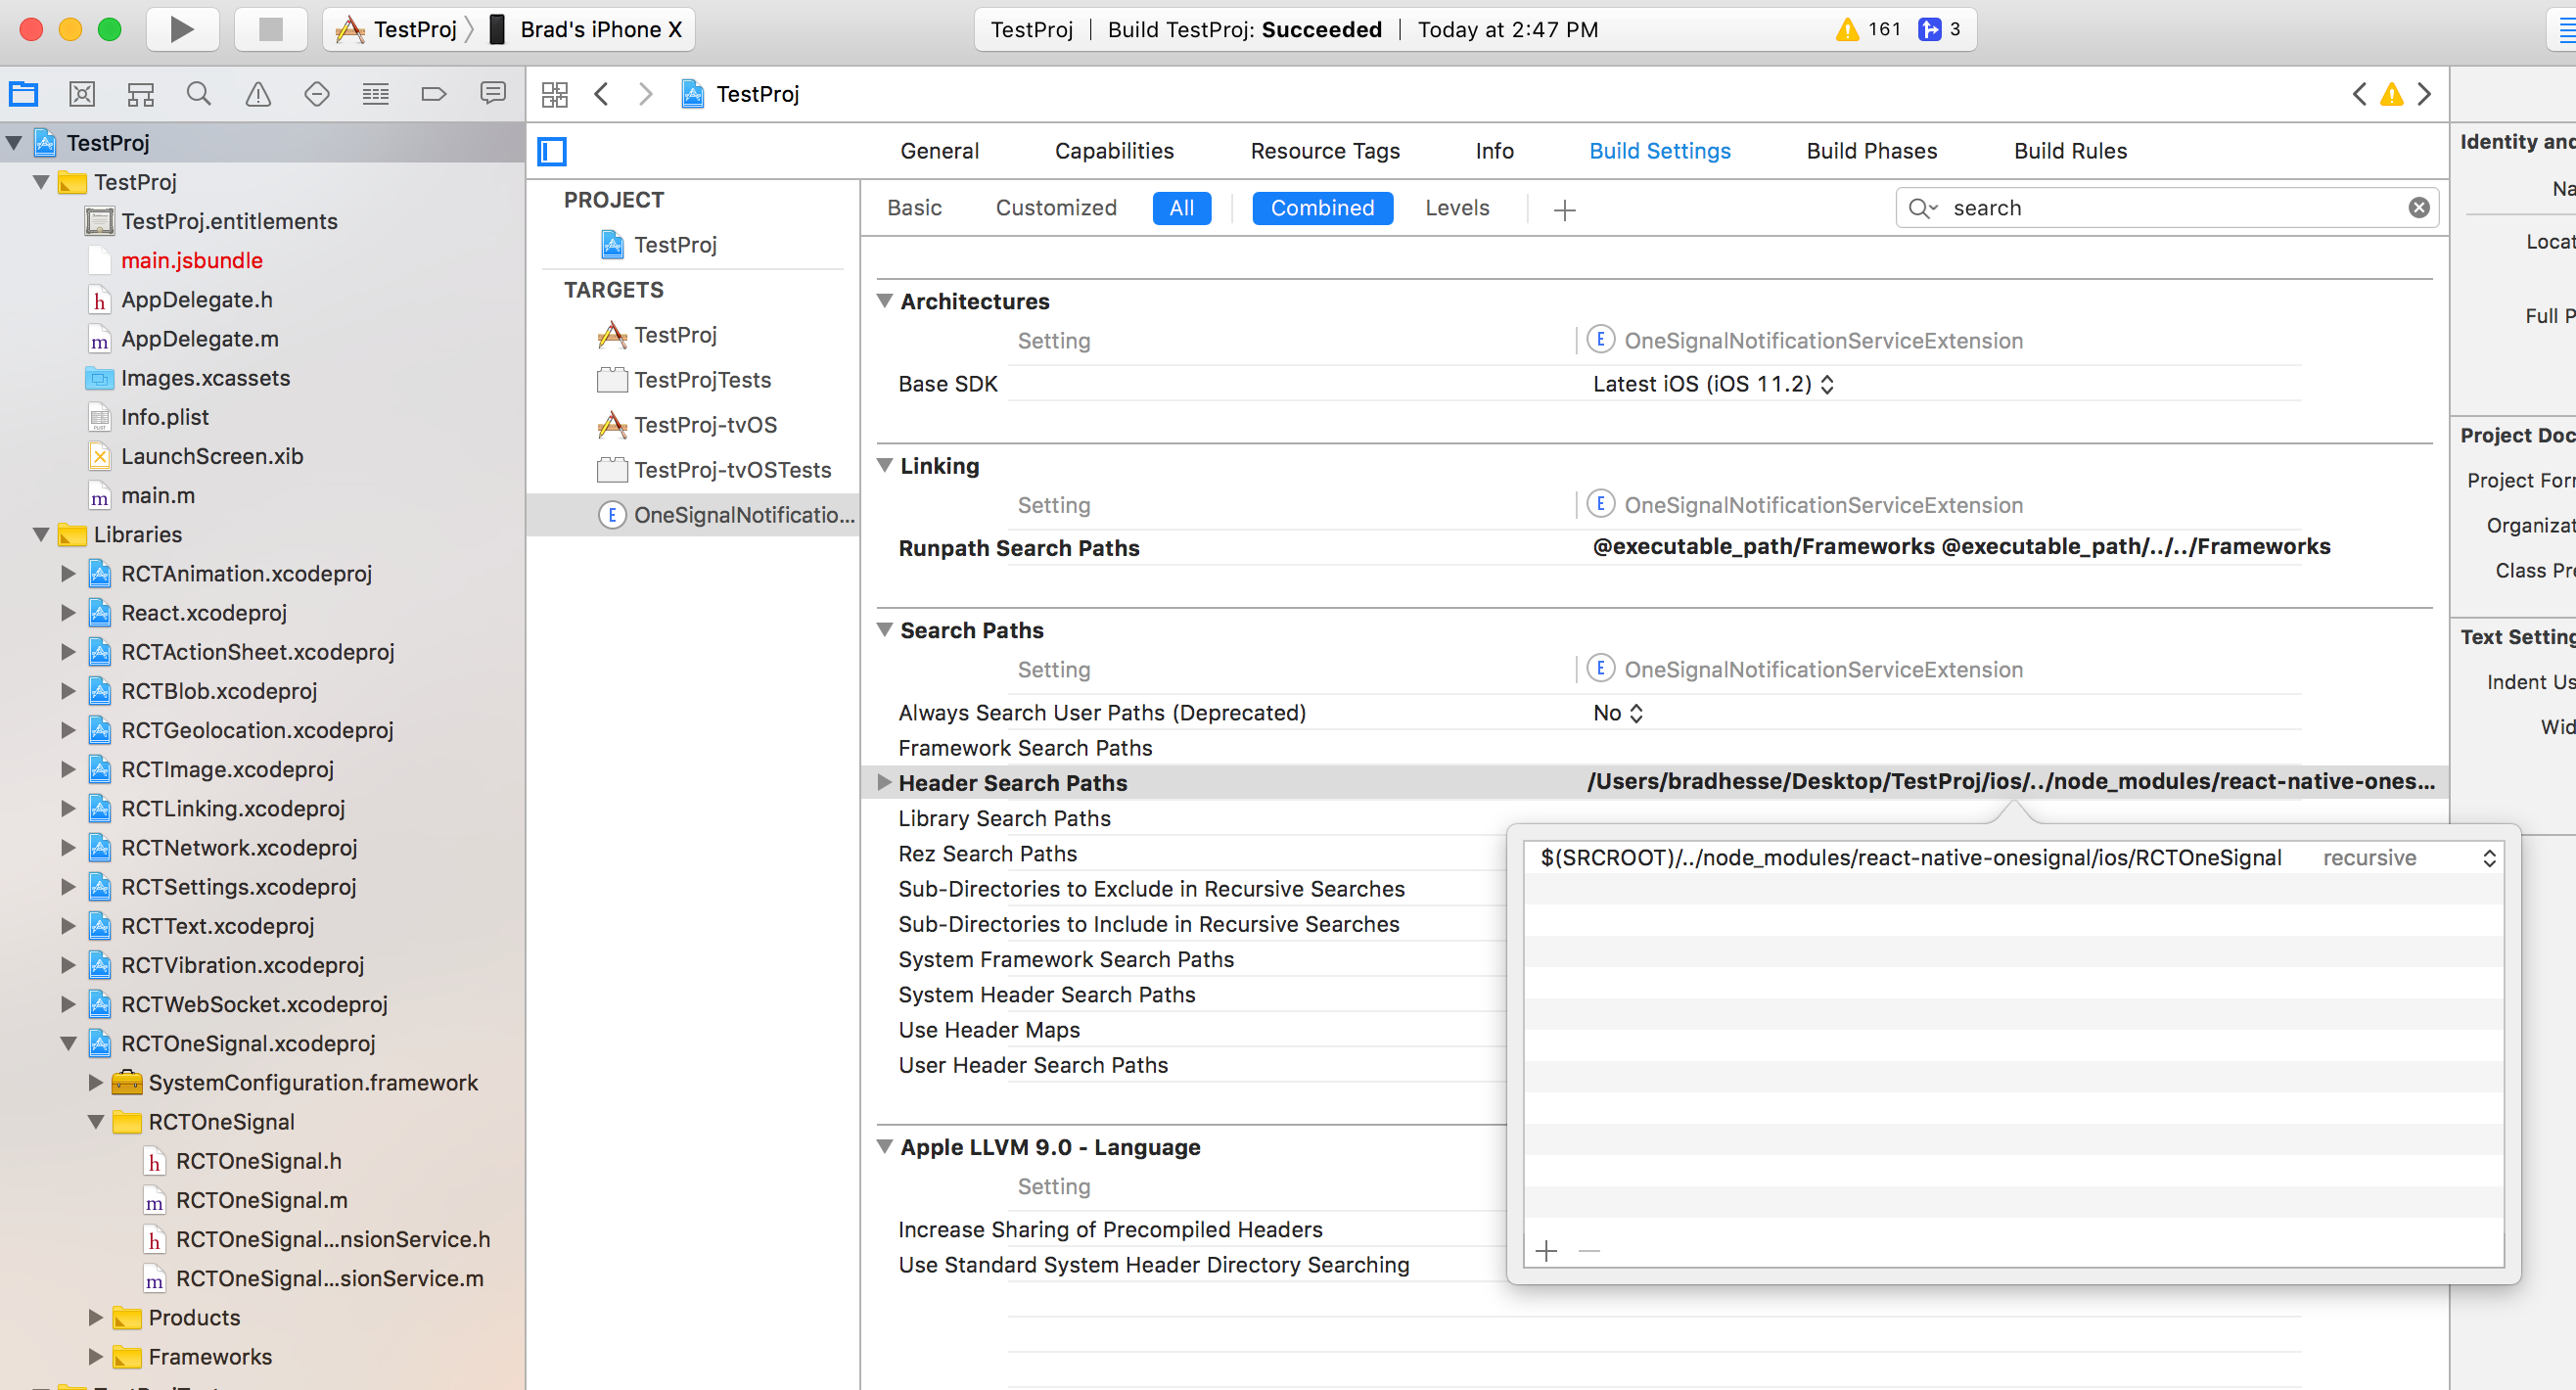
- Go to your Project Settings and select the
OneSignalNotificationServiceExtensiontarget. - Go to
Build Settingsand search forHeader Search Paths - Add
$(SRCROOT)/../node_modules/react-native-onesignal/iosand set it asrecursive
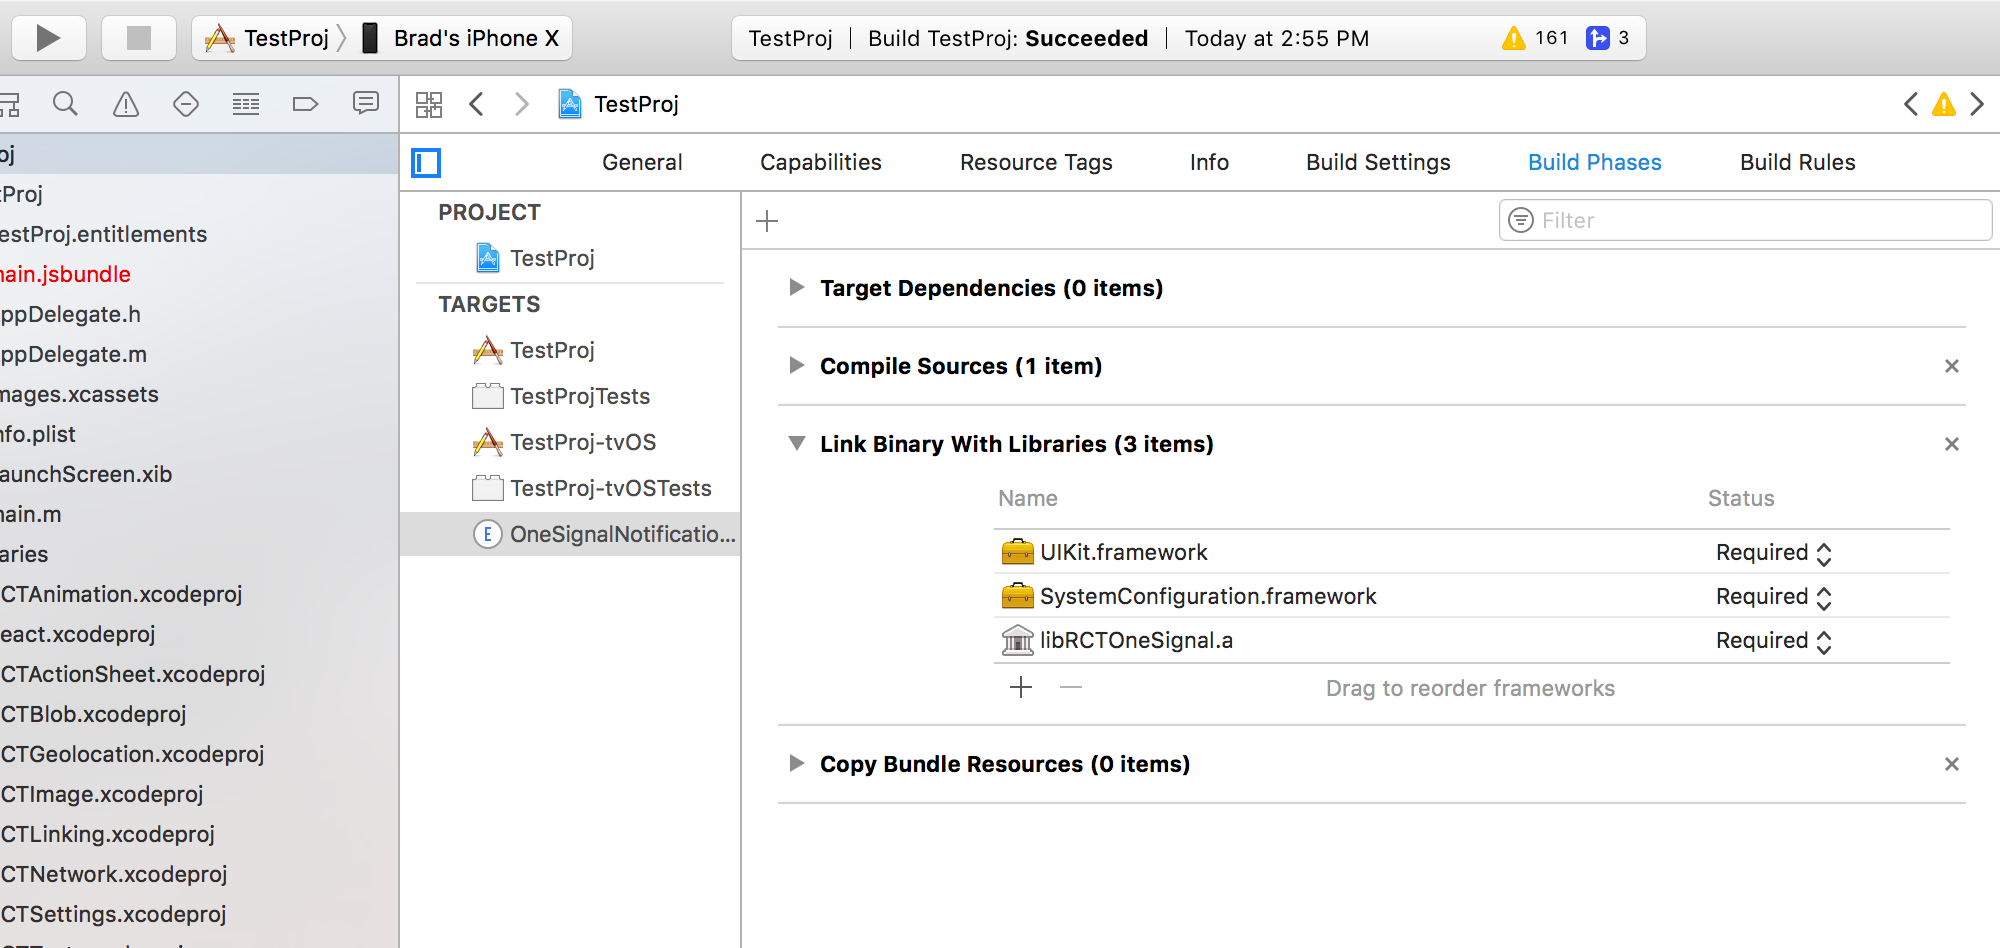
- With the
OneSignalNotificationServiceExtensiontarget still selected, select theBuild Phasestab in Project Settings - In
Link Binary with Libraries, add the following frameworks:UIKit.frameworkSystemConfiguration.frameworklibRCTOneSignal.a
- Open
NotificationServiceExtension.morNotificationService.swiftand replace the whole file contents with the code below:
Objective-C
#import <RCTOneSignalExtensionService.h>

#import "NotificationService.h"

@interface NotificationService ()

@property (nonatomic, strong) void (^contentHandler)(UNNotificationContent *contentToDeliver);
@property (nonatomic, strong) UNNotificationRequest *receivedRequest;
@property (nonatomic, strong) UNMutableNotificationContent *bestAttemptContent;

@end

@implementation NotificationService

- (void)didReceiveNotificationRequest:(UNNotificationRequest *)request withContentHandler:(void (^)(UNNotificationContent * _Nonnull))contentHandler {
    self.receivedRequest = request;
    self.contentHandler = contentHandler;
    self.bestAttemptContent = [request.content mutableCopy];

    [RCTOneSignalExtensionService didReceiveNotificationRequest:self.receivedRequest withContent:self.bestAttemptContent];

    // DEBUGGING: Uncomment the 2 lines below and comment out the one above to ensure this extension is excuting
    //            Note, this extension only runs when mutable-content is set
    //            Setting an attachment or action buttons automatically adds this
    // NSLog(@"Running NotificationServiceExtension");
    // self.bestAttemptContent.body = [@"[Modified] " stringByAppendingString:self.bestAttemptContent.body];

    self.contentHandler(self.bestAttemptContent);
}

- (void)serviceExtensionTimeWillExpire {
    // Called just before the extension will be terminated by the system.
    // Use this as an opportunity to deliver your "best attempt" at modified content, otherwise the original push payload will be used.

    [RCTOneSignalExtensionService serviceExtensionTimeWillExpireRequest:self.receivedRequest withMutableNotificationContent:self.bestAttemptContent];

    self.contentHandler(self.bestAttemptContent);
}

@end
Swift
- Make sure to create a separate Objective-C Bridging Header for your
OneSignalNotificationExtensionServiceand add the following import:
#import "RCTOneSignalExtensionService.h"- Then, replace the entire contents of
NotificationService.swiftwith the following code:
import UserNotifications

class NotificationService: UNNotificationServiceExtension {

    var contentHandler: ((UNNotificationContent) -> Void)?
    var bestAttemptContent: UNMutableNotificationContent?
    var receivedRequest : UNNotificationRequest!;

    override func didReceive(_ request: UNNotificationRequest, withContentHandler contentHandler: @escaping (UNNotificationContent) -> Void) {
        self.contentHandler = contentHandler
        bestAttemptContent = (request.content.mutableCopy() as? UNMutableNotificationContent)
        self.receivedRequest = request;

        RCTOneSignalExtensionService.didReceive(self.receivedRequest, with: self.bestAttemptContent);

        if let bestAttemptContent = bestAttemptContent {
            contentHandler(bestAttemptContent)
        }
    }

    override func serviceExtensionTimeWillExpire() {
        // Called just before the extension will be terminated by the system.
        // Use this as an opportunity to deliver your "best attempt" at modified content, otherwise the original push payload will be used.
        RCTOneSignalExtensionService.serviceExtensionTimeWillExpireRequest(self.receivedRequest, with: self.bestAttemptContent);

        if let contentHandler = contentHandler, let bestAttemptContent =  bestAttemptContent {
            contentHandler(bestAttemptContent)
        }
    }
}
Ignore any build errors at this point, the next step will import OneSignal which will resolve any errors.
In your index.android.js or index.ios.js:
import React, { Component } from 'react';
import OneSignal from 'react-native-onesignal'; // Import package from node modules
...

export default class App extends Component {

    componentWillMount() {
        OneSignal.addEventListener('received', this.onReceived);
        OneSignal.addEventListener('opened', this.onOpened);
        OneSignal.addEventListener('ids', this.onIds);
    }

    componentWillUnmount() {
        OneSignal.removeEventListener('received', this.onReceived);
        OneSignal.removeEventListener('opened', this.onOpened);
        OneSignal.removeEventListener('ids', this.onIds);
    }

    onReceived(notification) {
        console.log("Notification received: ", notification);
    }

    onOpened(openResult) {
      console.log('Message: ', openResult.notification.payload.body);
      console.log('Data: ', openResult.notification.payload.additionalData);
      console.log('isActive: ', openResult.notification.isAppInFocus);
      console.log('openResult: ', openResult);
    }

    onIds(device) {
		console.log('Device info: ', device);
    }
    ...
}When any notification is opened or received the opened and received are activated and calling their callback functions defined in the listeners, passing an OSNotificationOpenResult or an OSNotification object encapsulating the event data.
componentWillMount() {
    OneSignal.addEventListener('received', this.onReceived);
    OneSignal.addEventListener('opened', this.onOpened);
}

componentWillUnmount() {
    OneSignal.removeEventListener('received', this.onReceived);
    OneSignal.removeEventListener('opened', this.onOpened);
}

onReceived(notification) {
    console.log("Notification received: ", notification);
}

onOpened(openResult) {
    console.log('Message: ', openResult.notification.payload.body);
    console.log('Data: ', openResult.notification.payload.additionalData);
    console.log('isActive: ', openResult.notification.isAppInFocus);
    console.log('openResult: ', openResult);
}
Notification object received example:
{
    shown: true, // BOOLEAN: If the notification was displayed to the user or not
    payload: {notificationID : "", contentAvailable : false, badge : 1, sound : "default", title : "Hello!", body : "World", launchURL : "", }, // OBJECT; the push data
    displayType: 1, //The display method of a received notification
    silentNotification: false // BOOLEAN : Wether the received notification was a silent one
}We exposed the tags API of OneSignal to allow you to target users with notification later.
// Sending single tag
OneSignal.sendTag("key", "value");

// Sending multiple tags
OneSignal.sendTags({key: "value", key2: "value2"});

// Getting the tags from the server and use the received object
OneSignal.getTags((receivedTags) => {
    console.log(receivedTags);
});

// Delete a tag
OneSignal.deleteTag("key");Sync hashed email if you have a login system or collect it. Will be used to reach the user at the most optimal time of day.
OneSignal.syncHashedEmail("test@domain.com");OneSignal now allows you to send emails to your userbase. This email can be set using the OneSignal react-native SDK.
To set the email:
let emailAuthCode = ""; //Your email auth code should be securely generated by your backend server

OneSignal.setEmail("test@test.com", emailAuthCode, {(error) => {
    //handle error if it occurred
}});
If you don't want to implement email auth hashing on your backend (which is heavily recommended), you can still use the OneSignal email feature in an unauthenticated state like this:
OneSignal.setEmail("test@test.com", {(error) => {
    //handle error if it occurred
}});
If your application implements logout functionality, you can logout of the OneSignal email for this user using the logout function:
OneSignal.logoutEmail({(error) => {
    //handle error if it occurred
}});We exposed the idsAvailable API of OneSignal (both Android & iOS) as an event.
Listen for ids event and define a callback to handle the returned object.
componentWillMount() {
    OneSignal.addEventListener('ids', this.onIds);
}

componentWillUnmount() {
    OneSignal.removeEventListener('ids', this.onIds);
}

onIds(device) {
    console.log('Device info: ', device);
}We exposed the enableVibrate API of OneSignal (Android only).
You can call this from your UI from a button press for example to give your user's options for your notifications. By default OneSignal always vibrates the device when a notification is displayed unless the device is in a total silent mode. Passing false means that the device will only vibrate lightly when the device is in it's vibrate only mode.
// Setting enableVibrate
OneSignal.enableVibrate(true);We exposed the enableSound API of OneSignal (Android only).
You can call this from your UI from a button press for example to give your user's options for your notifications. By default OneSignal plays the system's default notification sound when the device's notification system volume is turned on. Passing false means that the device will only vibrate unless the device is set to a total silent mode.
// Setting enableSound
OneSignal.enableSound(true);We exposed the inFocusDisplaying API of OneSignal.
0=None- Will not display a notification, instead onlyonNotificationReceivedwill fire where you can display your own in app messages.1=InAppAlert- (Default) Will display an Android AlertDialog with the message contains.2=Notification- Notification will display in the Notification Shade. Same as when the app is not in focus.
// Example, always display notification in shade.
OneSignal.inFocusDisplaying(2);We exposed the setSubscription API of OneSignal (both Android & iOS).
You can call this method with false to opt users out of receiving all notifications through OneSignal. You can pass true later to opt users back into notifications
// Setting setSubscription
OneSignal.setSubscription(true);We exposed the getPermissionSubscriptionState API of OneSignal (both Android & iOS).
Allows you to check whether notifications are enabled for the app, whether user is subscribed to notifications through OneSignal, and what the user's in-app subscription preference is. It also provides access to pushToken and userId
// Check push notification and OneSignal subscription statuses
OneSignal.getPermissionSubscriptionState((status) => {
    console.log(status);
});We exposed the postNotification API of OneSignal, currently supports one Player ID to send a notification to. We call it internally P2P Notification, and therefore there is a special attribute to listen to while receiving the notification.
Allows you to send notifications from user to user or schedule ones in the future to be delivered to the current device.
The OneSignal documentation shows how to pass the parameters as here:
// Calling postNotification

let otherParameters = {"ios_attachments" : {"image1" : "{image_url}"}};
let data = arr // some array as payload
let contents = {
	'en': 'You got notification from user'
}
OneSignal.postNotification(contents, data, playerId, otherParameters);

// Listening to postNotification using OneSignal.Configure:
onNotificationOpened: function(message, data, isActive) {
	if (data.p2p_notification) {
		for (var num in data.p2p_notification) {
			// console.log(data.p2p_notification[num]);
		}
	}
}We exposed the promptLocation API of OneSignal.
Prompts the user for location permissions. This allows for geotagging so you can send notifications to users based on location. Note: Make sure you also have the required location permission in your AndroidManifest.xml. For iOS, make sure you set the NSLocationWhenInUseUsageDescription or the NSLocationAlwaysUsageDescription in your info.plist. (Location Always also requires the location background mode capability)
// Calling promptLocation
OneSignal.promptLocation();We exposed the clearOneSignalNotifications API of OneSignal (currently supported only on Android).
Removes all OneSignal notifications from the Notification Shade.
// Calling clearOneSignalNotifications
OneSignal.clearOneSignalNotifications();We exposed the cancelNotification API of OneSignal (currently supported only on Android).
Cancels a single OneSignal notification based on its Android notification integer id. You can get the notification Id when invoking OneSignal.onNotificationOpened while receiving a notification.
// Calling cancelNotification
OneSignal.cancelNotification(id);See what push permissions are currently enabled. callback will be invoked with a permissions object (currently supported only on iOS).
// Requesting permissions
OneSignal.checkPermissions((permissions) => {
	console.log(permissions);
});We exposed the requestPermissions method (currently supported only on iOS).
// Setting requestPermissions
permissions = {
    alert: true,
    badge: true,
    sound: true
};
OneSignal.requestPermissions(permissions);We exposed the registerForPushNotifications API of OneSignal (currently supported only on iOS).
*Call when you want to prompt the user to accept push notifications. Only call once and only if you passed @NO to kOSSettingsKeyAutoPrompt on init.
// Calling registerForPushNotifications
OneSignal.registerForPushNotifications();
The following example is from our own App and needs to be customized in order to work.
Example:
_syncOneSignal = () => {
	var allTags = {};
	var missingTags = {};

	OneSignal.getTags((receivedTags) => {
		// Find missing tags
		for (var i = this.categories.length * 1; i >= 0; i--) {
			var category = this.categories[i];
			if (!(category.slug in receivedTags)) {
				missingTags[category.slug] = category.is_push_default;
			}
			// Hash all tags for performance later on deletion
			allTags[category.slug] = category.is_push_default;
		};

		// Send missing tags if there are any
		if (Object.keys(missingTags).length > 0) {
			OneSignal.sendTags(missingTags);
		}

		// Delete tags that doesn't show up in the categories
		Object.keys(receivedTags).forEach(function(key,index) {
		    if (!(key in allTags)) {
		    	OneSignal.deleteTag(key);
		    }
		});
	});
};The following issues has been marked as repeating, therefore we decided to devote them a separate section.
> com.android.build.api.transform.TransformException: com.android.ide.common.process.ProcessException: java.util.concurrent.ExecutionException: com.android.dex.DexException: Multiple dex files define Lcom/google/android/gms/internal/zzr;Solution: Update all your Google Play Services dependencies to the latest version rather than to a specific version.
From the Google Play Services documentation: Be sure you update this version number each time Google Play services is updated https://developers.google.com/android/guides/setup#add_google_play_services_to_your_project
In android/app/build.gradle
...
dependencies {
    ...
    compile "com.google.android.gms:play-services-base:+"
    compile "com.google.android.gms:play-services-location:+"
    compile "com.google.android.gms:play-services-ads:+"
}:app:dexRelease
Unknown source file : UNEXPECTED TOP-LEVEL EXCEPTION:
Unknown source file : com.android.dex.DexException: Multiple dex files define Landroid/support/v7/appcompat/R$anim;Solution: Upgrade your gradle to properly handle the dex tasks:
In android/build.gradle
...
dependencies {
    classpath 'com.android.tools.build:gradle:2.2.3'

    // NOTE: Do not place your application dependencies here; they belong
    // in the individual module build.gradle files
}
In android/gradle/wrapper/gradle-wrapper.properties
distributionBase=GRADLE_USER_HOME
distributionPath=wrapper/dists
zipStoreBase=GRADLE_USER_HOME
zipStorePath=wrapper/dists
distributionUrl=https://services.gradle.org/distributions/gradle-2.14.1-all.zipPlease double check the iOS Installation section as missing a step or entering an incorrect path will create these errors.
If you have both react native maps and react-native-onesignal make sure you compile react-native-maps in the following way (android/app/build.gradle).
compile(project(':react-native-maps')){
    exclude group: 'com.google.android.gms', module: 'play-services-base'
    exclude group: 'com.google.android.gms', module: 'play-services-maps'
  }
  compile 'com.google.android.gms:play-services-base:+'
compile 'com.google.android.gms:play-services-maps:+'If you have detached from Expo or CRNA, you might need to change the versions of Google Play Services that this library is using to make it work nicely with ExpoKit (as of SDK23). See this issue.
When you install react-native-onesignal it will automaticly include a specific version of the OneSignal iOS native SDK that is known to work with it. Only follow the instructions below if there is a native OneSignal SDK fix you need that isn't included already in the latest react-native-onesignal update.
- Download the latest OneSignal iOS native release.
- In XCode, delete
OneSignalNativeSDKunderLibraries/RCTOneSignal.xcodeproj - Press "Move to trash"
- Create a new
OneSignalNativeSDKfolder undernode_modules/react-native-onesignal/ios/. - From the downloaded iOS native release, copy all .h and .m files from the
iOS_SDKfolder and put them in toOneSignalNativeSDK. - Drop and drag this new
OneSignalNativeSDKfolder under theRCTOneSignal.xcodeprojin Xccode. - Select "Create groups" and check RCTOneSignal and press Finish.
Please see the examples/RNOneSignal/redux-index.js file for example code and comments. Note that it will not compile, but instead serves as a template for how to handle Redux integration in general, and specifically including the edge case for intercepting the onOpened event when a User taps a push notification and prompts the app to open from a previously unopened state.
Thanks for all the awesome fellows that contributed to this repository! @danpe, @lunchieapp, @gaykov, @williamrijksen, @adrienbrault, @kennym, @dunghuynh, @holmesal, @joshuapinter, @jkasten2, @JKalash
- Tell us?