| description | title | keywords | image | slug | last_update | |||||||||
|---|---|---|---|---|---|---|---|---|---|---|---|---|---|---|
Getting Start with FUXA |
Getting Start with FUXA - Web Based SCADA Tool |
|
/reTerminal-DM_intro_FUXA |
|
Supervisory Control and Data Acquisition (SCADA) is a critical system in industrial settings designed to monitor and control processes. It serves as a centralized platform that gathers real-time data from various sensors and devices across the industrial network. SCADA enables operators to visualize, analyze, and respond to this data, facilitating efficient decision-making. Additionally, it provides remote access and control capabilities, allowing operators to manage processes from a central location. The integration of SCADA enhances the overall efficiency, safety, and reliability of industrial operations by providing a comprehensive overview and control of the entire system.
FUXA stands as a robust web-based software, enabling the swift creation and deployment of scalable SCADA, HMI, Dashboard, or IIoT systems. With FUXA, you have the capability to craft contemporary process visualizations tailored to your machines, showcasing real-time data and controlling instruments in automated industrial plants.
Before you start this project, you may need to prepare your hardware and software in advance as described here.
| reTerminal DM |
|---|
 |
We recommend installing the Bullesye version of Raspberry Pi 64 bit OS from their official website. If you prefer to install a new Raspbian OS, please follow the steps outlined in this guide
:::note
Need to have installed Node Version 14.21.3. Execute below commands one by one in terminal.
:::
wget https://nodejs.org/dist/v14.21.3/node-v14.21.3-linux-arm64.tar.xz

tar -xf node-v14.21.3-linux-arm64.tar.xz

cd node-v14.21.3-linux-arm64

sudo cp -R * /usr/local/

node -v

npm -v
Next Install FUXA from NPM
sudo npm install -g --unsafe-perm @frangoteam/fuxa

sudo fuxa
FUXA UI will be available using the URL: http://localhost:1881.
Principally FUXA web server performs two page:
- Visualization for end-user http://localhost:1881/home
- Editor to project and design http://localhost:1881/editor
To establish a connection with a device, the first step is to obtain the necessary device credentials. FUXA boasts support for a range of devices, including Modbus RTU/TCP, Siemens S7 Protocol, OPC-UA, BACnet IP, MQTT, and Ethernet/IP (Allen Bradley). Once connected to a device, you can proceed to configure subscriptions for live values, Tags, Sensors, and more.
Step 1
Navigate to the settings menu and select "Connections" to access the device settings.

Step 2
Click on the "+" icon located at the bottom of the screen.

Step 3
In this example , we are going to connect MQTT server .Depending on your device type (Modbus RTU/TCP, Siemens S7 Protocol, OPC-UA, BACnet IP, MQTT, or Ethernet/IP), choose the appropriate connection type.
For more details Click Here
Select the device type, set the polling interval to your desired number of seconds, and enable it. Then, provide the necessary credentials to the server, including the address, client ID, username, and password.

Step 1
Following that, you'll observe a green indicator confirming the successful connection to the MQTT server. Subsequently, click on the attach icon.

Step 2
Click on the "+" icon to add an MQTT broker. Subscribe to relevant topics, and then proceed by clicking on the search icon.
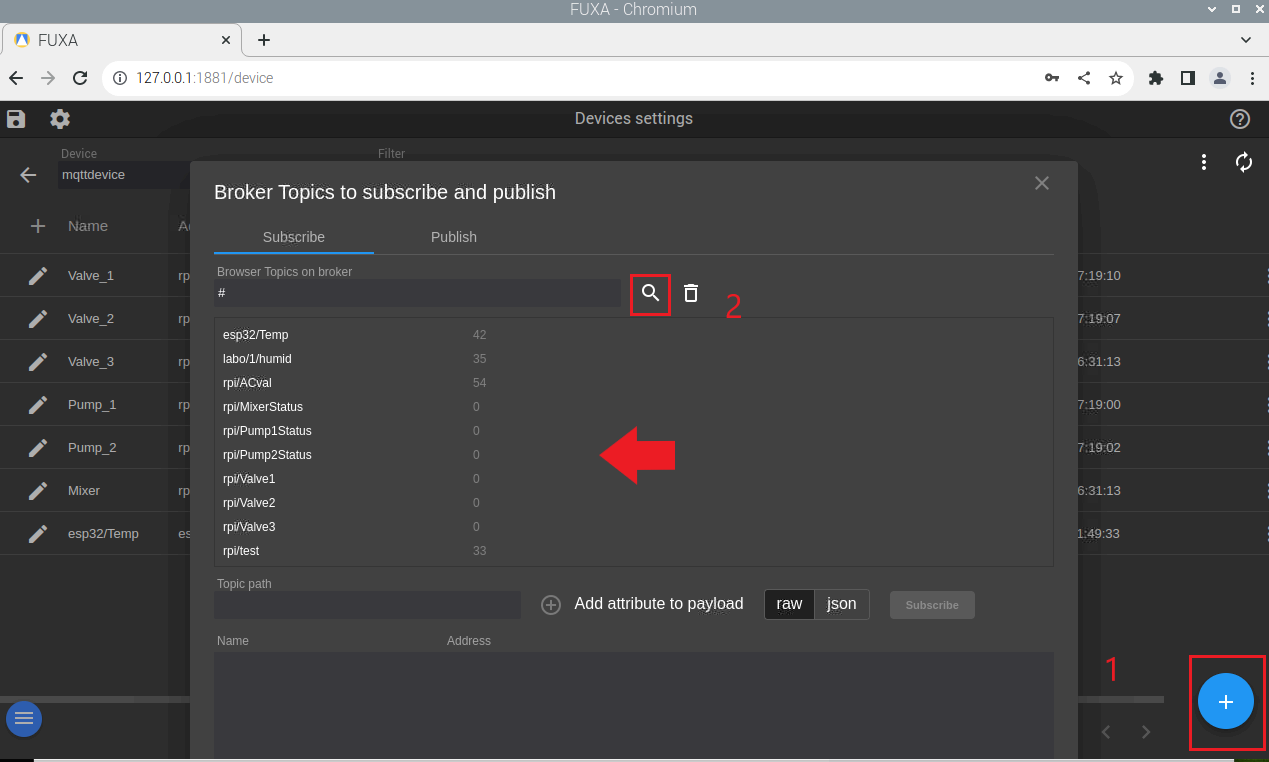
Step 3
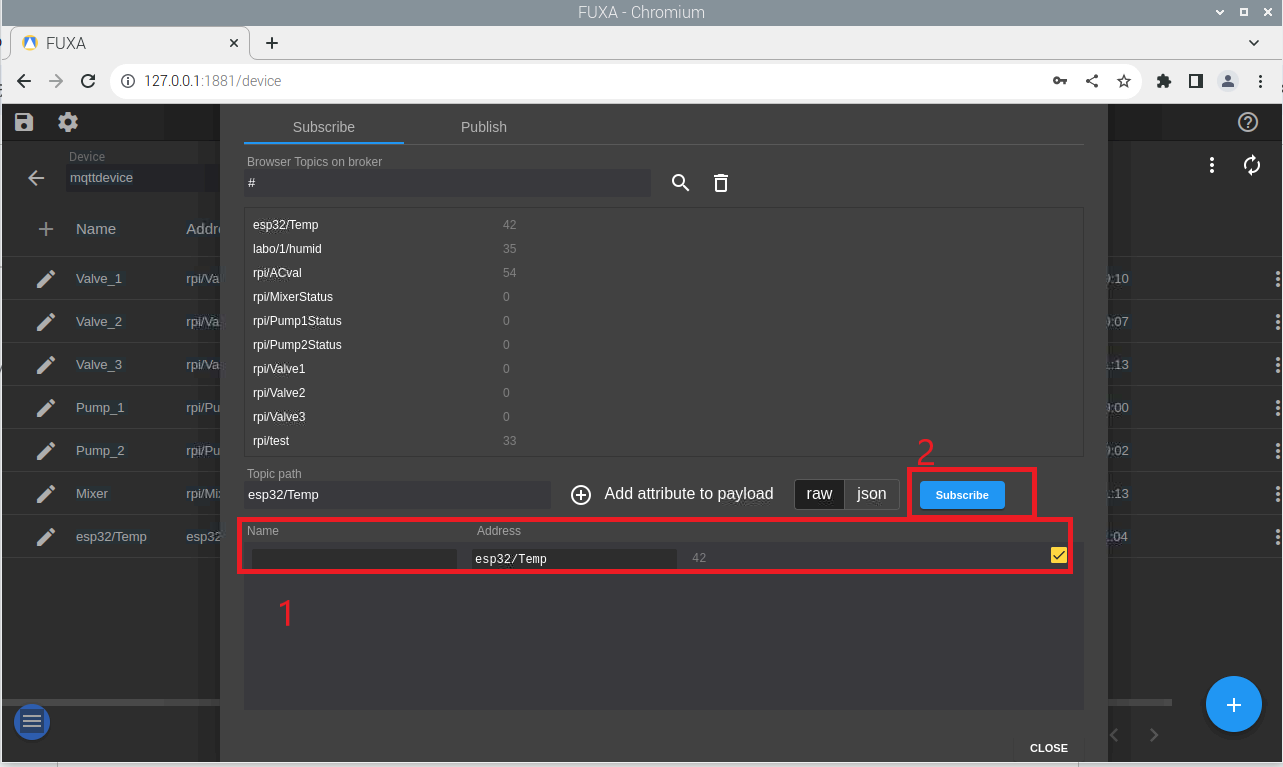
Next, choose the desired topic from the list for subscription. Provide a name and click on "Subscribe." You have the flexibility to add multiple topics for subscription.
To publish a topic, you need to specify it. Provide a name for identification and specify the topic.
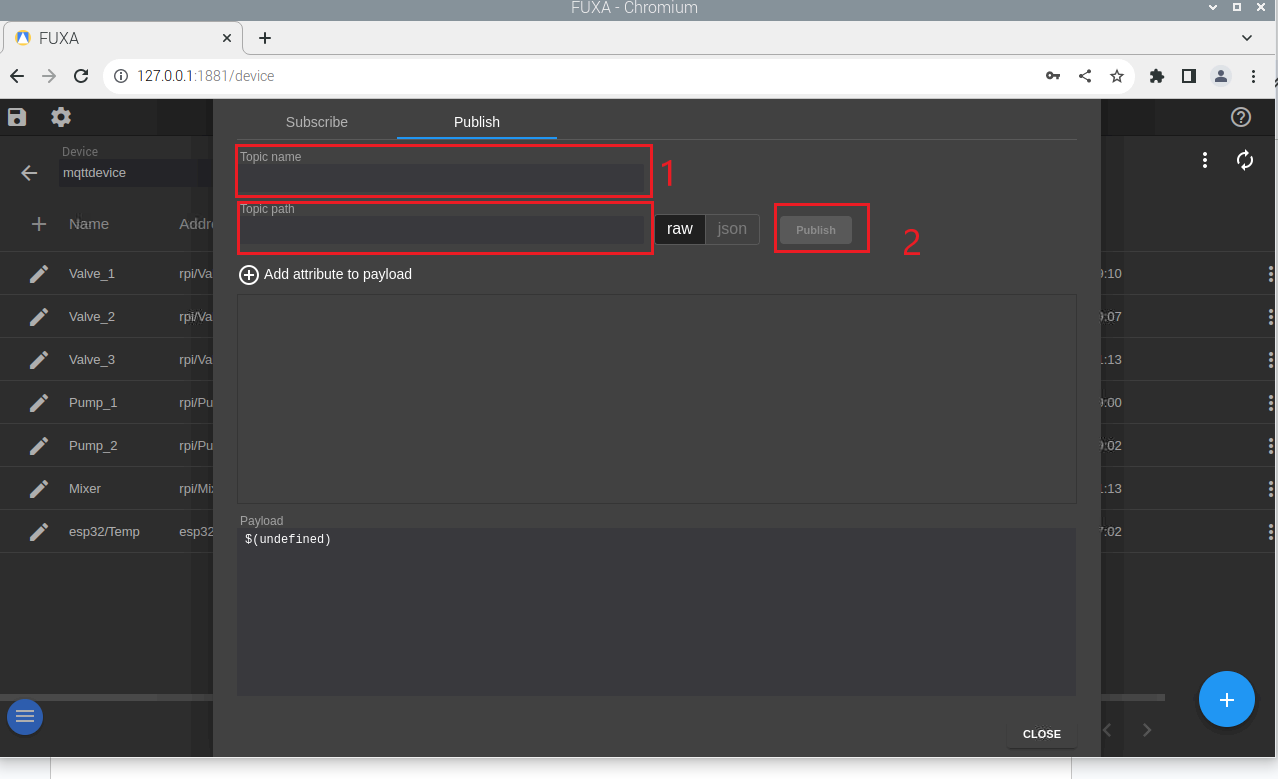
Afterward, you will have a list of topics, allowing you to choose whether to publish or subscribe.
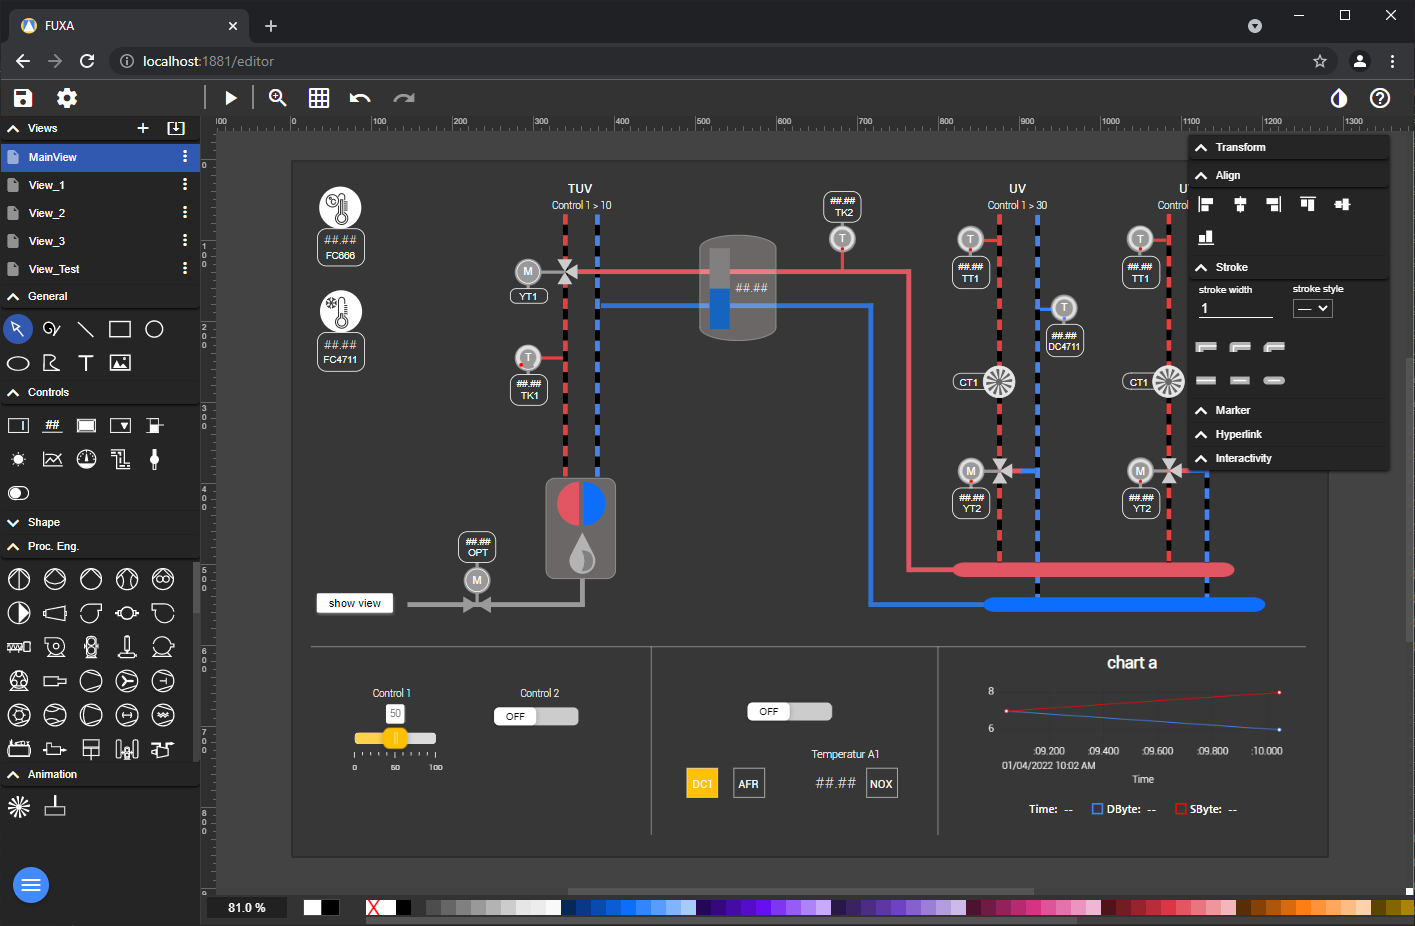
In this example, we'll bind the controllers to the device tag. The Control tab offers various features for inputting values, and in this case, we'll use a slider. The slider can be customized to suit your specific requirements.
In your system, there might be sensor values to showcase. For this purpose, you can utilize tools like Circular Gauge, Bar Gauge, etc. For the purpose of this demonstration, we will employ the Circular Gauge, which can be found under the Controls tab.
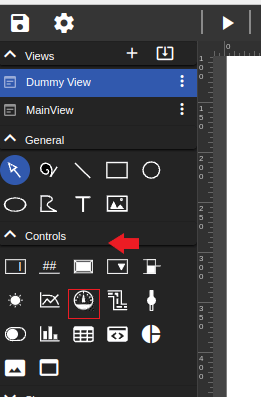
Next, you will encounter an interactive user interface to modify your circular gauge. Choose the tag and customize it according to your preferences. You have the option to divide it into subdivisions, assign colors to these divisions, and even change the text position, among other customization features.

In this section, you'll discover a wealth of process engineering components such as pumps, motors, blowers, tanks, mixers, and more. For our demonstration, we'll focus on setting on and off colors for a pump. Simply select the relevant tag and specify the colors for both on and off situations.
First you design your pipe form and then you define the action by bind the Device-Tag (Variable) with the animation.
To add a Chart Control to a View. going in editor and select the View.
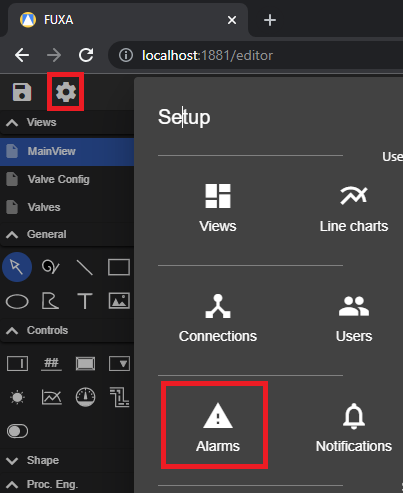
To add an alarm, you need to navigate to the settings in the editor window and select Alarms.
Next, there are a few options for setting alarms: High-High, High, Low, and Messages. In High-High,we can set the threshold value and configure alarms. In High, when a value exceeds a certain range, we can set alarms between two critical points. Message is a notification that pops up and vanishes when a value reaches a certain threshold. Low is triggered when sensor data falls below a certain level, for example, when the tank liquid level is low. We can also set alarms for two critical set points in this scenario. In this example, we will demonstrate the functionality of High-High and Message alarms working phenomenally.
To view the alarms, you may need to adjust the layout slightly because it's hidden by default. To do that, go to the Layout and navigate to the Header Navigation Bar.

Then, ensure that Alarms notification mode is set to fixed and Info notification mode is also set to fixed. This configuration allows you to view the alarm notifications when operating the SCADA system.


In this comprehensive demonstration, the setup includes three tanks, with two of them filled with various solutions. Additionally, two independent valves and pumps are present to transfer the solutions into a mixing tank. Following the mixing process, a separate valve is in place to obtain the resultant solution. Throughout this operation, the temperature of the mixing tank is continuously monitored.
We extend our sincere gratitude to the frangoteam for their support and guidance throughout the creation of this wiki. For more details on the FUXA project, please refer to the resources tab below.
- [Web Page] FUXA Official Documentation
Thank you for choosing our products! We are here to provide you with different support to ensure that your experience with our products is as smooth as possible. We offer several communication channels to cater to different preferences and needs.