Connecting a Motorized Slide Pot to Spacebrew and Unity
This tutorial will walk through setting up a simple mixed reality game using a motorized slide pot connected to Spacebrew. Motorized slide pots are simple slide potentiometers belt-driven by DC motors. The motor allows the slide to be pulled into specific positions. Reading from the potentiometer and powering the motor work as if they were independent parts making it quite simple to wire up and run.
For this tutorial we will be using the motorized slide pot to control our virtual avatar. We will be making a second controller with a potentiometer to control the movement of our avatar. For the sake of our demo, a second raspberry pi is required, but the Spacebrew cloudSlider can also work as an input device. This tutorial will also focus on using the MCP3008 ADC to convert analog signals to digital but the schematics for building your own simple ADC circuit is provided.
Hardware needed:
- 1x Raspberry Pi
- 1x Motorized Slide Pot
- 1x Motor HAT
- 1x MCP3008 ADC (or see below for components to create an ADC circuit)
- 1x Additional Raspberry Pi (optional)
- 1x Additional MCP3008 ADC (optional)
- 1x 10k pot (optional)
- 1x Pi Cobbler Plus Breakout Cable (optional)
If you do not to have an MCP3008 or decide to build your own ADC circuit, you will also need:
- 1x 100nf capacitor
- 2x 100k ohm resistors
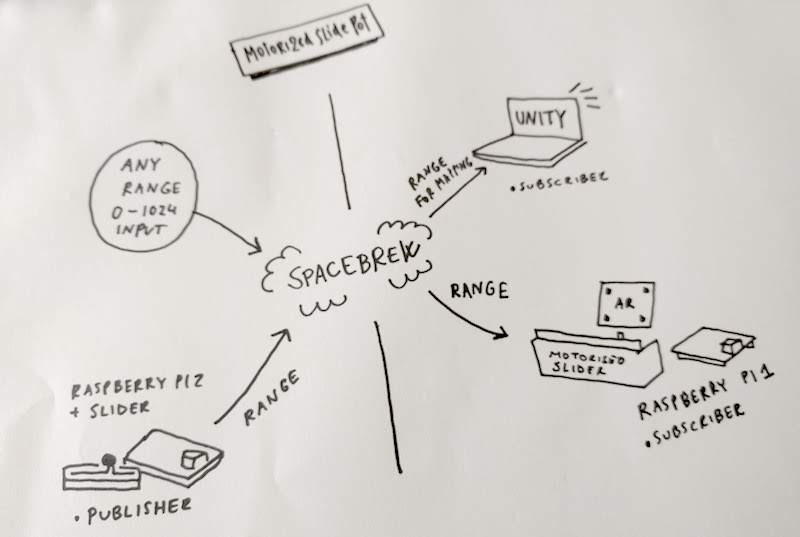
The slide pot will subscribe to a Spacebrew publisher and be controlled externally by the values sent through Spacebrew.
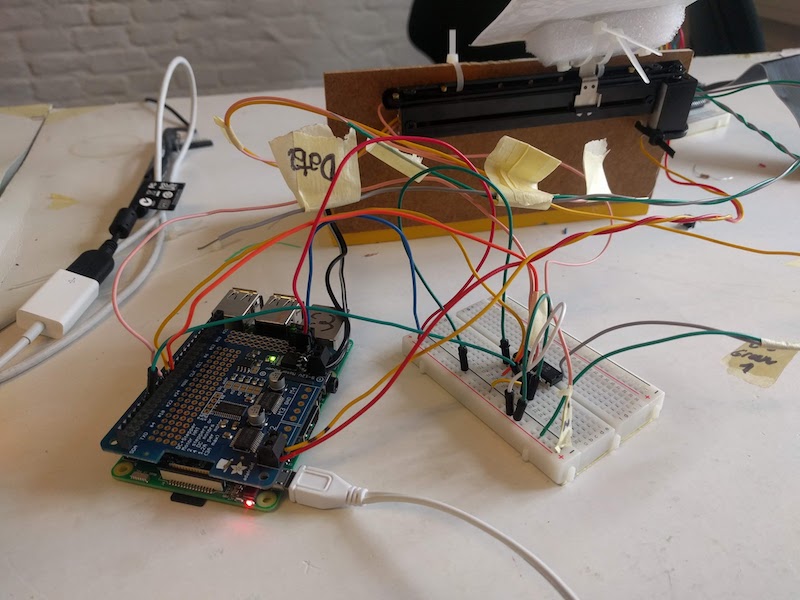
- Attach the motor hat to the raspberry pi board following this guide from Adafruit. Solder wire housing to make connecting components easier if desired. The motor hat will make controlling the slide pot's built in DC motor easier. This step is not necessary but our sample code provided will use the Adafruit Motor Hat library for python to control the motor.
- Attach the MCP3008 ADC to the motor hat following this guide from Adafruit. Make sure to follow through all the steps and download the python libraries needed to access the ADC. This tutorial used the software SPI and the code will reflect that. The hardware SPI may be used but the code must be updated (as seen in the Adafruit guide)
NOTE: If you will be building your own ADC circuit instead of using the MCP3008, follow this guide
-
Attach the potentiometer to the ADC by connecting terminals 1 and 3 to power and ground respectively and terminal 2 to channel 0 on the ADC. If connected properly, the value of the pot can be read by the ADC python library using mcp.read_adc(0)
-
Attach the pot's DC motor to the motor hat using M1 and ground. Attach the motor hat to a power source and check that the green power light on the hat turns on. If you find the potentiometer is sliding in the undesired direction, simply switch the two wires. If you downloaded the full github repository for the MCP python library, you can now run one of the examples to check if the motor is powering the belt-drive. The code will simply pull the slide one way or another but it's a quick way to check if everything has been wired correctly.
-
Run the provided code to setup the slide pot as a subscriber. Using the Spacebrew web interface, check to see that the subscriber appears.
- Open up the Spacebrew cloudSlide web interface to start a new client
- In another tab, navigate to the spacebrew page and connect the recently opened cloudSlide publisher to the subscriber created in step 1
- Adjust the top slider (slider1) in the cloudSlide interface, the motorized slide pot should move to match the position of the web slider. If the directions are flipped, simply swap terminals 1 and 3 of the slide pot.
- Attach paper with image from the Mixed Reality Hardware Toolkit to the top of the motorized slide pot. This will be the tracker for your in game avatar.
- Run the provided unity project.
- Direct your camera at the motorized slider so that it recognizes the image and your avatar appears.
- Have your friends throw objects at the motorized slide and move your digital avatar with the web controller to avoid them!
Optional avatar parallax effect: Add this code to adjust the movements of the in game avatar. The parameters passed into the second and third arguments of the Map function can be changed to alter the sensitivity of the avatar's movement. Increasing the range will cause the avatar to make wider movements allowing the avatar to fill wider spaces.
public static float Map (float from1, float to1, float from2, float to2, float value) {
    return (value - from1) / (to1 - from1) * (to2 - from2) + from2;
}

public void OnSpacebrewEvent(SpacebrewClient.SpacebrewMessage _msg) {
    if (_msg.name == "Capsule") {
        GameObject go = GameObject.Find("BaseBoARd/YourObjectsGoHere/Capsule2");
        int x = int.Parse(_msg.value);
        float objectPos = Map(0f, 1024f, 100f, -100f, (float)x);
        float yPos = go.gameObject.transform.position.y;
        float zPos = go.gameObject.transform.position.z;

        go.gameObject.transform.position = new Vector3(objectPos, yPos, zPos);
    }

}
This is the optional step for setting up an external controller with another Raspberry Pi.
- Follow steps 1a - 1c on your second pi NOTE: You will need to install the libraries again on this pi as it is a different board.
- Run the provided code to send the value of your potentiometer controller to spacebrew.
- In the spacebrew web interface, connect the newly created publisher to the subscriber created in step 1
- The motorized slide pot should now match the movements of your second potentiometer.
- Play the game with your friends, this time using a physical controller!
