
ServiceStack's new TypeScript React App VS.NET template offers the current Gold Standard for developing modern JavaScript Apps in VS.NET with the just released:
- TypeScript 1.8 - Superset of JavaScript with optional typing, advanced language features and down-level ES5 support
- JSPM - JavaScript Package Manager supporting SystemJS modules and multiple npm and GitHub repositories
- typings - Package manager to search and install TypeScript definition files
- React - Simple, high-performance JavaScript UI Framework utilizing a Virtual DOM and Reactive Data flows
- Gulp - Task runner for server and client packaging, bundling, minifying and deployments
Providing a great base for the development of large-scale, JavaScript Apps that's further enhanced by a great development experience within Visual Studio.
Download and install the latest TypeScript 1.8+ for your IDE:
The TypeScript Single Page App templates are optimized for VS.NET 2015's support for tsconfig.json
If you haven't already, you also need to install the ServiceStackVS VS.NET Extension containing the VS.NET template.

As with most modern JavaScript Apps we're leveraging an npm-based build system which are increasingly being split into hundreds of micro modules (often only containing a single function). The immediate impact of this is that creating a template can take minutes, so it's a good time to sit back, relax and continue ahead read the rest of this guide :)
For the purposes of this guide we'll assume you've created a project called NetworkedShapeCreator which we'll walk through creating the final Networked Time Travelling Shape Creator example seen below:
To help familiarize with these modern technologies we've published an in-depth step-by-step guide for beginners that starts off building the simplest HelloWorld TypeScript React App from scratch then slowly growing with each example explaining how TypeScript, React and Redux can be used to easily create more complex Apps.
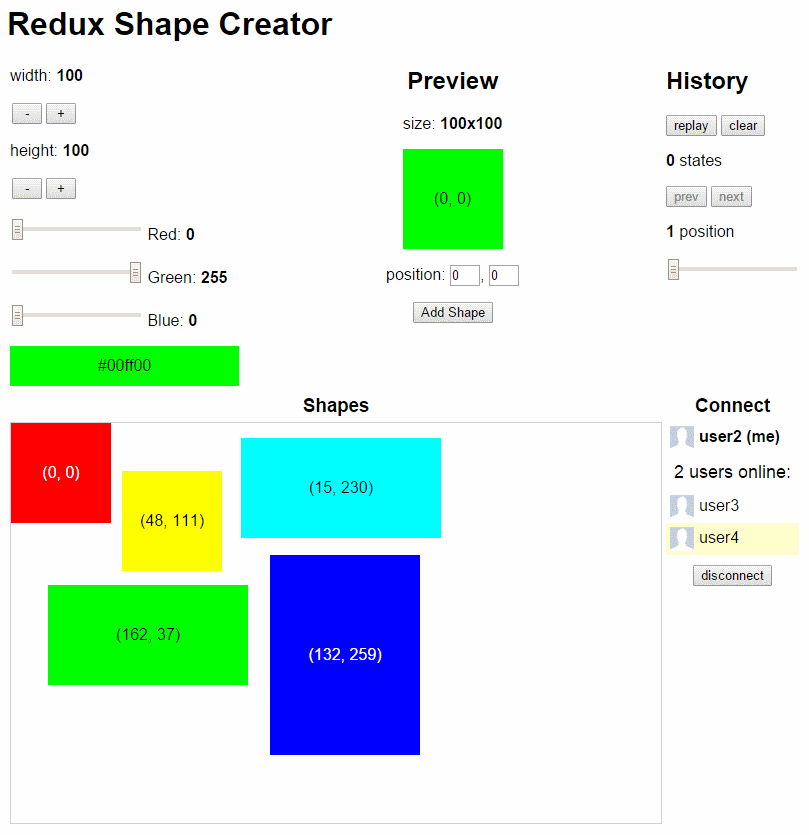
Live Demo: http://redux.servicestack.net
If you need to refer to it, the source code for this guide is available from the /src folder of this GitHub Repository.
Even after the template is loaded in Visual Studio you'll need to wait until npm completes:

After it successfully completes you can Rebuild + Run the solution to see a working client/server Hello World App:

If one of the many npm packages happens to fail to install during the creation of the template, the easiest way to resolve the issue is to delete npm's node_modules folder and in a command prompt from your NetworkedShapeCreator Web App project folder, run:
npm install
If there's still an issue we recommend deleting the solution folder and re-creating the VS.NET Template again.
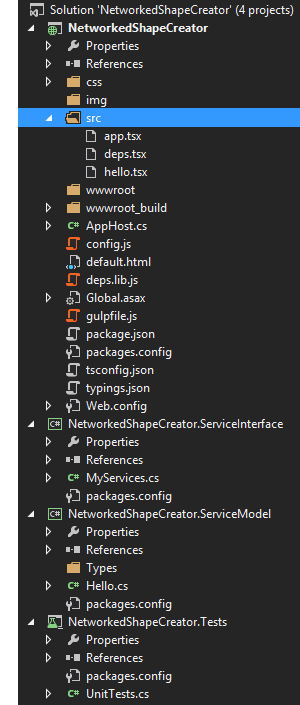
The resulting project structure is similar to other ServiceStackVS Single Page App VS.NET Templates which follows our Recommended Physical Project Structure:
- NetworkedShapeCreator - Complete Web App, inc. all .ts/.tsx, .js, .css, imgs, etc.
\src- Should contain all TypeScript source files used in your Client App\wwwroot- Where the packaged app is staged to ready for deployment\wwwroot_build- Scripts and production config used for packaging and deployment
- NetworkedShapeCreator.ServiceInterface - ServiceStack Service Implementations
- NetworkedShapeCreator.ServiceModel - Request and Response DTO's
- NetworkedShapeCreator.Tests - NUnit Tests
The primary NetworkedShapeCreator project contains the complete React Web App hosted in an ASP.NET Project.
It includes gulpfile.js which provides the necessary Gulp tasks to bundle and optimize the Wep Application
ready for deployment.
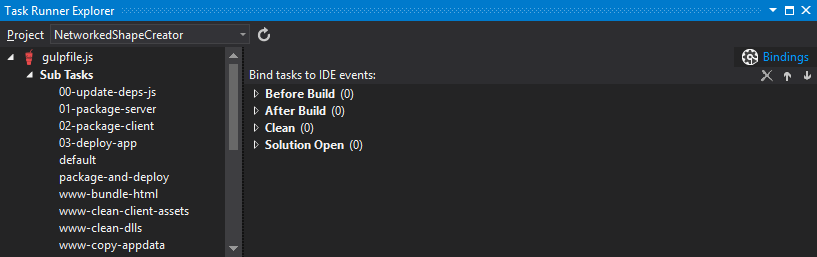
The primary Gulp Tasks you'll use to package and deploy your App are prefixed with a number in the logical order they're run in and sorted at the top of VS .NET's Task Runner Explorer which is built into VS 2015:
- 00-update-deps-js - Used to regenerate deps.lib.js from deps.tsx for reducing number of HTTP requests sent on each refresh
- 01-package-server - Used for building and staging the server components of your application
- 02-package-client - Used to compile and stage your client side resources ready for deployment
- 03-deploy-app - Deploys your application using msdeploy and config.json found in
wwwroot_build/publish - default - The default task that builds and stages your application
- package-and-deploy - Perform all tasks to build, stage and deploy your application
You can double-click the task name to run that specified task.
All other tasks below package-and-deploy starting with a www- prefix contain the individual granular tasks
the high-level tasks above call upon to accomplish their respective tasks.
Despite having a working App we also have our first problem where you'll witness a noticeable delay in rendering Hello World? Checking the network requests tab shows the root cause:
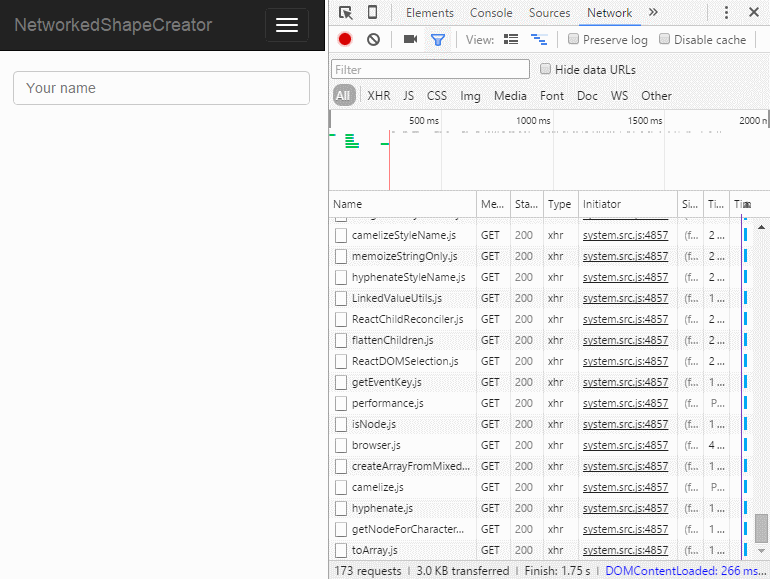
Over 170 requests to render the simplest React App! The same reason why we had to wait so long for npm to finish downloading all React's dependencies after the template was created, is what's causing noticeable lag here - micro modules!
Since we don't have the luxury of HTTP 2's multiplexed requests in VS.NET's WebDev server, we need another way to get the network requests countdown which we've built into the template with the 00-update-deps-js Gulp task which will create an interim bundle with all the 3rd Party dependencies in our deps.tsx:
/// <reference path='typings/browser.d.ts'/>
import * as React from 'react';
import { render } from 'react-dom';

class Deps extends React.Component<any, any> {
    render() {
        return <div>Hello, World!</div>;
    }
}

const ignore = () => render(<Deps/>, document.body);
When you run 00-update-deps-js it will populate all the dependencies used above into a single deps.lib.js
library which the template already references in default.html.
After deps.lib.js is populated with all referenced 3rd party modules, it drops requests for all external deps
down to a single HTTP Request as by the time our App requests use of a 3rd party module, it's already pre-loaded.
As this keeps a cache of external dependencies, if you update any 3rd Party dependency you'll need to re-run
00-update-deps-js so the cache is updated. You can also change deps.tsx with references to new
dependencies that you want to pre-load in deps.lib.js.
The necessary infrastructure for optimizing, packaging the React Web Application is contained in the
/wwwroot_build folder:
/wwwroot_build
  /deploy                   # copies all files in folder to /wwwroot
    appsettings.txt         # production appsettings to override dev defaults
  /publish
    config.json             # deployment config for WebDeploy IIS deployments
  00-install-dependencies   # runs npm and jspm install, for downloading missing deps after cloning repo
  package-and-deploy.bat    # runs the gulp **package-and-deploy** task
The <script /> in your default.html shows how your app is structured:
<div class="container">
    <div id="content"></div>
</div>

<!-- build:js system.js -->
<script src="jspm_packages/system.js"></script>
<!-- endbuild -->

<script src="config.js"></script>

<!-- build:remove -->
<script src="deps.lib.js"></script>
<!-- endbuild -->

<!-- htmlbuild:appbundle -->
<!-- endbuild -->
<script>
    System.import("./src/app");
</script>- The empty
<div id="content"></div>is where we'll instruct React to render our App in - system.js - is the Universal SystemJS Module loader
- config.js - holds all our apps 3rd party JSPM dependencies
- deb.lib.js - holds an interim bundle of our 3rd party JSPM dependencies
- The empty
<!-- htmlbuild:appbundle -->tells gulp where to insert our bundled app
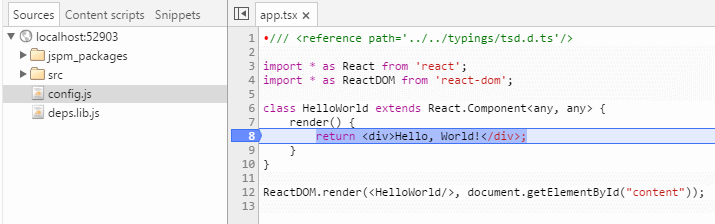
Whilst System.import("./src/app") runs the main entry point of our App in src/app.tsx:
/// <reference path='../typings/browser.d.ts'/>

import * as ReactDOM from 'react-dom';
import * as React from 'react';
import HelloWorld from './hello';

ReactDOM.render(<HelloWorld/>, document.getElementById("content"));
The first line references all the Type Definitions we've installed with typings.
The react and react-dom import statements references 3rd party JavaScript libraries installed with JSPM.
Whilst ./hello references our local <HelloWorld /> React Component below that the last line renders
in the <div id="content"></div> element:
/// <reference path='../typings/browser.d.ts'/>

import * as React from 'react';
import * as ReactDOM from 'react-dom';
import 'jquery';
export default class HelloWorld extends React.Component<any, any> {
    constructor(props, context) {
        super(props, context);
        this.state = { yourName: '' };
    }

    update(event: any) {
        var yourName = event.target.value;
        $.getJSON(`hello/${yourName}`, r => {
           this.setState({ yourName: r.Result });
       });
    }

    render() {
        return (
          <div className="form-group">
            <input type="text" placeholder="Your name" onChange={e=>this.update(e)} className="form-control"/>
            <h3>{this.state.yourName}</h3>
          </div>);
    }
}
The implementation for the HelloWorld component just calls our back-end Hello ServiceStack Service with
the value of the <input /> field on every key stroke, the result is then rendered in the <h3/> title tag.
The Service Contracts (DTO's) for all our Services is contained in the implementation-free ServiceModel
project which contains the Request and Response DTO for our Hello Service:
[Route("/hello")]
[Route("/hello/{Name}")]
public class Hello : IReturn<HelloResponse>
{
    public string Name { get; set; }
}

public class HelloResponse
{
    public string Result { get; set; }
}Implementation for our Services is contained in the ServiceInterface implementation project that just returns a simple Greeting message:
public class MyServices : Service
{
    public object Any(Hello request)
    {
        return new HelloResponse { Result = "Hello, {0}!".Fmt(request.Name) };
    }
}Every Time you save a .ts or .tsx file TypeScript automatically builds and regenerates the corresponding
.js file using the TypeScript compiler options configured in tsconfig.json.
The generated .js outputs are what gets loaded by JSPM when viewing the website in a browser. Since
TypeScript has sourceMap:true enabled in tsconfig.json it also generates the source maps that you can
use to debug original TypeScript source files directly from within Chrome!
When you create a new .ts or .tsx TypeScript source files, you'll want to include a reference to
browser.d.ts in order to reference all the Type Definitions installed with typings:
/// <reference path='../typings/browser.d.ts'/>After you're comfortable with your working project it's a good time to publish it to source control. Before you
publish you'll want to ensure that both node_modules/ and jspm_packages/ folders are added to your repo's
.gitignore
(or equivalent for your source control):
node_modules/
jspm_packages/
Otherwise it will unnecessarily check-in thousands of your app's javascript dependencies.
Other developers after cloning your project can download the missing npm and jspm dependencies with:
C:\proj> npm install
You'll also want to ignore your publish/ folder as it will contain sensitive info if you're also using Gulp
to deploy your App. This would already have been added if you've used the VisualStudio template when
creating your GitHub repository.
This template comes pre-installed with the major dependencies we expect most ServiceStack TypeScript React Apps to have, namely:
- react - The core React Framework
- react-dom - The DOM bindings for React
- es6-shim - A shim to add missing ES6 APIs in ES5 browsers
- jQuery - The One and Only and required dependency for ss-utils
- ss-utils - Client utils library and integration with ServiceStack features
The template also includes TypeScript definitions for all the above dependencies, installed using typings.
To learn about Redux and how to build a Networked Shape Creator from scratch please walk through all the examples in typescript-redux
Here we'll just include the steps to create the Networked Shape Creator from the default template.
First thing we need to is install the required JavaScript libraries which we rely on JSPM to install for us. Whilst the Install Package VS.NET Extension would provides a nice GUI to install JSPM packages we recommend that you use a command-line instead which offers better visibility of how external packages integrates with your project and all fits together.
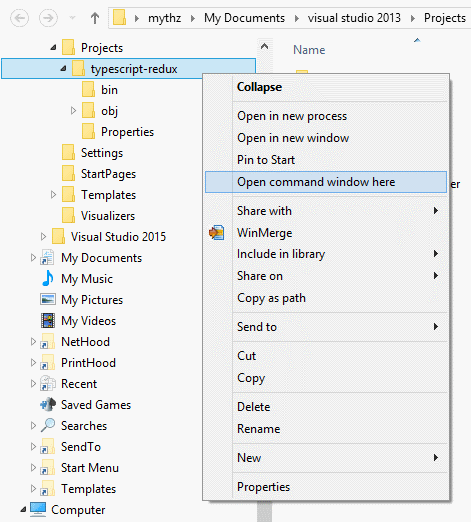
The easiest way to bring up a command prompt is to hold down Shift whilst right-clicking on your
NetworkedShapeCreator Web App project folder and clicking Open command window here on the context menu:
And in the Command Prompt install redux and react-redux:

by running both commands below:
jspm install redux
jspm install react-redux
We also need to install Type Definitions for the above libraries by running:
typings install redux --ambient --save
typings install react-redux --ambient --save
That will install all the missing dependencies and TypeScript Definitions NetworkedShapeCreator needs.
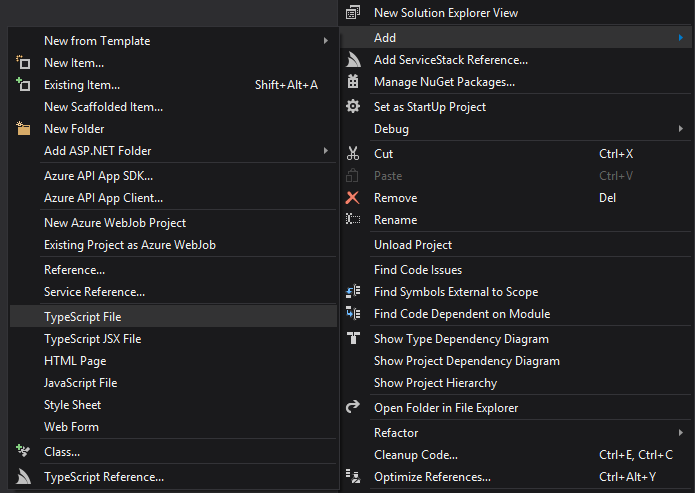
Now we just need to create the application by adding new TypeScript files to your project under the
TypeScript /src folder using the Add > TypeScript File context menu item:
After you've added your first TypeScript file a way to quickly create multiple copies is to copy + paste the file
Now replace each file with the filename and contents below:
- app.tsx
- ColorPicker.tsx
- Connect.tsx
- core.ts
- Counter.tsx
- History.tsx
- reducers.ts
- ShapeMaker.tsx
- ShapeViewer.tsx
Since we have a completely different application we need to also replace default.html with the HTML below:
<html>
<head>
    <title>TypeScript + JSPM + React</title>
    <style>
        body { font-family: sans-serif; }
        h1 { padding: 20px 0; }
        .noselect {
            -webkit-touch-callout: none;
            -webkit-user-select: none;
            -khtml-user-select: none;
            -moz-user-select: none;
            -ms-user-select: none;
            user-select: none;
        }
    </style>
</head>
<body>
    <h1>Networked Shape Creator</h1>
    <div id="content"></div>

    <!-- build:js system.js -->
    <script src="jspm_packages/system.js"></script>
    <!-- endbuild -->
    <script src="config.js"></script>
    <!-- build:remove -->
    <script src="deps.lib.js"></script>
    <!-- endbuild -->
    <!-- htmlbuild:appbundle -->
    <!-- endbuild -->

    <script>
        System.import("./src/app");
    </script>
</body>
</html>There's currently an outstanding issue with redux TypeScript definition
that makes the method signature of applyMiddleware incompatible with what createStore accepts. Until
a new TypeScript definition is released you'll need to manually edit typings/browser/ambient/redux/redux.d.ts
and replace the applyMiddleware definition from:
function applyMiddleware(...middlewares: Middleware[]): Function;
to:
function applyMiddleware(...middlewares: Middleware[]): () => any;
With the client created all that's left is to configure the Server which in order to facilitate real-time
communications between users we need to enable
Server Events by registering the
ServerEventsFeature in our AppHost.Configure():
public override void Configure(Container container)
{
    ...

    Plugins.Add(new ServerEventsFeature());
}
Then in the NetworkedShapeCreator.ServiceModel project add the Service Contracts for the 2 new Services:
using System.IO;
using ServiceStack;
using ServiceStack.Web;

namespace NetworkedShapeCreator.ServiceModel
{
    [Route("/publish-channel/{Channel}")]
    public class PublishToChannel : IReturnVoid, IRequiresRequestStream
    {
        public string Channel { get; set; }
        public string Selector { get; set; }
        public Stream RequestStream { get; set; }
    }

    [Route("/send-user/{To}")]
    public class SendUser : IReturnVoid, IRequiresRequestStream
    {
        public string To { get; set; }
        public string Selector { get; set; }
        public Stream RequestStream { get; set; }
    }
}
Then we just need to add the Services implementation in NetworkedShapeCreator.ServiceInterface
using NetworkedShapeCreator.ServiceModel;
using ServiceStack;

namespace NetworkedShapeCreator.ServiceInterface
{
    public class ReduxServices : Service
    {
        public IServerEvents ServerEvents { get; set; }

        public void Any(PublishToChannel request)
        {
            var msg = request.RequestStream.ReadFully().FromUtf8Bytes();
            ServerEvents.NotifyChannel(request.Channel, request.Selector, msg);
        }

        public void Any(SendUser request)
        {
            var msg = request.RequestStream.ReadFully().FromUtf8Bytes();
            ServerEvents.NotifyUserId(request.To, request.Selector, msg);
        }
    }
}Now that the app is in a state that's ready for deployment we can make use of the Gulp tasks to package and optimize the App and deploy it via Web Deploy.
The /wwwroot_build folder contains the necessary files required for deployments including:
/wwwroot_build
  /deploy                 # copies all files in folder to /wwwroot
    appsettings.txt       # production appsettings to override dev defaults
  /publish
    config.json           # deployment config for WebDeploy deployments
  package-and-deploy.bat  # runs package-and-deploy Gulp Task
The minimum steps to deploy an app is to fill in publish/config.json with the remote IIS WebSite settings
as well as a UserName and Password of a User that has permission to remote deploy an app:
{
    "iisApp": "vstest",
    "serverAddress": "remote.server.org",
    "userName": "{WebDeployUserName}",
    "password" : "{WebDeployPassword}"
}
Then just run the package-and-deploy Gulp task (or .bat script) which copies over the the server and
client assets into the /wwwroot folder which contain the physical files of what gets deployed.
The package-server task will copy over the required .NET .dll and ASP.NET files as well as any files
in /wwwroot_build/deploy which can be used to customize the production website.
The package-client task also optimizes any .jsx, .js and .css so only the bundled and minified
versions get deployed.
The resulting wwwroot folder is then packaged into a webdeploy.zip file and deployed to the remote server,
after it's finished running you will be able to run your app on the remote server which for
NetworkedShapeCreator is currently: http://vstest.servicestack.net/
We hope you've found this guide useful and it helps spur some ideas of what you can create with these simple and powerful technologies in your next TypeScript React App. Please feel free to suggest any improvements on ServiceStack's UserVoice or you can report any Issues on GitHub.