![]()
Simple and clean approach to form validation
![]()
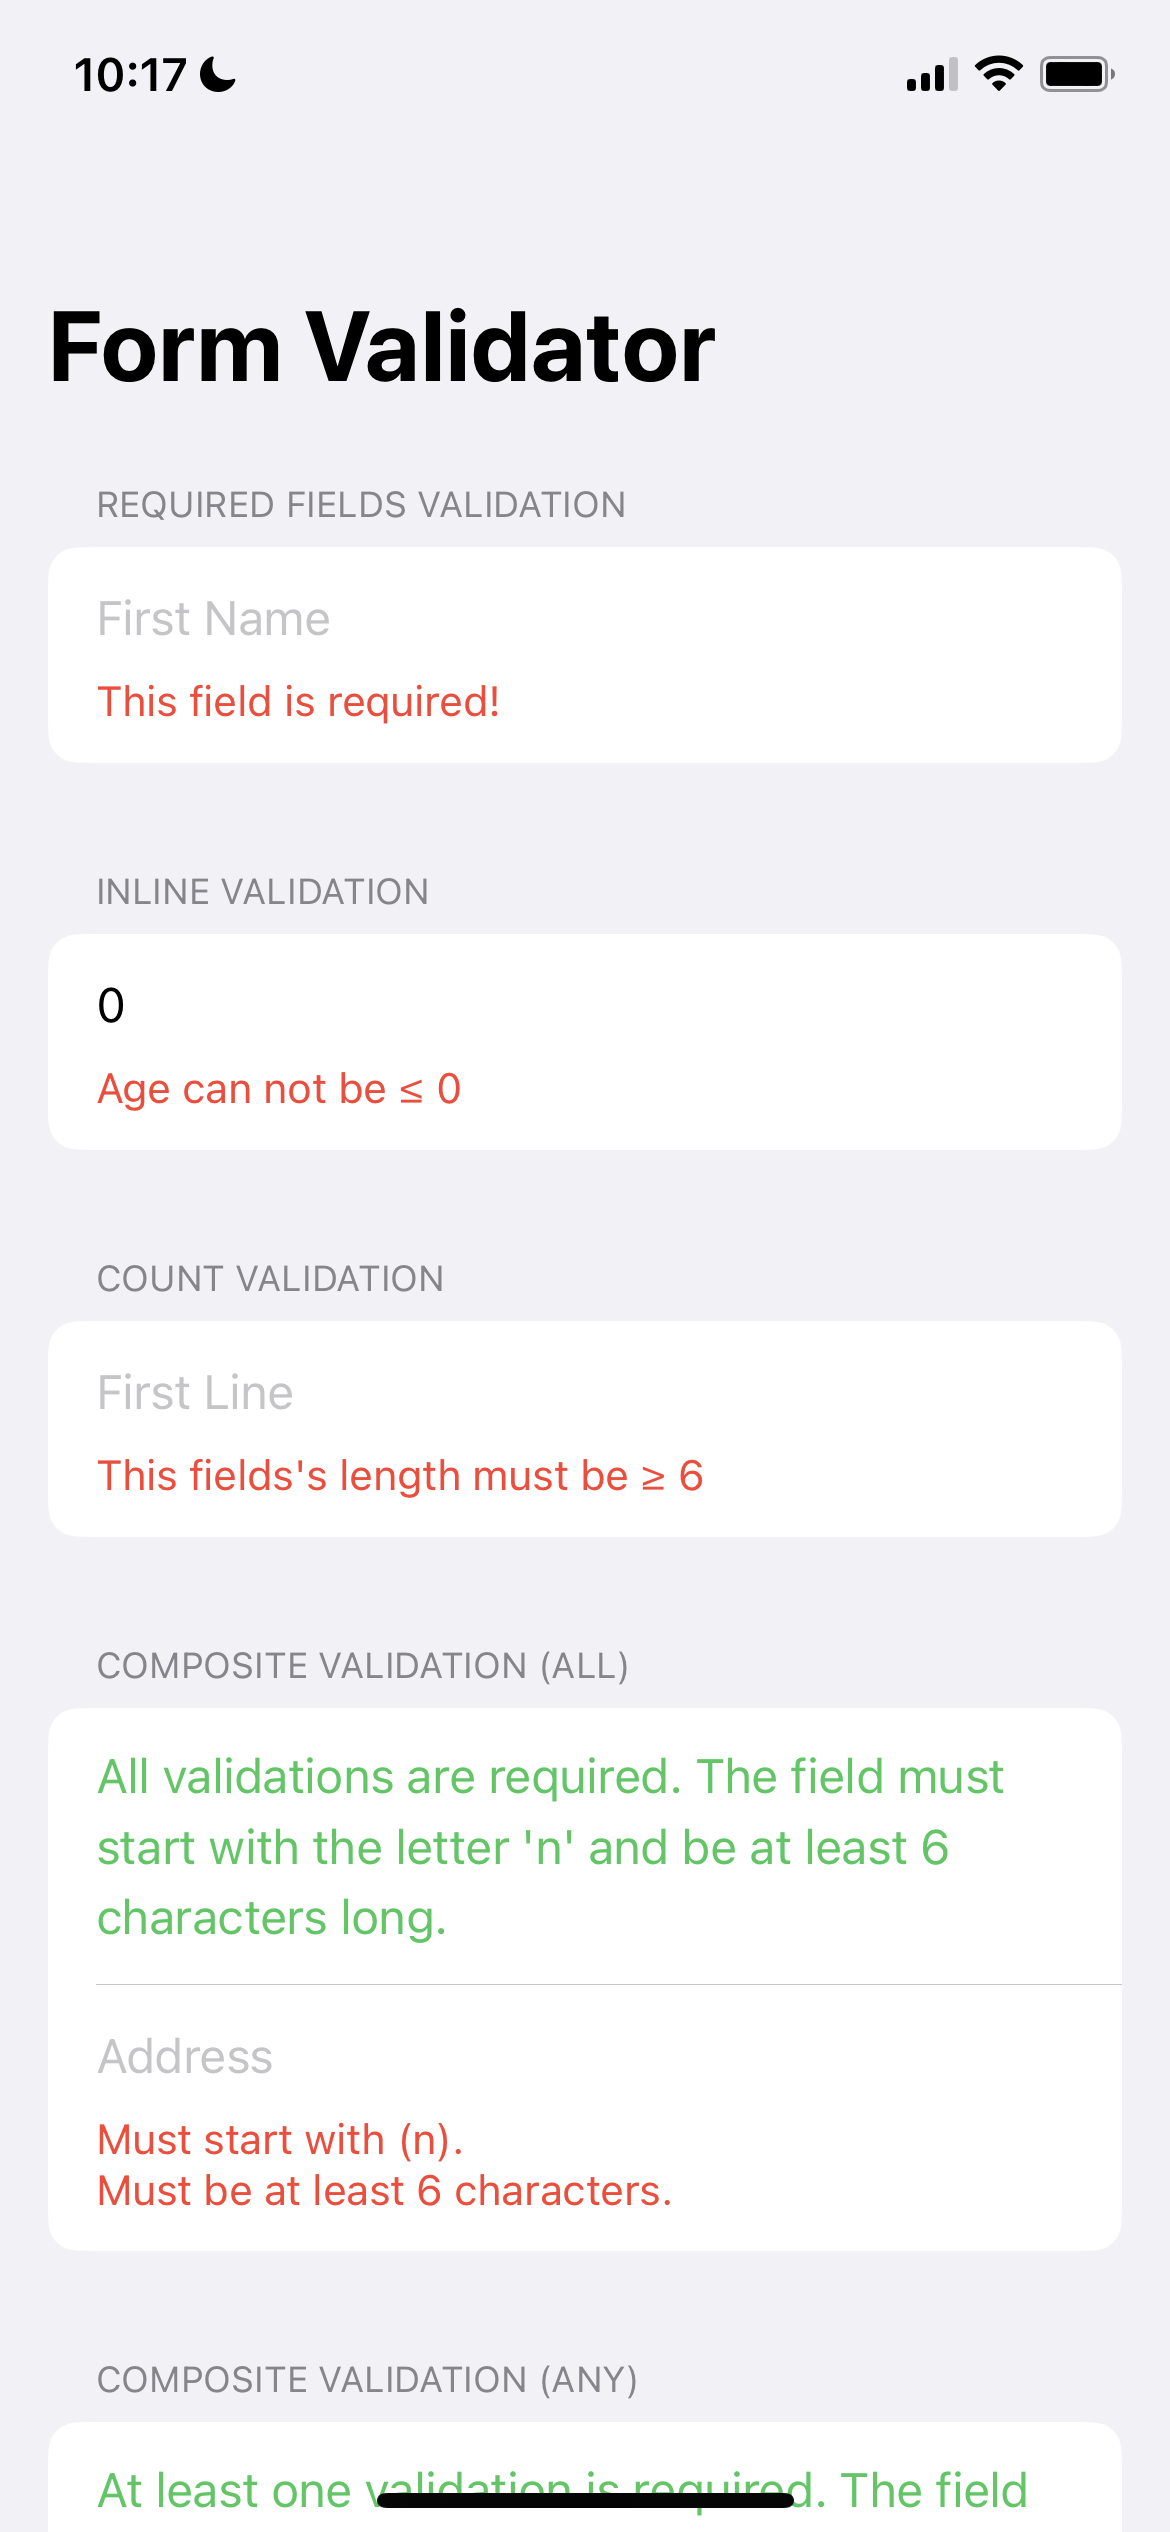
Introducing a clean, simple, and customizable approach to declarative form validation in SwiftUI. With our solution, you can easily validate user input and provide feedback in real-time, all while maintaining a sleek and intuitive user interface.
Discuss it on Product Hunt 🦄
  // 1

import FormValidator

class ExampleForm: ObservableObject {
    // 2
    @Published
    var manager = FormManager(validationType: .immediate)

    // 3
    @FormField(validator: NonEmptyValidator(message: "This field is required!"))
    var firstName: String = ""

    // 4
    lazy var firstNameValidation = _firstName.validation(manager: manager)
}

struct ContentView: View {
    @ObservedObject var form = ExampleForm()
    @State var isSaveDisabled = true

    var body: some View {
        TextField("First Name", text: $form.firstName)
                .validation(form.firstNameValidation) // 5
    }

  private func validateForm() {
    let valid = form.manager.triggerValidation()
    // Validation result.
    print("Form valid: \(valid)")

    // Another way for checking validation.
    print("Is all valid: \(form.manager.isAllValid())")

    // Check if all fields have text. This is not validation check.
    print("Is all filled: \(form.manager.isAllFilled())")

    // Get an array with all validation messages.
    print("All validation messages array: \(form.manager.validationMessages)")

    // Get error messages as string, separated with a new line.
    print("All validation messages string: \(form.manager.errorsDescription())")
  }
}
- Import
FormValidator.
import FormValidator- Declare
FormManager
@Published
var manager = FormManager(validationType: .immediate)
FormManager is a powerful class for controlling form validation in your application. It allows you to trigger validation and listen to changes in the form, and gives you the flexibility to control how and when validation is shown to the user.
- Specify the data type and validation rules for the input field
@FormField(validator: NonEmptyValidator(message: "This field is required!"))
var firstName: String = ""
The annotation
@FormFieldalong with a validator can be used to declare the field to be validated:
- To specify validation for a TextField in a view, use
.validation()modifier.
TextField("First Name", text: $form.firstName)
        .validation(form.firstNameValidation)
Congratulations! Your field has now been validated. It's concise and simple!
| Validator | Description |
|---|---|
| CompositeValidator | To combine multiple validators together into a single validator. |
| CountValidator.swift | To validate whether a string is matching a spcecific length |
| NonEmptyValidator | To validate whether a string is empty or blank |
| EmailValidator | To validate if an email is valid |
| DateValidator | To validate if a date falls within a range of dates |
| PatternValidator | To validate if a pattern is matched |
| InlineValidator | To validate if a condition is valid inline |
| PasswordValidator | To validate if a password is valid |
| PasswordMatchValidator | To validate if two password fields match each other and/or match a specific pattern |
| PrefixValidator | To validate if a text has a prefix |
| SuffixValidator | To validate if a text has a suffix |
To add custom validation logic to your form, you can conform to the Validatable or StringValidator
protocols depending on the type of data you want to validate.
The Validatable protocol is used to validate any type of data, such as numbers, strings or dates.
The StringValidator protocol is used to validate string data, such as email addresses or passwords.
By adding custom validators that conform to these protocols, you can create highly specific and tailored validation logic that meets the unique needs of your form and its users.
To create a customized error view, simply add the custom view to validation modifier. This will allow you to tailor
the error messages to your specific needs and provide a more user-friendly experience.
TextField("City", text: $form.city)
        .validation(form.cityValidation) { message in
            Text(message.uppercased())
                    .foregroundColor(.red)
                    .font(.system(size: 14))
}If you need to perform quick validations, the InlineValidator can be a useful validator.
It allows you to define your validation logic directly in the code, making it easy to write and maintain.
Simply add @FormField(inlineValidator:) annotation and define your validation rules inline to quickly and
efficiently validate the input field.
@FormField(inlineValidator: { value in
    guard value > 0 else {
        return "Age can not be ≤ 0"
    }
    guard value <= 50 else {
        return "Age can not be > 50"
    }
    return nil
})
var age: Int = 0When using FormManager, you have the flexibility to choose between three different validation types based on your
needs.
-
If you want to immediately validate user input as they are entering it, use
FormManager(validationType: .immediate). -
If you want to validate the entire form after the user has finished entering all the data, use
FormManager(validationType: .deferred).
To initiate validation in this scenario, you need to call
FormManager.triggerValidation(). This will trigger validation for all input fields in the form, based on the validation rules you have defined. Make sure to call this method at an appropriate time, such as when the user submits the form or when they have finished entering all the required data.
- If you want to perform validation silently in the background without displaying any error
messages to the user, use
FormManager(validationType: .silent).
After triggering validation with
FormManager.triggerValidation(), you can access the validation messages usingFormManager.validationMessages(). It is important to note that displaying these messages to the user is your responsibility as the developer. You can choose to display the messages in a variety of ways, such as displaying them in a modal window. The goal is to provide clear and helpful feedback to the user so they can correct any errors and successfully submit the form.
To initiate form validation at any time, you can simply call the FormManager.triggerValidation() method.
If you need to react to changes in the validation status of your form, you can use the FormManager.$allValid and FormManager.$validationMessages properties.
The FormManager.$allValid property is a boolean value that indicates whether all fields in the form
currently contain valid data. You can observe changes to this property to perform actions such
as enabling or disabling the form's submit button based on its validation status.
The FormManager.$validationMessages property is an array of error messages.
By reacting to these validation status changes, you can create a more dynamic and responsive user experience that helps guide the user towards successfully submitting the form.
.onReceive(form.manager.$allValid) { isValid in
    self.isSaveDisabled = !isValid
}
        .onReceive(form.manager.$validationMessages) { messages in
            print(messages)
}Select File -> Swift Packages -> Add Package Dependency and
enter https://github.com/Open-Bytes/SwiftUIFormValidator.git.
You can add SwiftUIFormValidator as a package dependency in your Package.swift file:
let package = Package(
        //...
        dependencies: [
            .package(url: "https://github.com/Open-Bytes/SwiftUIFormValidator.git", .upToNextMajor(from: "1.0.0"))
        ]
        //...
)
From there, refer to SwiftUIFormValidator in target dependencies:
targets: [
    .target(
            name: "YourLibrary",
            dependencies: [
                .product(name: "FormValidator", package: "SwiftUIFormValidator"),
            ]
            //...
    ),
    // ...
]
Then simply import SwiftUIFormValidator wherever you’d like to use the library.
Use the following entry in your Podfile:
pod 'SwiftUIFormValidator'Then run pod install.
Accio is a dependency manager based on SwiftPM which can build frameworks for
iOS/macOS/tvOS/watchOS. Therefore the integration steps of SwiftUIFormValidator are exactly the same as described above.
Once your Package.swift file is configured, run accio update instead of swift package update.
Don't forget to add import FormValidator to use the framework.
Carthage users can point to this repository and use generated SwiftUIFormValidator framework.
Make the following entry in your Cartfile:
github "ShabanKamell/SwiftUIFormValidator"Then run carthage update.
If this is your first time using Carthage in the project, you'll need to go through some additional steps as explained over at Carthage.
Validation with SwiftUI & Combine
We welcome all Pull Requests (PRs) to help improve this library and appreciate any contributions towards making it better. To ensure a smooth contribution process, please follow these guidelines:
- Ensure that your PR addresses an existing issue or proposes a new feature that is aligned with the library's goals.
- Before submitting a PR, please check to make sure that your changes do not introduce any new bugs or conflicts with existing code.
- Include a clear and concise description of your changes in your PR, along with any relevant documentation or tests.
- Be responsive to feedback and review comments from the maintainers and community members.
Thank you for your interest in contributing to our library and helping us make it better!
Look at Changelog for release notes.
click to reveal License
Licensed under the Apache License, Version 2.0 (the "License");
you may not use this file except in compliance with the License.
You may obtain a copy of the License at

   http://www.apache.org/licenses/LICENSE-2.0

Unless required by applicable law or agreed to in writing, software
distributed under the License is distributed on an "AS IS" BASIS,
WITHOUT WARRANTIES OR CONDITIONS OF ANY KIND, either express or implied.
See the License for the specific language governing permissions and
limitations under the License.