
First you need to install pip
If you have macOS, then you can use
sudo easy_install pipIf you have Ubuntu, then you need to use the following commands
sudo apt-get update
sudo apt-get -y install python3-pip
Now you can proceed to install the necessary libraries to run our application Create a folder with our project and a venv folder inside:
mkdir myproject
cd myproject
python3 -m venv venv
Activate the virtual environment
. venv/bin/activateTo install the libraries, you have to use requirements.txt (the virtual environment must be activated)
pip3 install -r requirements.txtBefore running application, you have to configure Postgres and environment variables:
export SECRET_KEY='your_secret_key'
export DATABASE_URI='your db uri'
,the next step is
python manage.py db init
python manage.py db migrate
python manage.py db upgradeTo start the service, use the following command:
python3 run.pypython3 -m unittest tests/test.pyUsed to calculate percentile, filling an array with zeros using numpy.zeros
Framework for writing current API
Used to interact with the database
Used to convert complex data types to Python data types
Used to validate input data. Using regular jsonschema is also possible, but then validation will be slower.
It was used to validate dates, that is, the DD.MM.YYYY format, to obtain utcnow (), and also to inadmissibly enter birthdays whose date is greater than the current one.
Used for writting tests
To deploy the application we need a host
ssh username@hostThe next step is to install Postgres and create a user. All the necessary steps to install Postgres on Ubuntu 18.04 are described here
Now you can start downloading files using git clone
git clone "repo"After that, install the necessary tools and libraries
sudo apt install python3-pip
sudo apt install python3-venv
python3 -m venv store/venv
Move to the project folder
cd store
source venv/bin/activate
pip install -r requirements.txt
After that, you need to slightly modify the config.py file, since there is a more convenient way than using env variables
sudo touch /etc/config.json
sudo nano /etc/config.json
Inside we add:
{
    "SECRET_KEY": "your_secret_key",
    "DATABASE_URI": "your_db_uri"
}
sudo nano config.pyMake the following changes to config.py
import json
with open('/etc/config.json') as config_file:
config = json.load(config_file)
class Config:
SECRET_KEY = config.get("SECRET_KEY")
SQLALCHEMY_DATABASE_URI = config.get("DATABASE_URI")
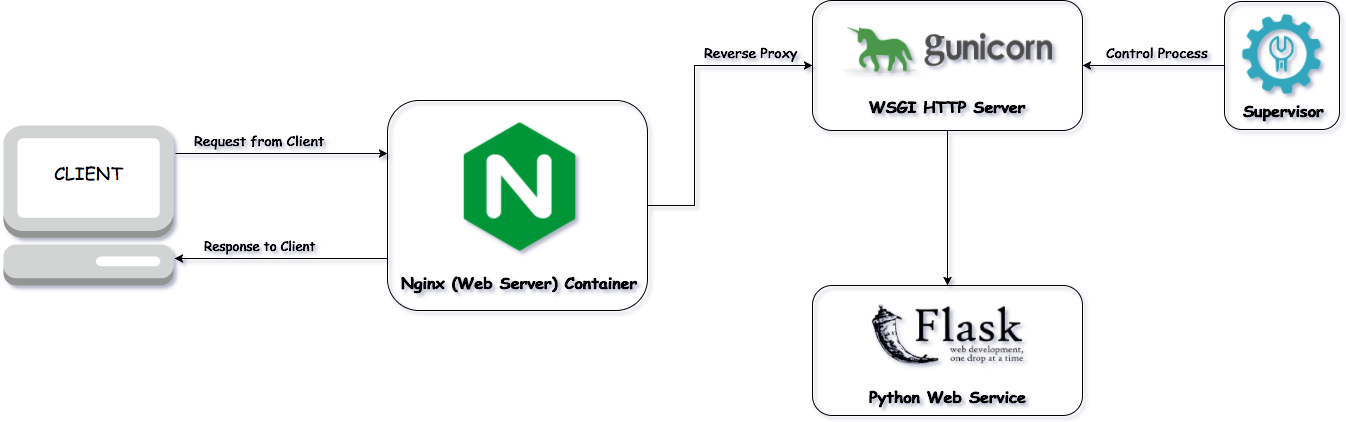
SQLALCHEMY_TRACK_MODIFICATIONS = FalseFollow the migration steps described above Install nginx & gunicorn
cd
sudo apt install nginx
pip install gunicorn
Let's dive into nginx & gunicorn configuration
sudo rm /etc/nginx/sites-enabled/default
sudo nano /etc/nginx/sites-enabled/store
And add the following to this file:
server {
    listen 8080;
    server_name <host_ip>;
    client_max_body_size 20M;

    location / {
        proxy_pass http://localhost:8000;
        include /etc/nginx/proxy_params;
        proxy_redirect off;
    }
}
sudo systemctl restart nginxNow you need to configure supervisor:
sudo apt install supervisor
sudo nano /etc/supervisor/conf.d/store.conf
It is also necessary to add the following inside:
[program:store]
directory=/home/<user>/store
command=/home/<user>/store/venv/bin/gunicorn -w <num> run:app
user=<user>
autostart=true
autorestart=true
stopasgroup=true
killasgroup=true
, where num = (2 x num_cores) + 1. You can get num_cores using the command
nproc --allLaunch:
sudo supervisorctl reloadUsed to make API requests and validation.