Step by step Installation Guide
The following step-by-step installation guide explains in detail how you can setup pyBAR under Windows, Linux or OS X operating system. This guide addresses users, that do not have python or git experience.
Thus only one verified way of setting up pyBAR is explained here. The guide can be expected to work if the instructions are carefully followed. In case of troubles, don’t hesitate to ask questions on the pyBAR mailing list (subscription required) or file a bug report/feature request here
-
Installing Miniconda Python
Miniconda Python is a Python distribution providing a simple to use package manager to install lots of Python packages for data analysis, plotting and I/O. These packages are heavily used in pyBAR.
Download and install Miniconda by following this link: Continuum Miniconda. PyBar supports Python 2.7.x but not Python 3 and newer.
Note: Select the Python 2.7 version according to your operating system architecture (e.g. 64-bit Python on 64-bit operating system)
Note: We strongly recommend installing a 64-bit operating system.
-
Installing C++ Compiler
Linux: Install gcc via package manager, e.g. on Ubuntu run:sudo apt-get install build-essential
Windows: Install Microsoft Visual C++ Compiler for Python 2.7
OS X: Install Xcode from App Store and install Xcode Command Line Tools by running:xcode-select --install
-
Installing Eclipse with PyDev
Eclipse is a state of the art Integrated Development Environment (IDE) for almost every important software programming language (JAVA, C++, Python, Fortran, Ruby, Mathematica). It has a plug in system to extend the development environment. PyDev is the Python IDE plugin for Eclipse.- Eclipse needs a Java runtime environmet (JRE) and will not start if this is not installed. Windows: It is recommend to use the Eclipse 32-bit version, even on a 64-bit machine. Since Eclipse 64-bit needs JRE 64-bit and Oracle JRE 64-bit does not provide automatic updates. This puts the PC at risk of viruses.
- Download the Eclipse installer from Eclipse Homepage and choose Eclipse for C/C++ developers during installation.
- Eclipse asks for a workspace path where the projects will be located on your hard drive. Standard settings are sufficient.
- Close the welcome screen.
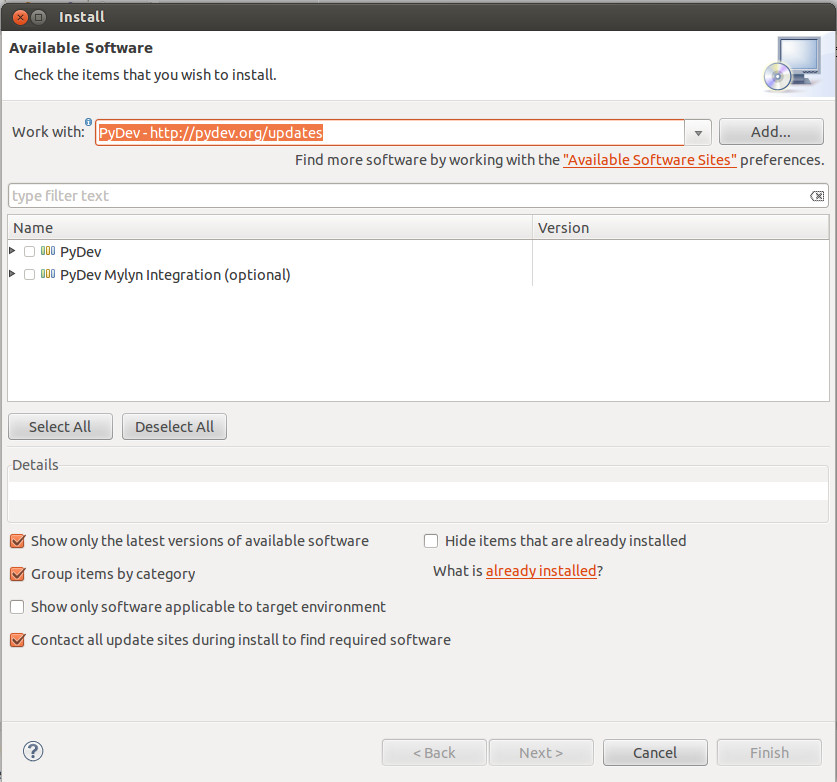
- Install the PyDev plugin by clicking on Help → Install New Software . Press add and fill the form (name = PyDev, location = http://pydev.org/updates):
Select PyDev and install (accept license agreement and trust the certificate). - Add PyDev perspective to Eclipse and select it. The button is located in the upper rigth corner:

- Goto Window → Preferences → PyDev → Interpreters→ Python Interpreter and press new.

Select the Python executable in /home//miniconda/bin/ on Linux or c:\Miniconda\ on Windows (optionally use the Miniconda/env// folder if you are using Miniconda environments) and press the OK button. Everything is set up automatically.
More details are given here.
-
Installing Required Packages
- Installing Python Packages
Open a console and type one by one:
conda update conda
conda update --all
conda install python=2.7 bitarray contextlib2 cython ipython matplotlib mock nose numba numpy pyqt pyserial pytables pyyaml pyzmq qtpy scipy
pip install progressbar-latest pyvisa pyvisa-py git+https://github.com/pyqtgraph/pyqtgraph.git@pyqtgraph-0.10.0
On Windows additionally run:
conda install pywin32
Note: Updating packages requires the following commands:
First runconda update conda
to update conda itself and thenconda update --all
orpip install -U --no-deps [package name]
to update a single package. - Installing Packages for USB support (libusb, PyUsb and pySiLibUsb)
The installation process is described in the pySiLibUSB wiki.
Linux: If you run a Linux based operating system, a udev rule has to be provided to change device permission. Please read the pySiLibUSB wiki carefully.
Note: Only required for USBpix2. Other supported readout hardware uses SiTCP. - Installing Basil
Basil (package name basil_daq) is required for pyBAR and is used to access the test setup hardware. The latest stable version
is automatically installed, when the pyBAR setup is ran. You do not have to do anything at this point.
- Installing Python Packages
-
Cloning pyBAR
- In Eclipse, goto File→Import→Git and select Projects from Git
- Click clone URI and type the pyBAR repository (URI: https://github.com/SiLab-Bonn/pyBAR)
- If you have a GitHub account you can add the credentials here
- Click next, select all branches, click next and specify the directory where pyBAR will be cloned to
- If you want the latest stable tag select the master branch. If you want to have the newest features or contribute to pyBAR select development
- Wait until the download of the code is finished and check Import as project configured using the New Project Wizard
- Select PyDev → PyDevProject
- Give the project a name, select the folder where the pyBAR was cloned to (e.g. /home/username/git/pyBAR) and click finish
-
Installing pyBAR
Open the shell and change to the pyBAR git directory where the pyBAR was cloned to. Inside the pyBAR folder, where the setup.py file is located, run:
python setup.py develop
This will add pyBAR to the Python environment.
-
Installing ViTables data viewer and Plotting Plug-in (optional)
ViTables is a open source data viewer for viewing and editing HDF5 files created by PyTables. PyBAR stores raw data (e.g. FEI4 raw data), interpreted data and histograms in HDF5 files. A simple plugin pyBAR was written to allow the creation of plots from pyBAR data within ViTables.- Installing ViTables from GitHub
Clone the ViTables git repository:
git clone https://github.com/uvemas/ViTables.git
When using Anaconda/Miniconda Python, edit thesetup.pyand remove the PyQt5 dependency (remove the line with'PyQt5 (>=5.5.1)',) and run:conda install qtpy pyqt pytables numpy numexpr
Finally install with:python setup.py install
- Setting up the pyBAR Plotting Plug-in (optional)
- Open ViTables and go to Settings→Preferences→Plugins and add the pyBAR plugin folder via pressing New:

- Restart ViTables and add the pybar_vitables_plugin in the same settings dialog:

- After a restart you can right click in the Tree of databases and select plot pyBAR data to get a plot from the selected leaf.
- Open ViTables and go to Settings→Preferences→Plugins and add the pyBAR plugin folder via pressing New:
- Installing ViTables from GitHub