[My project for AGI Safety Fundamentals programme ~Oct 2021. Blog post link: LessWrong]
A short tutorial to get started with feature extraction in CNNs, based on TensorFlow's DeepDream code. Content available under CC BY 4.0 and code under Apache 2.0 License.


This isn't actually too complicated, especially broken down to the bare minimum:
- A trained network whose features we want to visualize
- A loop to maximize the activation of a targeted node
- A few lines to make and show an image.
The whole code runs in about a minute on my laptop (no GPU).
- The first part is easy, we get the pre-trained network from tensorflow.
import tensorflow as tf
base_model = tf.keras.applications.VGG19(include_top=False, weights='imagenet')- The next part in the code (it's mostly comments really), see the comments marked with
#for explanations:
def maximize_activation(starting_img,\
                        target_layer="mixed0", target_index=0,\
                        steps=10, step_size=0.1):

    # Take the network and cut it off at the layer we want to analyze,
    # i.e. we only need the part from the input to the target_layer.
    target = [base_model.get_layer(target_layer).output]
    part_model = tf.keras.Model(inputs=base_model.input, outputs=target)

    # The next part is the function to maximize the target layer/node by
    # adjusting the input, equivalent to the usual gradient descent but
    # gradient ascent. Run an optimization loop:
    def gradient_ascent(img, steps, step_size):
        loss = tf.constant(0.0)
        for n in tf.range(steps):
            # As in normal NN training, you want to record the computation
            # of the forward-pass (the part_model call below) to compute the
            # gradient afterwards. This is what tf.GradientTape does.
            with tf.GradientTape() as tape:
                tape.watch(img)
                # Forward-pass (compute the activation given our image)
                activation = part_model(tf.expand_dims(img, axis=0))
                # The activation will be of shape (1,N,N,L) where N is related to
                # the resolution of the input image (assuming our target layer is
                # a convolutional filter), and L is the size of the layer. E.g. for a
                # 256x256 image in "block4_conv1" of VGG19, this will be
                # (1,32,32,512) -- we select one of the 512 nodes (index) and
                # average over the rest (you can average selectively to affect
                # only part of the image but there's not really a point):
                loss = tf.math.reduce_mean(activation[:,:,:,target_index])

            # Get the gradient, i.e. derivative of "loss" with respect to input
            # and normalize.
            gradients = tape.gradient(loss, img)
            gradients /= tf.math.reduce_std(gradients)

            # In the final step move the image in the direction of the gradient to
            # increate the "loss" (our targeted activation). Note that the sign here
            # is opposite to the typical gradient descent (our "loss" is the target
            # activation which we maximize, not something we minimize).
            img = img + gradients*step_size
            img = tf.clip_by_value(img, -1, 1)
        return loss, img

    # Preprocessing of the image (converts from [0..255] to [-1..1]
    img = tf.keras.applications.inception_v3.preprocess_input(starting_img)
    img = tf.convert_to_tensor(img)
    # Run the gradient ascent loop
    loss, img = gradient_ascent(img, tf.constant(steps), tf.constant(step_size))
    # Convert back to [0..255] and return the new image
    img = tf.cast(255*(img + 1.0)/2.0, tf.uint8)
return img- Finally apply this procedure to a random image:
import numpy as np
import matplotlib.pyplot as plt

starting_img = np.random.randint(low=0,high=255,size=(300,300,3), dtype=np.uint8)
optimized_img = maximize_activation(starting_img, target_layer="block4_conv1", target_index=47, steps=10, step_size=0.1)
plt.imshow(np.array(optimized_img))
And here we go!
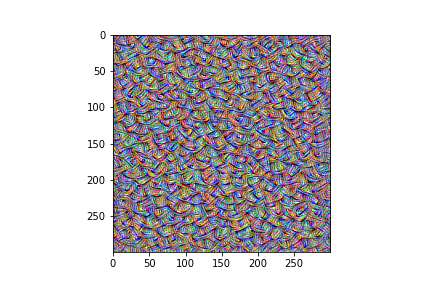
Looks like features. Now let's try to reproduce one of the OpenAI microscope images, node 4 of layer block4_conv1 -- here is my version:
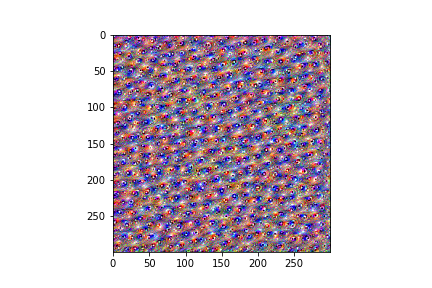
And the OpenAI Microscope image:

Not identical, but clearly the same feature in both visualizations!
Finally here is a run with InceptionV3, just for the pretty pictures, this time starting with a non-random (black) image. And an animation of the image after every iteration.
Note: There's an optional bit to improve the speed (by about a factor of 2 on my laptop), just add this decorator in front of the gradient_ascent function:
    @tf.function(
        # Decorator to increase the speed of the gradient_ascent function
        input_signature=(
          tf.TensorSpec(shape=[None,None,3], dtype=tf.float32),
          tf.TensorSpec(shape=[], dtype=tf.int32),
          tf.TensorSpec(shape=[], dtype=tf.float32),)
    )
    def gradient_ascent(img, steps, step_size): ...
See the notebook here for the code reproducing the results above.