This quick start tutorial will show you to how to setup an Ionic hybrid mobile application embedding its own database together with SyncProxy client. Used with online SyncProxy server (https://www.syncproxy.com), this is the quickest way to create applications that will synchronize bidirectionally, reactively in realtime with your backend database (MySQL, SQL Server, MongoDB...), and also work perfectly when offline. Only with one line of code.
The SyncProxy client targets hybrid mobile applications (Ionic, Phonegap, Cordova, Xamarin...) with an embedded database (IndexedDB, SQLite, WebSQL...) that provides offline capabilities. By adding the SyncProxy client to your main .html file with one single line of code, you will turn your offline app into a powerfull online application with bidirectionnal reactive (realtime) sync that will work perfectly with or without connection. You will not need develop any specialized webservices, since the SyncProxy server enables to define sync profiles directly online on https://www.syncproxy.com which acts as a gateway between your app and your backend database.
The following tutorial applies to Ionic, but it should be relevant to any Cordova-based framework, too
Go to https://www.syncproxy.com, register and log-in as a proxy administrator (it's free !), then create and configure your proxy to synchronize with your backend database.
To get your existing Ionic application ready with the SyncProxy client:
- Download the SyncProxy client and copy it into the /src/assets/ folder of your Ionic project.
- Add the followin line in the <body> section of your index.html file located in the /src/ folder of your Ionic project (replace proxyId attribute with the id allocated during the online creation of the proxy):
<script src="sync-client/sync-client.js" proxyID="kMrtc82xffw2ZrPf6" connectorType="IndexedDB" dbName="your-client-db-name"></script>Replace connectorType and dbName attributes with the targetted embedded database. The supported connector types are: "IndexedDB", "SQLite", "WebSQL", "IonicStorage", "localStorage".
- Recompile and relaunch your app
The Sync button should now appear on top of the application:
![]()
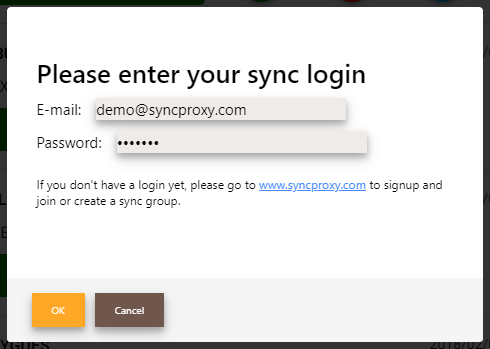
and when sync is launched, the login prompt should popup:
You are now ready to sync ! Any changes made to your embedded database are sent in realtime to your backend database and vice-versa. When offline, all changes made are marked temporarily, and synched when going back online, bidirectionnally.
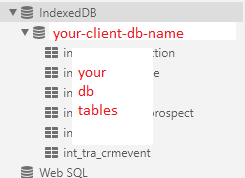
To facilitate the testing, we recommend beginning with the IndexedDB connector, and run the app within Chrome or Firefox. Using browser's developer's tools, you will be able to verify that the database has been created or updated:
Launch the app within your browser, and press F12 to open the developer's tools. You will find the created IndexedDB database in the "Application" or "Storage" section of your browse's dev tools.
You can litterally create a new Ionic application and start synching your data with your backend database within minutes !
To begin with, setup the Ionic environment and create your first Ionic application as explained in the "Get Started" section of Ionic framework website.
Once your app is ready, simply follow the 3 easy steps described above to upgrade an existing Ionic app to get it ready to sync.
And now it's your turn to play ! We recommend that you get familiar with Ionic development and with coding read/write access to the embedded database (starting with IndexedDB or WebSQL), you will find plenty of resources available online, and that is all that you need to create a powerful offline-first reactively synched application !
The SyncProxy sync client will create the embedded database for you ! You won't need to worry about the tedious schema management (create tables, created columns, etc.). Every upgrade made to your backend database will apply to the embedded database during the synchronization.
To access SyncProxy administration to setup your sync proxy and connect to your backend database, go to https://www.syncproxy.com