- prebuilt Raspberry Pi images
- boots silently with boot splash screen including progress bar
- boots directly into a full screen web browser with custom URL (video and audio playback capable)
- optionally: boots directly into full screen video player (omxplayer).
- Node.js webserver included for hosting local web pages displayed in the browser
- HDMI CEC support
- SSH enabled (including SFTP), colorful terminal like connecting to a raspbian installed device
- wpa_supplicant, RPi Wireless drivers, Ralink drivers
- The device will also setup a TTY on the UART (ttyAMA0). You can connect with an USB serial converter.
- simple to use wpe-launcher for launching browser with custom url
- keyboard and mouse input support
- nano text editor
- auto-expand the persistent rootfs on the first boot to the max. SD card size
- mDNS, so you can access your RPi by calling rpi0.local or rpi3.local
- slim buildroot distro (≈300MB) running linux 4.9.80 kernel. Bare system takes 12MB of RAM only!
By the way: Raspberry Pi 3 boots up in 14 seconds - full system, wireless network, Node.js server and fullscreen browser! Raspberry Pi Zero W takes 25 seconds.
We were looking for a suitable buildroot system that could launch directly into a full-screen web browser. The original Buildroot offers a ready to compile Qt WebEngine package, but it is much slower in performance than the usual WebKit implementations. Unfortunately, we couldn't find a solution which was suitable for our purposes. Compiling some of them was partly faulty, not all boards were supported and the WebKit browser couldn't be started conveniently easy. After spending a lot of time, we now have made a perfectly running system. We are glad to offer it to the public now.
Many thanks to https://github.com/hlev for supporting us! Many thanks to all the people who investigated enormous time creating the source code for all the great software!
Most of the adaptions are stored in the ./board/toldotechnik_rpi/rootfs-overlay folder. After creating the sdcard.img it's content is placed in the root / folder.
Two board configurations are available at the moment:
toldotechnik_rpi0_wpe_defconfigfor RPi Zero (V1.3) and RPi Zero W (V1.1), both tested
All other RPi 1 boards should work as well.
toldotechnik_rpi3_wpe_defconfigfor RPi 3 B (V1.2) and RPi 3 B+, both tested
Below you will find the explanations of how the customization is made on the final running Raspberry Pi image.
If you want to apply the settings before building, you can adapt the board/toldotechnik_rpi/rootfs-overlay folder. The default URL for the browser is defined in tthe board/toldotechnik_rpi/post-image.sh script.
Create a /boot/url.txt file and insert the desired link in the first line (e.g. http://localhost).
If the file exists, the browser will start automatically after boot and the url gets loaded in it.
Our distro is capable to boot directly into a full screen video player. We use the super fast omxplayer which supports lots of codecs.
To enable video playback follow these steps:
- Put the video file path into
/boot/video.txtIt can be a local path or any url (eg./var/video1.mp4). - Ensure to delete the
/boot/url.txtfile or its content, so the internal web browser does not get started.
Video gets played in loop mode.
You can modify the sample /boot/wpa_supplicant.conf.example file on your SD card and insert your WiFi settings. After that you should rename the file into wpa_supplicant.conf
If the file exists at boot time it gets moved to /etc/wpa_supplicant.conf and network should start up immediately. Changes are retained even after restarts. If WiFi credentials are missing, boot times will be much longer.
Our custom company boot splash (see patches/psplash folder) is enabled by default. Please contact us if you want another boot splash logo in a prebuilt image.
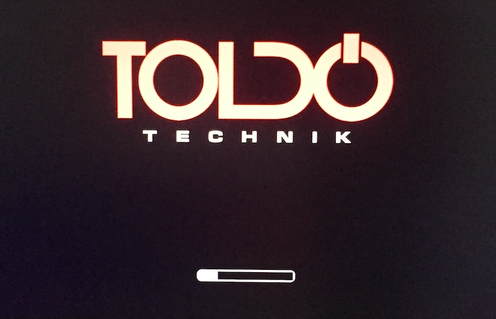
We took some existing init scripts and appended the /usr/bin/psplash-write "PROGRESS x" command, so the progress bar increases while booting and decreases when shutdown is in progress.
Node.js binaries and some node modules are preinstalled:
- express
- serve-static
- nodecec
A small Node.js webserver is also included and gets started while booting. It is running on localhost port 80.
Startup script is located here: /etc/init.d/S30nodeserver
Local web server content is located here: /var/www/
libcec and corresponding node module are both preinstalled so node apps can receive HDMI CEC messages.
See /var/node/server.js for an example.
If you need a real web server like Apache or NGINX please refer to #13 (comment).
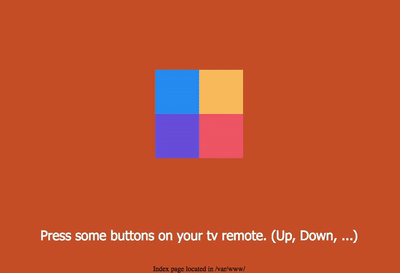
Builtin local web page supporting CEC and keyboard inputs.
If the file /boot/url.txt exists the fullscreen browser will start automatically after boot. You will find the corresponding init script here: /etc/init.d/S90wpe
You can call the web inspector from an external client browser (tested with Chrome and Safari, not working with Firefox). http://rpi0.local:9998 or http://rpi3.local:9998
If you want do disable it, you can comment out the export WEBKIT_LEGACY_INSPECTOR_SERVER=0.0.0.0:9998 line in /usr/bin/wpe
Attach your keyboard and it's working out of the box. Try it out in the input form control on the sample web page. Please note that the keyboard layout cannot be changed for the WPE WebKit browser yet.
Mouse support in the browser window is enabled by uncommenting the export WPE_BCMRPI_CURSOR=1 line in /usr/bin/wpe
SSH (OpenSSH) is enabled by default. You can ssh into it with ssh root@rpi0.local or ssh root@rpi3.local SFTP is also supported.
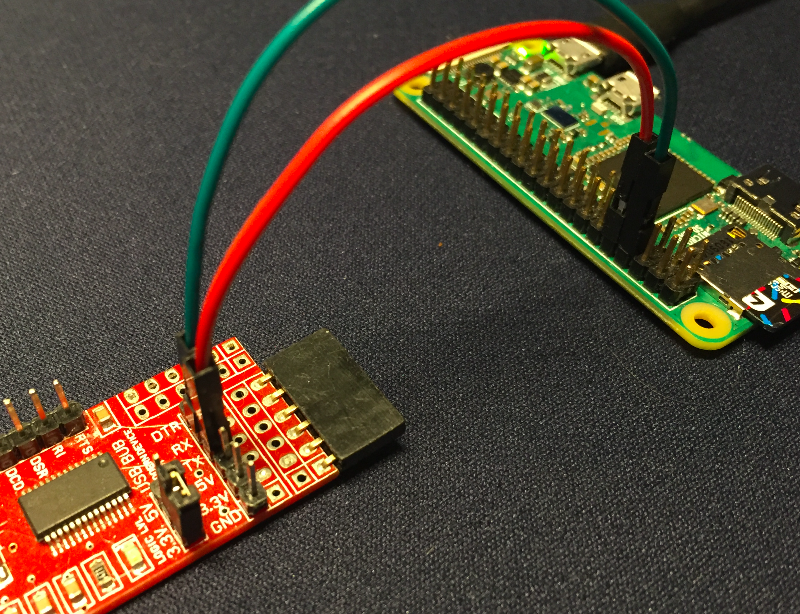
The device will setup a TTY on the UART (ttyAMA0, baud rate: 115200). You can connect to it with an USB serial converter. Ensure to use 3.3V level!
Console output on ttyAMA0 while booting

converter (RX) - green - (TX) RPi
converter (TX) - red - (RX) RPi
Connect GND to GND if you're using different power supplies for the RPi and the serial converter.
The root password is root
Please change it after first boot: passwd root
Due to bootup speed improvement eth0 is disabled by default. You can enable it by editing /etc/network/interfaces. If it's not working please refer to this issue.
The S22resize_rootpart init script expands the root filesystem to the maximum flash disk size on the first boot.
Firstly it expands the root partition, then a reboot is invoked. After second boot the root filesystem gets expanded to match the partition size. After that the system is ready to use and all the init scripts for expanding the root file system get removed.
You can change the CEC client name in /boot/config.txt. Store it in the cec_osd_name variable. It will be shown on your screen when selecting the HDMI source.
Currently, the time zone is set to Europe/Zurich. You can change this by editing the /etc/timezone file. Valid names you can find in the time zones database.
You also have to link the corresponding zone info file:
ln -sf /usr/share/zoneinfo/xx/yy /etc/localtime
for example:
ln -sf /usr/share/zoneinfo/US/Alaska /etc/localtime
Prebuilt images are freely available from our server.
- RPi Zero / Zero W (2020-03-14)
- RPi 2 B (2020-08-15)
- RPi 3 B / 3 B+ (2019-06-24)
Image files can be written the same way as the official Raspberry Pi images. Please see https://www.raspberrypi.org/documentation/installation/installing-images/
If you're using Etcher, you can take the compressed image file without extracting it.
Buildroot compiled Node.js binaries do start much slower than prebuilt ones from nodejs.org
That's why on Raspberry Pi Zero the browser gets loaded before the internal Node.js server is ready. This then results in a blank page screen.
To solve this issue we took the node binary from the prebuilt ones instead: https://nodejs.org/download/release/v8.16.0/node-v8.16.0-linux-armv6l.tar.gz
If you're compiling your own image you can achieve this by creating a sub folder mkdir -p ./board/toldotechnik_rpi/rootfs-overlay/usr/bin and copy the node binary into it.
The Error opening terminal: xterm-256color we solved by creating the /usr/share/terminfo/x/ folder and put in the xterm-256color database file.
If your board does not have onboard WiFi you can attach some USB Ralink WiFi adapters. We've already included those drivers. RTL8188CUS and RT5370 work for sure.
To get the git tools working again you have to update them:
add-apt-repository -y ppa:git-core/ppa
apt-get update
apt-get install git -y
Install the packages:
apt-get install -y git subversion bc zip build-essential bison flex gettext libncurses5-dev texinfo autoconf automake libtool libpng12-dev libglib2.0-dev libgtk2.0-dev gperf libxt-dev ccache mtools libssl-dev
Not fully tested! Seems to have trouble to enable nodejs package...
apt-get install -y git subversion bc zip build-essential subversion libncurses5-dev zlib1g-dev gawk gcc-multilib flex  gettext libssl-dev

package/e2fsprogs from current buildroot master
Clone our repo.
git clone https://github.com/TOLDOTECHNIK/buildroot-webkit.git
Our implementation is based on the WebPlatformForEmbedded/buildroot repository. So let's clone it also. We actually took the master branch commit b3a832d17fa9bfd8a5b2399cf53d1b8311909e68 as of 2019-01-22.
git clone https://github.com/WebPlatformForEmbedded/buildroot
cd buildroot
git reset --hard b3a832d17fa9bfd8a5b2399cf53d1b8311909e68
Add our custom board folder
cp -r ../buildroot-webkit/board/toldotechnik_rpi ./board/
Then add our custom board configs
cp ../buildroot-webkit/configs/toldotechnik_rpi0_wpe_defconfig ./configs
cp ../buildroot-webkit/configs/toldotechnik_rpi2_wpe_defconfig ./configs
cp ../buildroot-webkit/configs/toldotechnik_rpi3_wpe_defconfig ./configs
The guys from WebPlatformForEmbedded switched over to their mighty tool WPEFramework which comes with a lot of plugins, debugging and so on. For most of the cases the older and simpler to use wpe-launcher for starting up the web browser will be sufficiant.
The current WebPlatformForEmbedded/buildroot master branch does not provide the wpe-launcher anymore, so add it easily with our patch again.
patch -p1 < ../buildroot-webkit/0001-port-wpelauncher-from-stable.patch
Everything is ready now. You can load your board's configuration by typing
make toldotechnik_rpi0_wpe_defconfig
or make toldotechnik_rpi2_wpe_defconfig or make toldotechnik_rpi3_wpe_defconfig
If you want to make your own changes, run this before compiling.
make menuconfig
Finally build everything with
make
After some hours of compiling the final image is ready. You can take it from the output directory: ./output/images/sdcard.img
Note: At the time of this writing (02/25/2023), the Node.js module sockt.io cannot be built automatically. socket.io should be disabled in .config and copied manually from a precompiled image after the build.