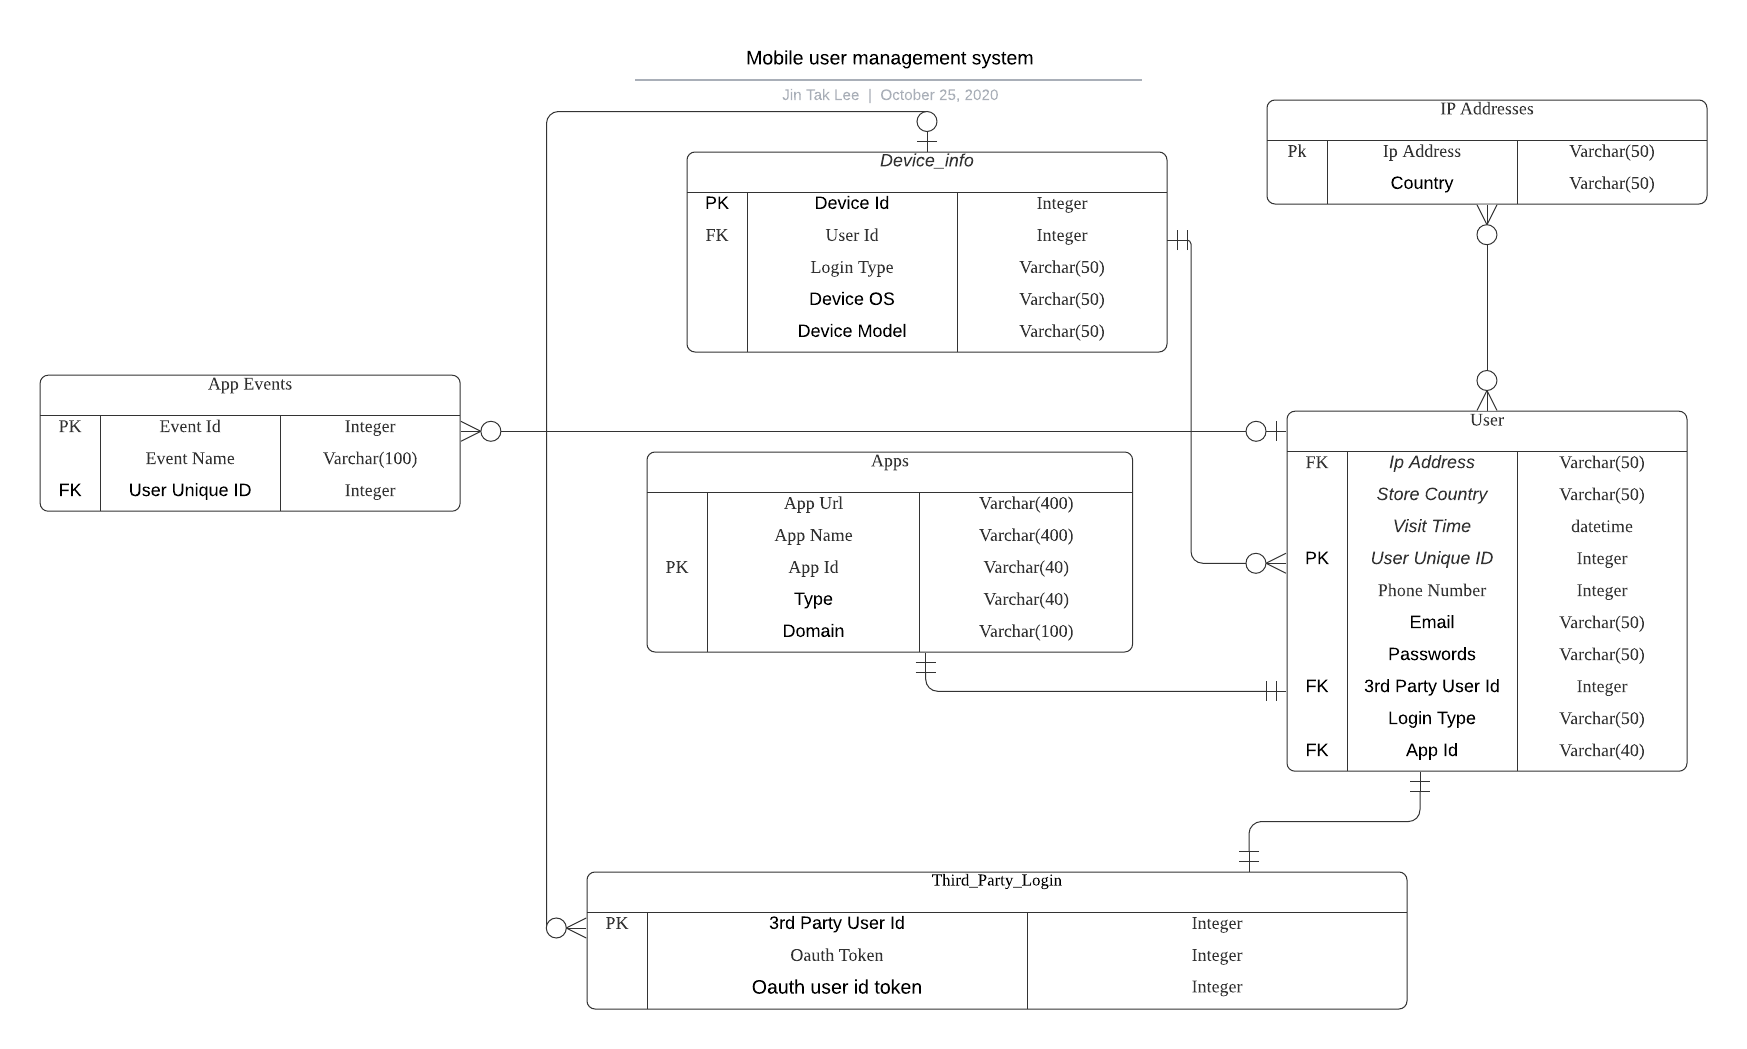
It is an app to track the following features from a user
- App installs
- App events
- Automated push notifications
- Custom or 3rd party login
This app supports both IOS and Android system. The app also supports multiple apps to track user's activities on the apps.
When the app is called, the basic data the app collects are the following
- Ip Addresses
- Country
- Visit time
- Device characteristics
With the data collected from user, our backend generates unique User Id and store the User Id on users' mobile to use it with any subsequent services. The app also offers login systems. When user logins to our login system, his mobile sends following infos:
- User Id
- Login Type
- Oauth Token
- Oauth User Id Token
- Password
The app records any activities that we want to track from users when they use our app. The app also make custom reports of user events. The app uses the following parameters to records:
- User Id
- Time/Date of the event
- Event Value Using the app event service, we are able to track users' behavior toward some of the features of the app (like what they do with our push notifications)
Using One Signal API, the app's backend send push notifactions after creating a specific query to users upon specific events they make.
This guide is created on Ubuntu 16 machine. It should work correctly for all Debian linux operating systems.
Server setup will only show basic commands required to install Docker CE and setup initial PostgreSQL database.
Full Docker CE install guide can be found on: https://docs.docker.com/engine/install/ubuntu/
sudo apt-get update

sudo apt-get install \
    apt-transport-https \
    ca-certificates \
    curl \
    gnupg-agent \
    software-properties-common

curl -fsSL https://download.docker.com/linux/ubuntu/gpg | sudo apt-key add -

sudo add-apt-repository \
   "deb [arch=amd64] https://download.docker.com/linux/ubuntu \
   $(lsb_release -cs) \
   stable"

sudo apt-get update
sudo apt-get install docker-ce docker-ce-cli containerd.io

sudo docker run hello-worldTo connect to db, we need to install postgres client:
apt install postgresql-client-common
sudo apt-get install postgresql-clientPull the docker postgres image, run it then connect to the postgres server to create our users.
docker pull postgres
docker run -d --name postgres-instance -e POSTGRES_PASSWORD=mypwd -p 543:5432 postgres
psql -h 127.0.0.1 -p 543 -U postgres
create database clicktracker;
create user username with password 'pwd';
grant all privileges on database clicktracker to username;
\q
After that we need to set up a crontab script to reboot postgres container if the server reboots.
To open crontab use:
crontab -eThen add the following line:
@reboot docker postgres-instancepsql "postgresql://username:pwd@<ip>/clicktracker" -p 543Create directory on the desired location on the server
mkdir ~/backupsOpen cronjob configuration
crontab -eAdd the following line at the end of a file
0 */2 * * * docker exec -t postgres-instance pg_dumpall -c -U postgres > ~/backups/dump_`date +%d-%m-%Y"_"%H_%M_%S`.sqlGet the swagger UI Docker image
docker pull swaggerapi/swagger-uiCreate a swagger yaml local file that will be run from your Docker instance
touch ~/swagger.yamlPopulate the yaml file with your API content
Run the docker image
docker run -d --name swagger-instance -p 80:8080 -e API_URL=http://64.225.126.152/swagger.yaml SWAGGER_JSON=~/swagger.yaml -v /bar:/foo swaggerapi/swagger-uiAfter that we need to set up a crontab script to reboot swagger container if the server reboots.
To open crontab use:
crontab -eThen add the following line:
@reboot docker swagger-instanceTODO add more explanation later
a2enmod rewrite
systemctl restart apache2
sudo nano /etc/apache2/sites-available/000-default.conf
<Directory /var/www/html>
        Options Indexes FollowSymLinks MultiViews
        AllowOverride All
        Require all granted
    </Directory>
systemctl restart apache2
docker run -d --name swagger-instance -p 81:8080 -e SWAGGER_JSON=/var/www/html/swagger.yaml -v /bar:/foo swaggerapi/swagger-ui
docker run -d --name swagger-instance -p 81:8080 -e SWAGGER_JSON=/var/www/html/swagger.yaml -v /bar:/foo swaggerapi/swagger-ui
docker run -d --name swagger-instance -p 81:8080 -e API_URL=http://64.225.126.152/swagger.yaml -v /bar:/foo swaggerapi/swagger-ui
vi
SWAGGER_JSON=/foo/swagger.json -v /bar:/foo swaggerapi/swagger-ui
docker run -d --name swagger-instance -p 81:8080 -e SWAGGER_JSON=/foo/swagger.json -v /bar:/foo swaggerapi/swagger-ui