Deployment
NOTES
- Old authentication changed, now we can't use bot or replit to generate token.pickle. You need OS with a browser.
- Windows users should install python3 and pip.
- You can ONLY open the generated link from
generate_drive_token.pyin local browser.
- Visit the Google Cloud Console
- Go to the OAuth Consent tab, fill it, and save.
- Go to the Credentials tab and click Create Credentials -> OAuth Client ID
- Choose Desktop and Create.
- Publish your OAuth consent screen App to prevent token.pickle from expire
- Use the download button to download your credentials.
- Move that file to the root of mirrorbot, and rename it to credentials.json
- Visit Google API page
- Search for Google Drive Api and enable it
- Finally, run the script to generate token.pickle file for Google Drive:
pip3 install google-api-python-client google-auth-httplib2 google-auth-oauthlib
python3 generate_drive_token.py
For Service Account to work, you must set
USE_SERVICE_ACCOUNTS= "True" in config file or environment variables. NOTE: Using Service Accounts is only recommended while uploading to a Team Drive.
1. Generate Service Accounts. What is Service Account?
Let us create only the Service Accounts that we need.
Warning: Abuse of this feature is not the aim of this project and we do NOT recommend that you make a lot of projects, just one project and 100 SAs allow you plenty of use, its also possible that over abuse might get your projects banned by Google.
NOTE: If you have created SAs in past from this script, you can also just re download the keys by running:
python3 gen_sa_accounts.py --download-keys $PROJECTID
NOTE: 1 Service Account can upload/copy around 750 GB a day, 1 project can make 100 Service Accounts so you can upload 75 TB a day or clone 2 TB from each file creator (uploader email).
Choose one of these methods
- List your projects ids
python3 gen_sa_accounts.py --list-projects
- Enable services automatically by this command
python3 gen_sa_accounts.py --enable-services $PROJECTID
- Create Sevice Accounts to current project
python3 gen_sa_accounts.py --create-sas $PROJECTID
- Download Sevice Accounts as accounts folder
python3 gen_sa_accounts.py --download-keys $PROJECTID
python3 gen_sa_accounts.py --quick-setup 1 --new-only
A folder named accounts will be created which will contain keys for the Service Accounts.
Choose one of these methods
- Mount accounts folder
cd accounts
- Grab emails form all accounts to emails.txt file that would be created in accounts folder
For Windows using PowerShell
$emails = Get-ChildItem .\**.json |Get-Content -Raw |ConvertFrom-Json |Select -ExpandProperty client_email >>emails.txt
For Linux
grep -oPh '"client_email": "\K[^"]+' *.json > emails.txt
- Unmount acounts folder
cd ..
Then add emails from emails.txt to Google Group, after that add this Google Group to your Shared Drive and promote it to manager and delete email.txt file from accounts folder
- Run:
python3 add_to_team_drive.py -d SharedTeamDriveSrcID
- You may check your team drive in order to see whether the service accounts are added or not. If it’s added by 100 people, then it works. You can check the members too.
https://gitlab.com/ParveenBhadooOfficial/Google-Drive-Index
-
Create Index Workers
-
Copy Paste Index Code.txt
-
Combined all SA (Service Accounts) Credential in one combined.txt by copy paste
-
Open CMD from accounts folder then Copy Paste this code
copy 0.json + 1.json + 2.json + 3.json + 4.json + 5.json + 6.json + 7.json + 8.json + 9.json + 10.json + 11.json + 12.json + 13.json + 14.json + 15.json + 16.json + 17.json + 18.json + 19.json + 20.json + 21.json + 22.json + 23.json + 24.json + 25.json + 26.json + 27.json + 28.json + 29.json + 30.json + 31.json + 32.json + 33.json + 34.json + 35.json + 36.json + 37.json + 38.json + 39.json + 40.json + 41.json + 42.json + 43.json + 44.json + 45.json + 46.json + 47.json + 48.json + 49.json + 50.json + 51.json + 52.json + 53.json + 54.json + 55.json + 56.json + 57.json + 58.json + 59.json + 60.json + 61.json + 62.json + 63.json + 64.json + 65.json + 66.json + 67.json + 68.json + 69.json + 70.json + 71.json + 72.json + 73.json + 74.json + 75.json + 76.json + 77.json + 78.json + 79.json + 80.json + 81.json + 82.json + 83.json + 84.json + 85.json + 86.json + 87.json + 88.json + 89.json + 90.json + 91.json + 92.json + 93.json + 94.json + 95.json + 96.json + 97.json + 98.json + 99.json combined.txt
-
In Notepad:Ctrl + F , Replace “}” with “},” -
Copy Paste SA credentials replace to {}
-
Save INDEX URL
IMPORTANT NOTES:
- You must set
SERVER_PORTvariable to80or any other port you want to use. - To clear the container (this will not affect on the image):
sudo docker container prune
- To delete the images:
sudo docker image prune -a
- Check the number of processing units of your machine with
nproccmd and times it by 4, then editAsyncIOThreadsCountin qBittorrent.conf. - You can add
CONFIG_FILE_URLvariable using docker and docker-compose, google it.
- Clone this repo:
git clone https://github.com/Tamilupdates/KPSML mirrorbot/ && cd mirrorbot
- Start Docker daemon (SKIP if already running):
sudo dockerd
- Build Docker image:
sudo docker build . -t mirror-bot
- Run the image:
sudo docker run -p 80:80 mirror-bot
- To stop the image:
sudo docker ps
sudo docker stop id
NOTE: If you want to use port other than 80, change it in docker-compose.yml also.
sudo apt install docker-compose
- Build and run Docker image:
sudo docker-compose up
- After editing files with nano for example (nano start.sh):
sudo docker-compose up --build
- To stop the image:
sudo docker-compose stop
- To run the image:
sudo docker-compose start
Important Notes
- Generate all your private files from master branch (token.pickle, config.env, drive_folder, cookies.txt, accounts, .netrc) since the generators not available in Heroku branch but you should add the private files in heroku branch not in master or use variables links in
config.env. (recommended use the private files index links in theconfig.env) - Don't add variables in heroku Environment, you can only add
CONFIG_FILE_URL. - Don't deploy using hmanager or GitHub integration.
- To avoid idling fill
BASE_URL_OF_BOTor you can use corn-job to ping your Heroku app. - If you want to edit anything in code, so u should edit update branch. After that u should add fill
UPSTREAM_REPOof your fork and leaveUPSTREAM_BRANCHempty since it's by defaultupdate. - This branch use megasdkrest and latest version of qBittorrent...
- Clone this repo:
git clone https://github.com/Tamilupdates/KPSML mirrorbot/ && cd mirrorbot
- Switch to heroku branch
-
NOTE: Don't commit changes in master branch. If you have committed your changes in master branch and after that you switched to heroku branch, the new added files(private files) will
NOTappear in heroku branch.
-
NOTE: Don't commit changes in master branch. If you have committed your changes in master branch and after that you switched to heroku branch, the new added files(private files) will
git checkout heroku
- After adding your private files
git add . -f
- Commit your changes
git commit -m token
- Login to heroku
heroku login
- Create heroku app
heroku create --region us YOURAPPNAME
- Add remote
heroku git:remote -a YOURAPPNAME
- Create container
heroku stack:set container
- Push to heroku
git push heroku heroku:master -f
- To create heroku-postgresql database
heroku addons:create heroku-postgresql
- To delete the app
heroku apps:destroy YOURAPPNAME
- To restart dyno
heroku restart
- To turn off dyno
heroku ps:scale web=0
- To turn on dyno
heroku ps:scale web=1
- To set heroku variable
heroku config:set VARNAME=VARTEXT
- To get live logs
heroku logs -t
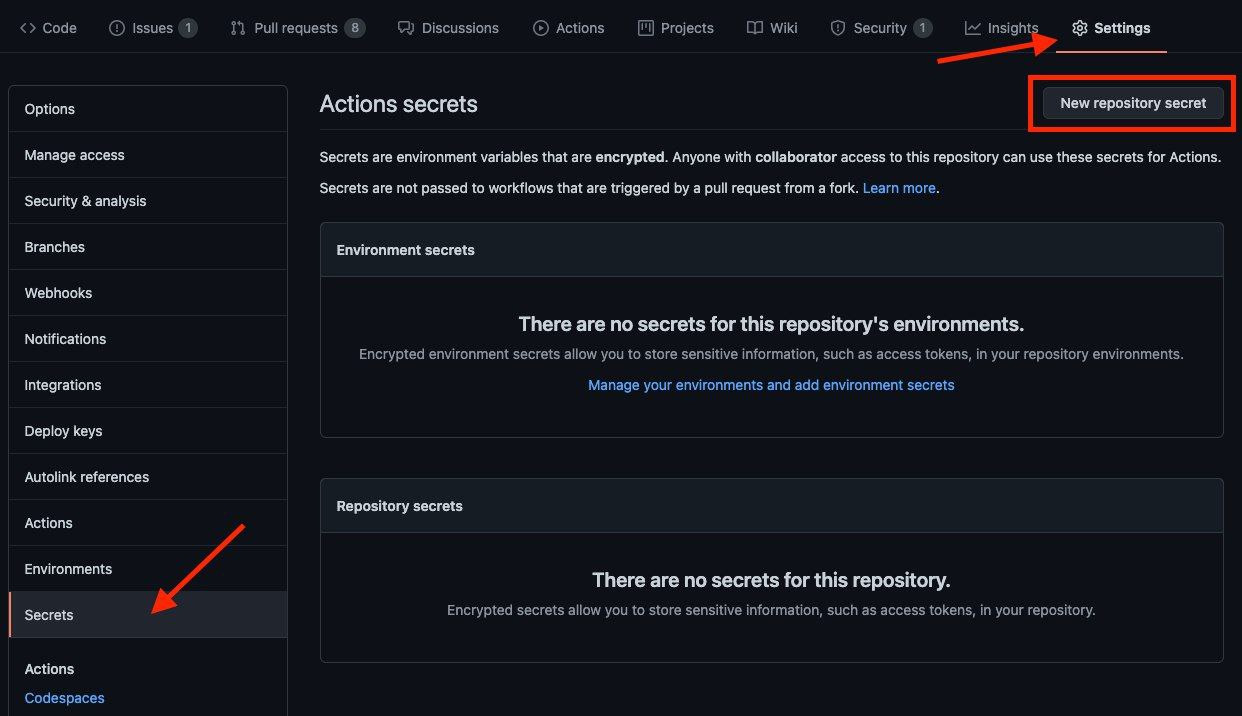
- Go to Repository Settings -> Secrets
-
Add the below Required Variables one by one by clicking New Repository Secret every time.
- HEROKU_EMAIL: Heroku Account Email Id in which the above app will be deployed
- HEROKU_API_KEY: Your Heroku API key, get it from https://dashboard.heroku.com/account
- HEROKU_APP_NAME: Your Heroku app name, Name Must be unique
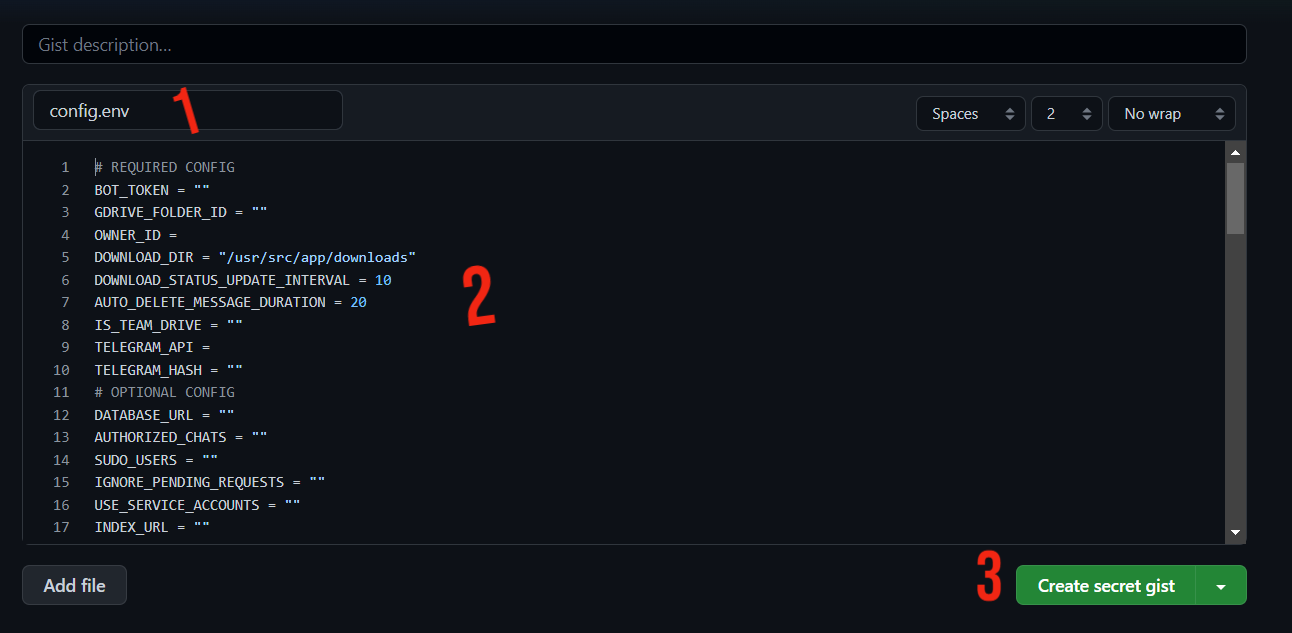
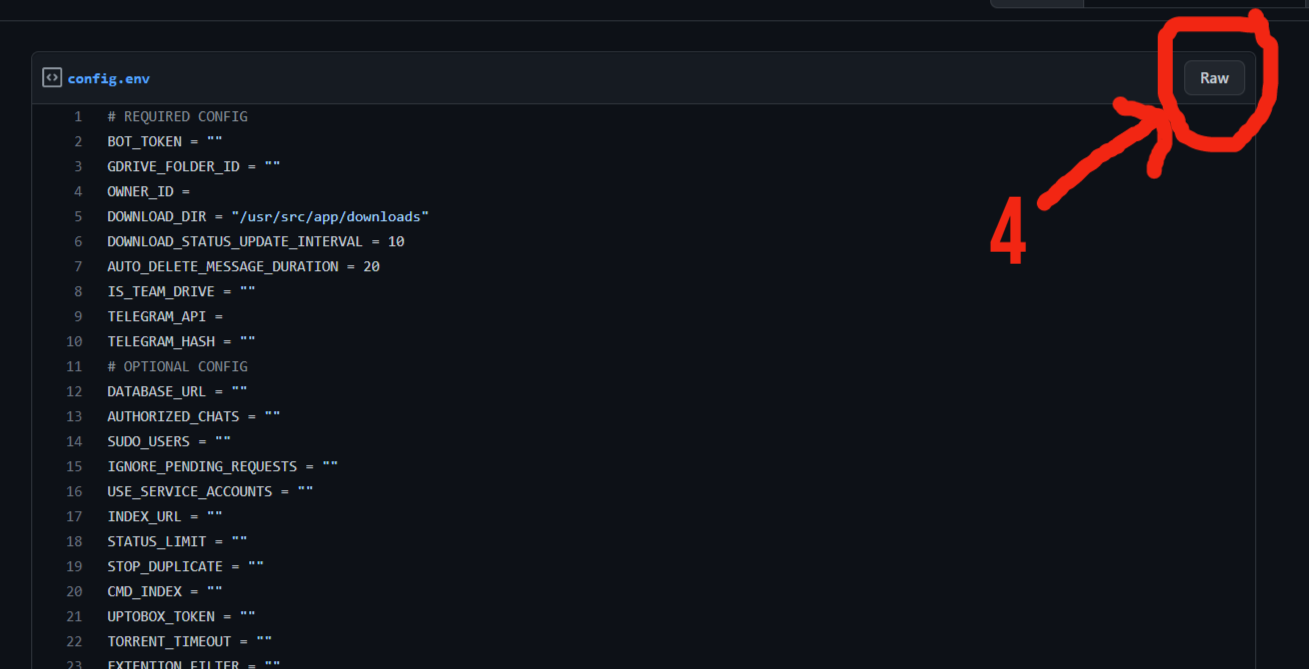
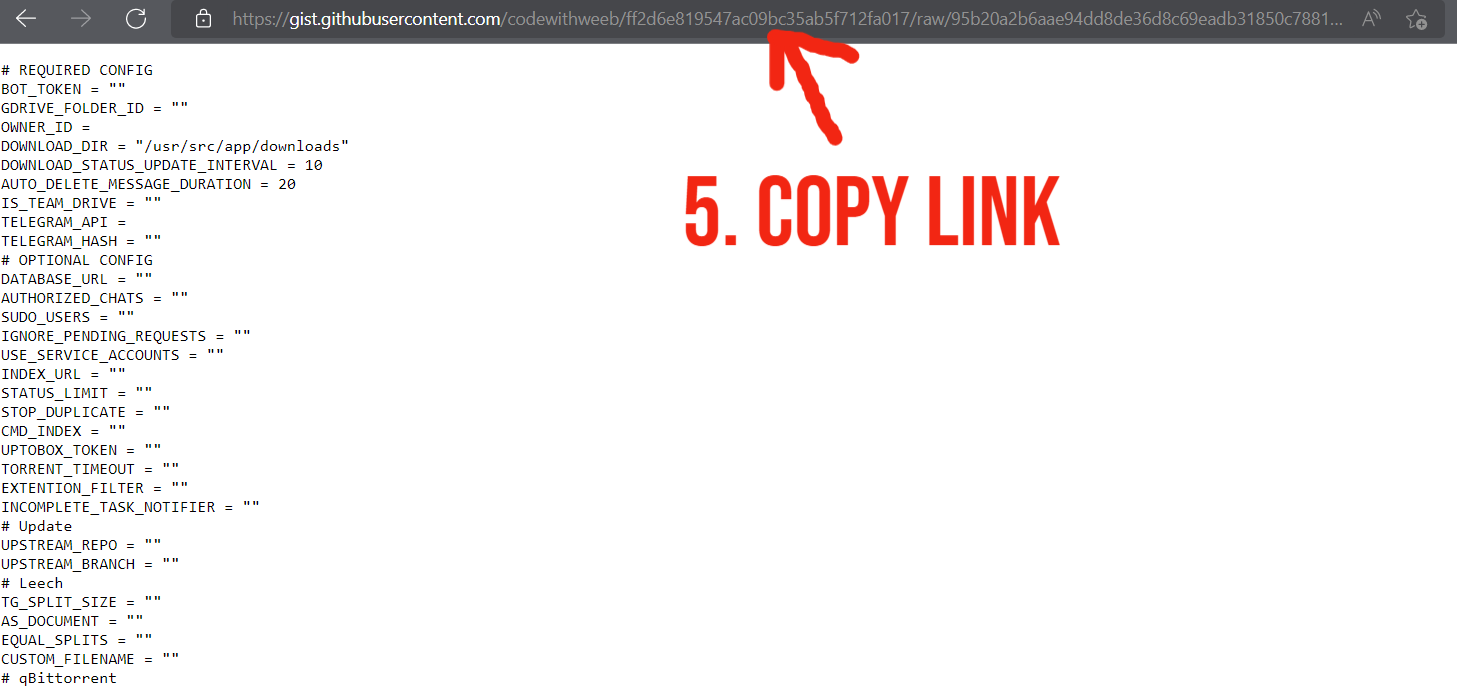
- CONFIG_FILE_URL: Copy This in any text editor. Remove the REMOVE_THIS_LINE=True line and fill the variables. For details about config you can see Here. Go to https://gist.github.com and paste your config data. Rename the file to config.env then create secret gist. Click on Raw, copy the link. This will be your CONFIG_FILE_URL. Refer to below images for clarity.
-
Remove commit id from raw link to be able to change variables without updating the CONFIG_FILE_URL in secrets. Should be in this form: https://gist.githubusercontent.com/username/gist-id/raw/config.env
-
Add all your private files in this branch or use variables links in
config.env. -
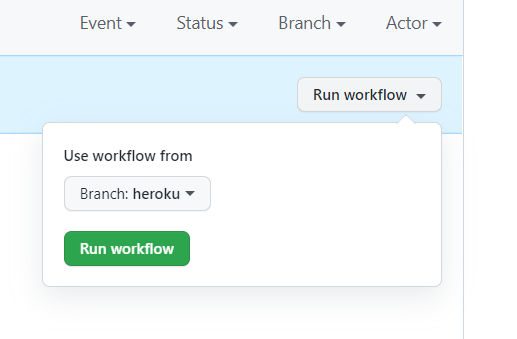
After adding all the above Required Variables go to GitHub Actions tab in your repository.
- Select Manually Deploy to Heroku workflow as shown below:
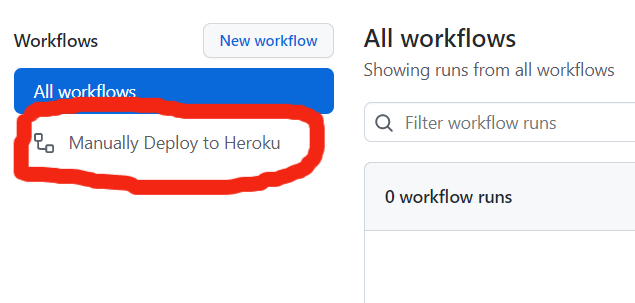
- Choose
herokubranch and click on Run workflow