Using the Pi Zero as a MIDI USB gadget, MIDI2GPIO is a python script that will pass along note and velocity information to the assigned GPIO pins with PWM. Much of the script, and my understanding of even basic python comes from the awesome work by Tobias Wissmueller here: http://www.rampmeupscotty.com/blog/2016/01/24/receiving-midi-on-rpi/
To use this script, I assume you have ssh access over WIFI or a USB ethernet adapter, which will be broken after this process. I highly recommend using a Pi Zero W and using the built in WiFi to issue commands over SSH so we can have access to the USB data port.
-
Follow gbaman's excellent guide on how to setup the Pi Zero as a USB MIDI gadget. Use process number 2, swapping in 'g_midi' instead of 'g_ether' for the last command: https://gist.github.com/gbaman/50b6cca61dd1c3f88f41
-
Plug in the device into a computer with a DAW. I've tested this on a Mac with Ableton Live and have no issues seeing the device. Assign MIDI to be sent on Channel 1 to your Pi.
-
Copy over the script, or run 'nano MIDI2GPIO.py' and paste the script into the text editor, saving with 'CTRL + X', then 'Y and Enter'.
-
Run the script with 'python MIDI2GPIO.py' and test by sending a middle C to your Pi. If all works well, you should see the note, velocity, and brightness level appear on your screen, as well as output on GPIO pin 21.
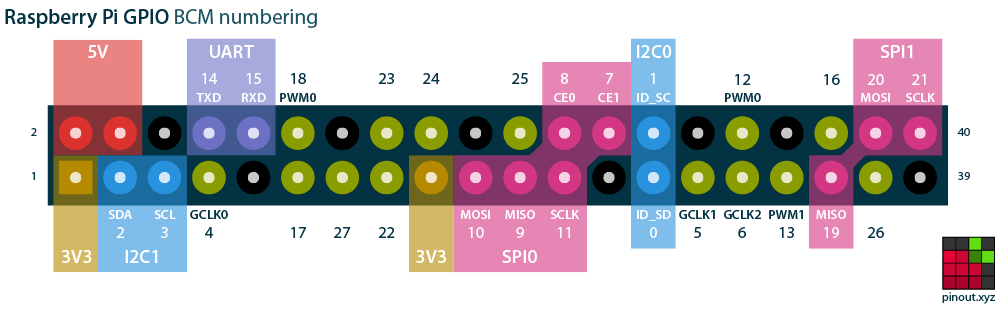
I'm using the GPIO number scheme found here: https://pinout.xyz/resources/raspberry-pi-pinout.png Current values are as follows. Middle C (60) = GPIO 21, D above middle C (62) = GPIO 20, E above middle C (64) = GPIO 16.
You can find out notes and their assigned midi note numbers here: http://cote.cc/w/wp-content/uploads/drupal/blog/logic-midi-note-numbers.png
I've included my pre-built Ableton racks for controlling the default 3 LEDs with incoming audio. Place 'MIDI2GPIO Audio Capture' on the audio channel you would like to use to drive LED's 1-3. Place MIDI2GPIO Control on a new MIDI track with the MIDI output assigned to your Raspberry Pi. You must have MAX for Live Installed due to some modules that capture the peak of an audio signal and send a MIDI note once triggered. This emulates those light up T-Shirts and Hats you find at festivals, fairs, raves, etc.
If you have any questions or ideas to expand this project feel free to reach out to me!