Configuration Management
Looking for the application configuration?
Using a PaaS solution (Heroku) has greatly reduced the configuration Management tasks for Total Briecall.
Other than what application is on the machine, the actual configuration of the OS instance does not matter as it is completely managed by the PaaS solution. Because of this the only configuration we are responsible for is the configuration and management of our actual application code and application dependencies. If we were to have used an IaaS solution, something like Ansible would have been in order. Ansible is a configuration management tool, much like Puppet which would allow us, via scripting, to manage many platforms simulataneously and ensure consistent configuration and easy management of all of the deployed system.
When using a NodeJS solution, the dependencies are managed via a combination of NPM (Node Package Manager), and the package.json included with the application. The package.json file defines what dependencies are required by the application, as well as what version(s) of those dependencies are allowed.
As for actual application configuration values, such as connection strings, they are managed by Heroku. When an NodeJS application is deployed, its settings are configured in the Configuration Variables section of the app. Once those settings are set, they apply to any instances (Dynos) that are running the application. Since Configuration Management is bound at the application level it becomes very easy to maintain as all Dynos running that application because they will all automatically receive the same configuration.
Configuration variables can either be set via the interface or via the Heroku Toolbelt CLI command:
heroku config:set MY_KEY1=MYVALUE_A MY_KEY2=MYVALUE_B --app <APPNAME>
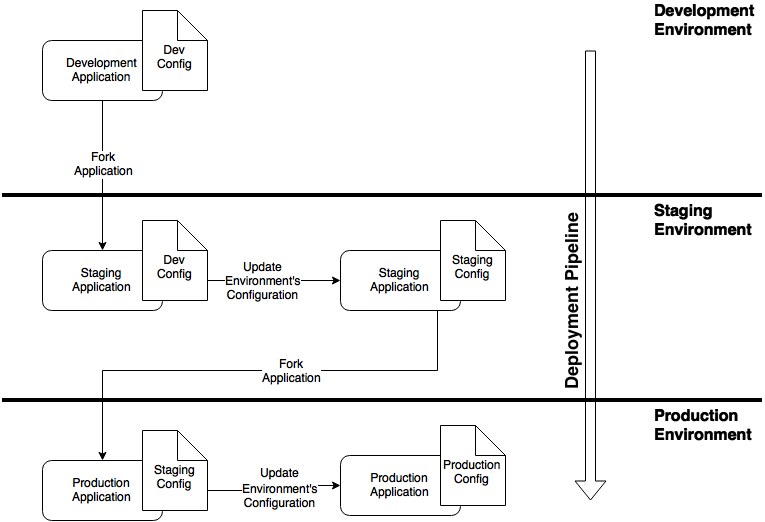
Heroku also has a beta functionality that allows the pipelining of applications from one environment to another. This allows operations and development teams so fork running instances, create downstream pipelines, push changes to the upstream, test, and then push those finalized changes down the pipeline from environment to environment.
In the diagram below, the steps are as follows (Offical Documentation):
- Development environment was forked to staging (since one did not exist)
- Staging configuration was updated
- The pipeline was created between development and staging
- Staging environment was forked to production (since one did not exist)
- Production configuration was updated
- The pipeline was created between staging and production
- Development received an update from from GitHub, and it was validated as working
- Operations pushed the pipeline, which pushed development code to staging, and staging code to production
heroku fork -a development staging
heroku config:set MY_KEY1=MYVALUE_A MY_KEY2=MYVALUE_B --app staging
heroku pipeline:add -a development staging
heroku fork -a staging production
heroku config:set MY_KEY1=MYVALUE_C MY_KEY2=MYVALUE_D --app production
heroku pipeline:add -a staging production
heroku pipeline:promote