A simple yet functional Discord verification bot for new members. Please contact
☣ Tσxιƈ Dҽʋ ☣#7308for help setting up this bot!

This bot is a Single Server Bot and can only be used in One Guild.
This basic, simple - yet very useful verification bot for Discord - built on discord.js
Node.js version v8.0.0+ (to check your node version, you can type
node --version- to update Node, use nvm andnvm install 9.5.0(latest version as of this edit) which works here (cannvm install <version>andnvm use <versionanytime to switch)
Git (to clone the repository, which is the easiest way)
The rest of the dependencies (just discord.js) are handled through nvm.
Any unmet peer dependency warnings after using npm to install can be safely ignored as they are not needed for this project and this is the normal behavior within discord.js
After you ensure that your Node is the correct version, simply install the dependencies through npm:
git clone https://github.com/TheRealToxicDev/Toxic-Verifier.git && cd Toxic-verifier && npm install -g
(you can also do each command above separately, these just combine three with &&)
(1) You must edit
verify.jsaccordingly. All the message strings are consts inverify.js. Specifically, you have to edit:
const welcomemsg = ``
const verifymsg = ''
const completemsg = ``
Where:
welcomemsg: the message to send on guild join
verifymsg: the message that the users must type to gain the verified role - include the token here (see below)
completemsg: the message sent upon successful verification
-
The
verifymsgcan be edited, just remember this is what the string will be that the user must type. In the latter part ofverify.js, there will be amember.send(Stuff here...);which I mention at the top of the file in a comment with instructions: -
The
verifymsgconst at the top is not the same, but it is the string they must match perfectly to actually verify their account and get the role assigned. Can be anything you want, for example if you just want it to be the token with no message, simply editconst verifymsg = '{token}'; -
Just remember that when you edit the welcomemsg (
const welcomemsg) with your message, include what the member has to post to get verified. If you change theverifymsgto '{token}', then you should say something likePlease post the following: {token}or whatever you wish. If the user doesn't know what they need to do, then it will be obviously confusing! The examples are inverify.jsfor you to see.
(2) You must also edit
config.jsonaccordingly. Specifically, you have to edit:
{
	"token": "",
	"guild": "",
	"role": "",
	"playing": ""
}
Where:
token: your bot's token.
guild: the guild ID (not name) for the bot.
role: the role ID (not name) for the bot to assign upon verification. Must be a valid/active role, bot must have role-assign permissions.
playing: the game that the bot shows playing on Discord.
- Save the changes and continue onwards.
-
The point of this bot is to manage your guild so that users can't see much - if at all - unless verified. You need to make sure that the channel permissions are correct for the roles.
-
When I say "MEMBER" role I mean the role most of the members will have, and the role once verified by the bot going forwards. So this is the role ID that will go in the ROLE const in
verify.js -
So, here is a guide - and I am sorry for the detail, but this is one of the most common/one of the easiest things to mess up due to the nature of the permissions system being different and channel overrides:
Edit the guild-wide permissions for the @everyone role in your server to not have READ_MESSAGES as a guild permission. The downside to this is that users cannot read any messages, even in say an announcements or serverinfo channel, or if you have a helproom for new users they can't either. So, I do it the "hard" way, but it's (frankly) the proper way to do it and a one time task. Anyway, if you do this route, then add a members role with permissions to read messages, etc. on a guild level.
Your "main" room (the general chat room assigned by discord) is special as it can't be deleted. It also can't have the read messages permission revoked like other channels. But we can do this another way.
For every channel except the general/main one, the @everyone role should have deny (so edit channel permissions for the @everyone role and make sure it has the READ_MESSAGES permission set to red/off/disabled). This will cause most channels to not be seen at all.
Create a role for your members, which has access to the main channels in your guild. All your members mainly will be in this role, including the new ones after verifying. This is the role that the bot will assign to verified users. Now, edit all the channel permissions for every channel your regular members should be able to access and give the READ_MESSAGES permission to green/on/enabled.
Lastly, in your general channel, we can't disable the READ_MESSAGES. But, for the @everyone role, we can disable
READ_ MESSAGE_HISTORY- which will show the channel to the unverified user, but it will have no content in it unless they are verified and then they can see history again. For just the general/main channel we should also, in addition to enabling READ_MESSAGES for our members role, enable theREAD_MESSAGE_HISTORYfor the permissions heirarchy. The optional step is to disableSEND_MESSAGESin our main/general room for the @everyone role. I personally don't, because I use that room if anyone has questions or whatnot, so I allow unverified/new members to send messages, but they cannot view the history, so it's like a blank slate for them. If you do disableSEND_MESSAGESfor @everyone, they won't be able to really message anywhere, so make sure you have a read-only for all channel like announcements with an FAQ or whatnot. Lastly, if you do disableSEND_MESSAGESfor the general room @everyone role, be sure to enable it for the members role too.
If this was all done properly then you don't need to do anything else. Remember, for the other channels, we only need to modify the
READ_MESSAGESon each channel for the @everyone role to red/disable/off -- doing just that will hide the channel, so no need to make everything disabled, that is bad practice and causes issues for many down the road. Leave the rest of the permissions at the default setting. Just enableREAD_MESSAGESfor the member role for all channels.
If you have an announcements channel, this is fine, of course, just make it read-only which it probably is for everyone. Here the @everyone role wants to have
READ_MESSAGE_HISTORYandREAD_MESSAGESbut notSEND_MESSAGES, which should be the default behavior of a serverinfo/announcements/FAQ page or the like for your members role too.
*It is very important that the above gets done correctly, otherwise the bot won't do its job. Well...it will, but if your @everyone role can message and view channels freely, then assigning them a MEMBER role will not do much for verification
Here is a cheatsheet:
| Channels | @everyone role | Members Role |
|---|---|---|
| announcements | HISTORY: YES, READ: YES, SEND: NO | HISTORY: YES, READ: YES, SEND: NO |
| main/general default | HISTORY: NO, SEND: YES/NO CHOICE | READ: YES HISTORY: YES SEND: YES |
| some-channel | READ: NO | READ: YES |
| some-channel-2 | READ: NO | READ: YES |
| some-channel-3 | READ: NO | READ: YES |
| staff-channel or private | READ: NO | READ: NO |
You shouldn't touch other permissions when you don't need to ;)
Lastly, if you have any MUTED roles by bots, make sure they are above the Members role in the channel heirarchy, and just have that role set to
SEND_MESSAGESdisabled. This way if you give a Member role the SEND_MESSAGES permission for a specific channel, the Muted role will only work if it is above in the ranking, otherwise it will be useless. (this applies to Mute actions via. bots for now)
So.....assuming you don't have any overrides, this will work 🏆
here is a good guide from jagrosh - this page applies for getting a token and client ID
-
Invite the bot using the link to your server. It will show offline until we start it.
-
cdto your directory if you haven't already. By this step I assume you have ran thenpm install -gand should see anode_modulesfolder, averify.jsfile, and a README file. Inside that directory, which I am assuming isToxic-Verifierif you followed the first step, simply use node to install. -
NOTE: Make sure you have your
verify.jsconfigured (the strings edited to your desire). Again, if you look at theverify.jsfile it has all the comments for information on changing the strings, and by default it has our base implementation.
Start the app: (it is well worth it to see the below section as well!)
$ node verify.jsYou will want to keep this online even if your terminal window times out. We have two main options. I strongly reccomend the first, pm2, as it is built for node and works very well - manages restarts if needed, can map it to systemd so it will restart automatically on server/VPS/etc. reboots, is able to be used to monitor the status, and does default logging, plus a ton of other potential things we don't need for this app.
Don't forget to terminate any sessions you have of the bot running before doing this.
pm2 can be found here: https://github.com/Unitech/pm2
You can read their quick install instructions, it takes just a minute. Please make sure you run pm2 update if you have pm2 but haven't updated in a while. It is seamless.
Once installed, instead of using node verify.js we go in our same directory and can run:
pm2 start verify.js --name "somename" where you can edit somename to call your application.
Make sure the node version of pm2 is adequate. It is more than likely fine, but I personally run my applications with PM2 the following way:
-
In the folder for the bot, create a file called botname.json (whatever you wish)
-
Use an editor (this is just a a few lines we will be needing, so I just do it with nano in the terminal) to edit the file.
-
I am using it on the latest node - if you don't have this and wish to, again can use nvm and do
nvm install v9.5.0which will switch and install that node version for you.
[{
	"name": "application-name",
	"exec_interpreter": "node@7.9.0",
	"script": "verify.js"
}]
-
Save this file in the same directory as
verify.js. I called itverify.json(note: we can add a lot of things to this json file, like"interpreter_args":but we do not need that here. Just good to know for the future if this comes in handy. -
Now we can run:
NVM_DIR=/path/to/.nvm/ pm2 start verify.json
- The path to your nvm can be found by typing
which node(orwhich npm) and it will output something like:
# example output of which node with nvm

vlexar@node1:~$ which node
/home/vlexar/.nvm/versions/node/v9.5.0/bin/node

# or if you are running under the root user, it may look like

root@lemp-512mb-nyc3-01:~# which node
/root/.nvm/versions/node/v9.5.0/bin/node
-
Either way, the path is the part up to the
/.nvm/directory. We should use the absolute path here, so in my case:/home/vlexar/.nvm/is the path to nvm, or in the other example it would be/root/.nvm/ -
So we can now run:
$ NVM_DIR=/path/to/.nvm/ pm2 start verify.json # with our updated path :-)
Running this will start the application reading the json file we edited, which tells it to use the node v7.9.0 interpreter, and the application name for pm2. All done! You should see the bot come online if it has been invited/added to the guild.
RUNNING AS SYSTEMD Once we did all this with pm2, we can have it so it will restart on things like server reboots. For Linux,
systemdmanages the startup tasks. Once we started the bot, we can simply runpm2 startup systemdwhich will take your pm2 projects and run them in the systemd for autostartup on harder reboots.
pm2 unstartup [platform]                    disable and clear auto startup
pm2 startup [platform]                      setup script for pm2 at boot

where [platform]=systemd,upstart,launchd,rcd   # one of these, with Linux it is just systemd
(this step was optional re: systemd, but it is a good step to take and only is a few seconds to enable as pm2 will automate the config)
If for some reason you don't want pm2, then tmux will work for the basic task. Their page is here: https://github.com/tmux/tmux
Linux based and macOS systems (which, if you couldn't tell, this is written that way) are going to either come with tmux installed depending on the provider, or you can get it by doing
sudo apt-get update && sudo apt-get -y install tmuxon Debian/Ubuntu,sudo yum install update && sudo yum -y install tmuxon CentOS/RHEL based systems, if those don't work you may need to do something likeyum epel-releasebefore, but I digress.. on macOS you can use a package manager, like homebrew - which is super easy to install - and then dobrew install tmux
tmux is fairly easy, but there's a ton of things you can read about it if you wish.
- If you use tmux here, you would just need to run something like this once tmux is installed:
$ cd Toxic-Verifier
$ tmux new -s Toxic-Verifier
$ node verify.js
And do CONTROL+B+D on your keyboard to detach from the session. To attach, do tmux a -t [name] - here tmux a -t Toxic-Verifier and tmux ls to list all processes. To kill a session, you can do tmux kill-session -t [name] - so here tmux kill-session -t Toxic-Verifier
There's a lot more to tmux, but that's all you need for this if you do decide to use it instead of pm2, which I again strongly suggest you use instead here.
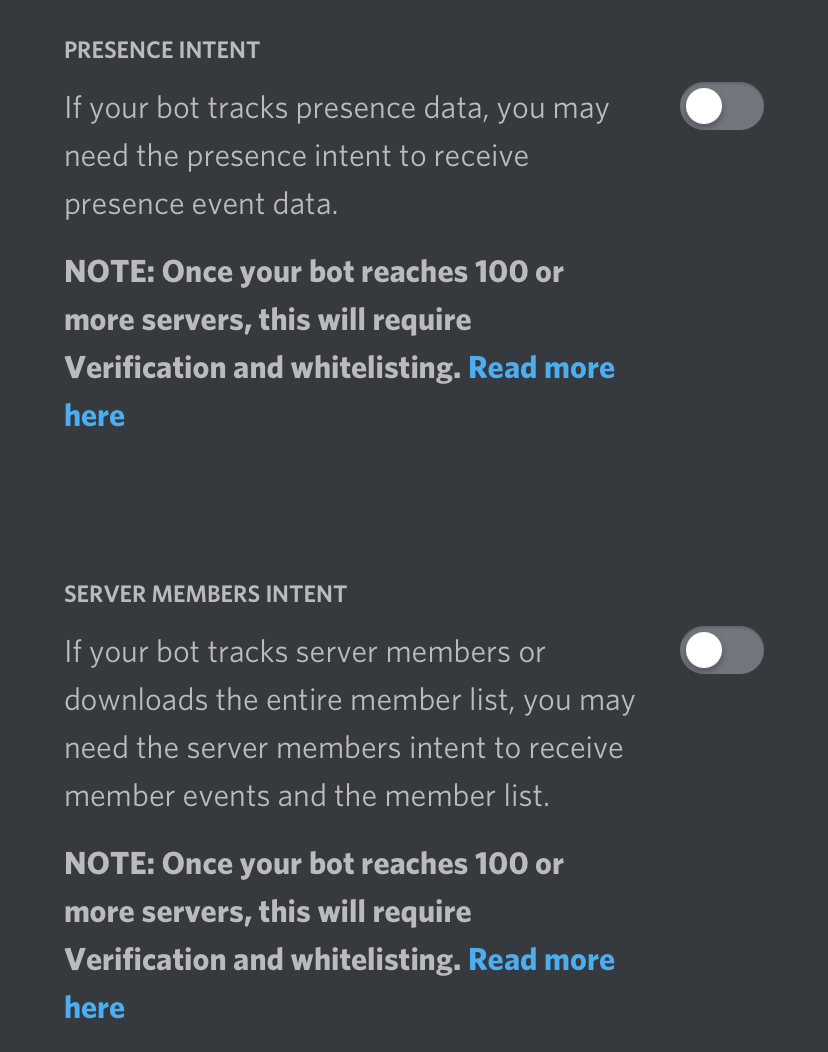
As per Discords newest update you must allow intents for the bot to be able to send DMs.
You can contact me directly on Twitter @TheRealToxicDev or on Discord as ☣ Tσxιƈ Dҽʋ ☣#7308 (ID: 510065483693817867)
You can also join my server here: ToxicDevelopment
The code here is under UNLICENSE, and you may utilize it as you wish. No implied warranty or guarantees, of course, but that should go without saying on most if not all Discord bots and tools. :)