movies, K-Nearest-Neighbors,KNN, predict movies
How many of you spend countless hours trying to find the right movie to watch? I second that! The premise of this build was to predict recommendations from user ratings that have rated 75 or great films. By inputting a film title into our application we used the k-nearest neighbors aka KNN algorithm that predicts an output of ten recommendations. I’ll do my best to break down the process and the thinking in layman terms as best I can.
| Jorge A. Lima | |
|---|---|
 |
|
| |
Python
K-Nearest-Neighbors(KNN)
Setup:
Jupyter notebook
text editor
or
Google Colab
Installation:
pip install scikit-learn
pip install fuzzywuzzy
pip install python-Levenshtein
pip install sparse==0.1.1
Import Statements:
#classics
import pandas as pd
import numpy as np
import os

# algorithm
from sklearn.neighbors import NearestNeighbors
# sparse matrix

from scipy.sparse import csr_matrix

# string matching
from fuzzywuzzy import fuzz
from Levenshtein import *
from warnings import warn
Environment setup:
-
Open your command-line (Terminal for MacOS, Anaconda Prompt for Windows)
-
Navigate and download requirements.txt
-
Run
conda create -n FILMLY python == 3.7Once the command completes, your conda environment should be ready to go. -
Now, we are going to add the proper python packages for this application. You will need to activate your conda environment:
source activate FIMLYon Terminal orconda activate FILMLYon Anaconda Prompt. Once your environment is activated, runpip install -r requirements.txt, which will install the required packages into your environment. -
We are also going to add an ipython Kernel reference to your conda environment, so we can use it in JupyterLab or text editor of choice.
-
Next, we will run
python -m ipykernal install — -user — -name FILMLY- -display-name “FILMLY(Python3)"=> This will add a JSON object to an ipython file. So when we are using JupterLab if you go this route. It will know that it can use this isolated instance of Python. -
Deactivate your conda environment and launch JupyterLab. It would help if you remembered to see “FILMLY (Python3)” in the list of available kernels on the launch screen.(Jon-Cody Sokoll)
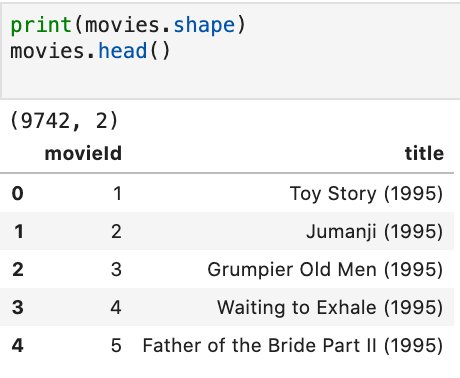
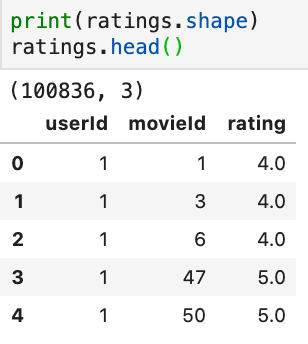
After installing the above assets to build our project we can download our dataset from MovieLens. This data changes over time, as listed on site. “it is not appropriate for report research results.” This zip file contains several files. We are only utilizing movies.csv and ratings.csv. There is a tag DataFrame that will be interesting to implement into another build. For now, I will stick with those two files.
Now we can load and validate our data.
# configure file path
data_path = os.path.join(os.environ['DATA_PATH'], 'MovieLens')
movies_path = 'movies.csv'
ratings_path = 'ratings.csv'#read data
movies = pd.read_csv(
    os.path.join(data_path, movies_filename),
    usecols=['movieId', 'title'],
    dtype={'movieId': 'int32', 'title': 'str'})

ratings = pd.read_csv(
    os.path.join(data_path, ratings_filename),
    usecols=['userId', 'movieId', 'rating'],
    dtype={'userId': 'int32', 'movieId': 'int32', 'rating': 'float32'})
Next will view our movies data:
print("Top 10 Rating by user")
print(df["rating"].value_counts().head(10))

plt.figure(figsize=(8,6))

#Total rating distribuition
g = sns.distplot(df["rating"], bins=20)
g.set_title("Rating distribuition", size = 20)
g.set_xlabel('Rating', fontsize=15)
Now that both of our datasets we have to pivot the DataFrame and also make sure fo fill NA/NaN using a specified method. We use this to fill any holes in our data a simply default the value to zero. Don’t worry any values, not in our DataFrame will not be filled. This way That way it doesn’t interfere:
# Here we are making a pivot to set our dataset and features
features = ratings.pivot(index='movieId', columns='userId',  values='rating').fillna(0)
# now will convert our DataFrame of movie features to scipy sparse matrix:
matrix_movie_features = csr_matrix(features.values)
# number of ratings each movie recived:
movie_count = pd.DataFrame(ratings.groupby('movieId').size(), columns=['count'])
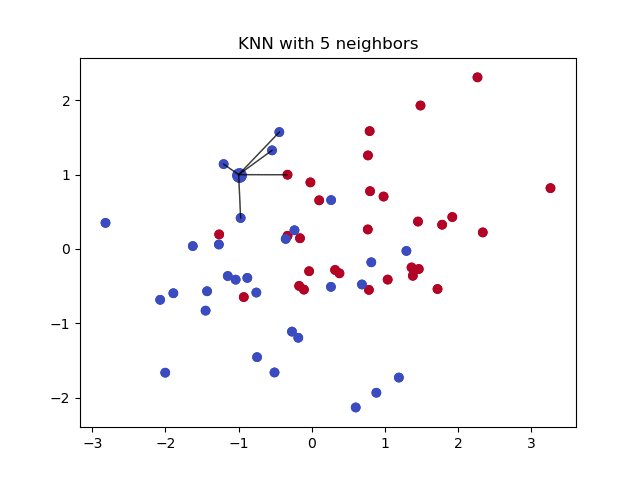
Now we can discuss how we are pivoting into K-Nearest Neighbors(K-NN). Why do you ask why we did an array? For our film recommended we needed our data to be in anm x n array. Ourmrepresents the number of moves and n represents our number of users. We had to reshape our DataFrame by pivot which allows setting the movie as rows and format our users as columns. Since our rating distribution is 0–5 as the chart below. We will be calculating the distances between our vectors. By doing this will need to perform linear algebra. (Kevin Liao)
We will be using cosine similarity for our nearest neighbor search. When a KNN helps us under the hood, it is relying on us to set up our pivot and features to help predict movies by calculating our distances between similar user movie recommendations reason why are dataset is sparse.
Here is an example of a KNN with 5 neighbors. We will set our parameters to 10 so we can predict ten movies. To learn more I recommend watching StatQuest: K-nearest neighbors, Clearly Explained
Parameters:
n_neighbors: int, default = 5
-
Will set ours to 10 algorithm: {‘auto’, ‘ball_tree’, ‘kd_tree’, ‘brute’}, default = ‘auto’
-
optional metric: string or callable, default ‘minkowski’
-
‘ball_tree’
-
‘kd_tree’
-
‘brute’ will use a brute-force search.
-
‘auto’
Read more on sklearn.neighbors.KNeighborsClassifier
Lets review. Now we have our sparse matrix complete our DataFrame is transformed and ready to predict movies. We will now need to implement our KNN model with the following parameters:
# applying and defining our model
model_knn = NearestNeighbors(metric='cosine', algorithm='brute', n_neighbors=10, n_jobs=-1)
#fit
model_knn.fit(movie_user_matrix_sparse)
Since we will not be utilizing NLP natural language processing. We, will, kind of, by using a magical matcher called FuzzyWuzzy. This will aid us in getting a proper ratio of our movie names by string matching. Under the hood, it uses Levenshtein Distance which will calculate between sequences.
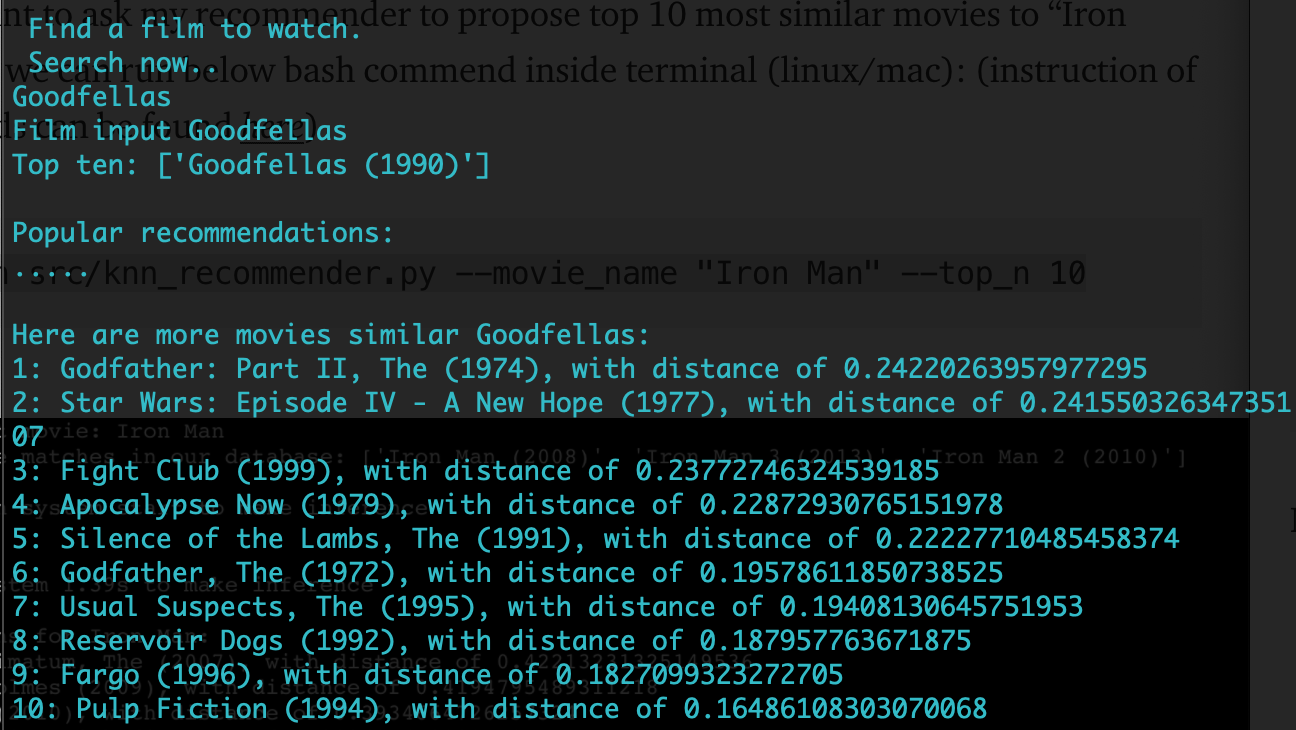
def recommendation(model_knn, data, mapper, favorite_movie, n_recommendations):

 # fit
 model_knn.fit(data)
 # get our movie index
 print(‘Film input’, favorite_movie)
 index = fuzzy_matcher(mapper, favorite_movie, verbose=True)
print(‘Popular recommendations:’)
 print(‘…..\n’)
 distances, indices = model_knn.kneighbors(data[index], n_neighbors=n_recommendations+1)
raw_recommends = sorted(
 list(zip(indices.squeeze().tolist(), distances.squeeze().tolist())), key=lambda x: x[1])[:0:-1]
 # reverse mapping and unflattening
 reverse_mapper = {v: k for k, v in mapper.items()}
 # print recommendations
 print(‘Here are more movies similar {}:’.format(favorite_movie))
 for i, (index, dist) in enumerate(raw_recommends):
 print(‘{0}: {1}, with distance of {2}’.format(i+1, reverse_mapper[index], dist))
Now we can make movie predictions.
- Open your command-line (Terminal for MacOS, Anaconda Prompt for Windows)
- now run this command:
python or python3 [FILENAME].py
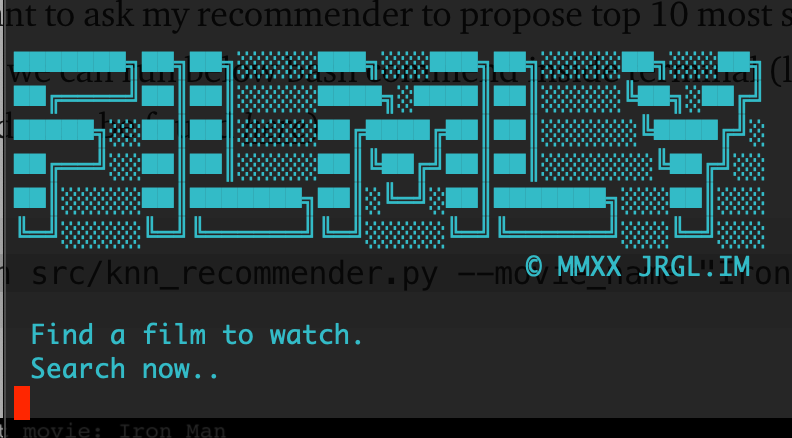
And Wallah! We have our ten predictions! Wait for one minute. If you’d like to have fun change colors within your command line or even add a title card to your application like:
def displayIntro():
   print(" Find a film to watch.")
#
# Main
#
# Clears screen for opening logo :
clear_terminal()
# change colors:
# text = colored('Hello, World!', 'red', attrs=['reverse', 'blink'])
# print(text)
print(Fore.CYAN)
print("""
███████╗██╗██╗░░░░░███╗░░░███╗██╗░░░░░██╗░░░██╗
██╔════╝██║██║░░░░░████╗░████║██║░░░░░╚██╗░██╔╝
█████╗░░██║██║░░░░░██╔████╔██║██║░░░░░░╚████╔╝░
██╔══╝░░██║██║░░░░░██║╚██╔╝██║██║░░░░░░░╚██╔╝░░
██║░░░░░██║███████╗██║░╚═╝░██║███████╗░░░██║░░░
╚═╝░░░░░╚═╝╚══════╝╚═╝░░░░░╚═╝╚══════╝░░░╚═╝░░░
                               © MMXX JRGL.IM
   """
     )
displayIntro()
type_and_will_predict_favorite_films = input(' Search now.. \n')
First, you’ll have to make a new filename. I simply named it utils.py
Then add this code in your new file:
"""
Import Statements:
"""
from os import name, system
def clear_terminal():
   if name == "nt":
       # Windows
       system("cls")
   else:
       # Linux or Mac
       system("clear")
Second, go back to your application.py or [filename].py you named your project and add the following in your Import Statements:
"""
Import Statements:
"""
# change font colors within command line
from colorama import Fore, Back, Style

# clears our terminal for title
from utils import clear_terminal #. where utils add [filename].
Add the code above and you’ll have an interacting interface to search for your films. If you’d like to learn more about how to customize and print colors in Python terminal here’s a guide.
In conclusion, coming from a film background and true film buff this was a fun build. It’s not perfect and does occasionally make errors. I may need to modify the FuzzyWuzzy and do a straight-up Natual Language Processing, to help implement get us better analysis. Which will include a corpus of text using text visualizations of token frequency in regards to our movie titles. That will be for another blog another day.
Resources:
MovieLens Latest Datasets, k -nearest neighbors algorithm, A Gentle Introduction to Sparse Matrices for Machine Learning, Here’s How to Build a Pivot Table using Pandas in Python, Building a movie recommendation system K-Nearest Neighbors Machine Learning, Machine Learning Basics with the K-Nearest Neighbors Algorithm, Collaborative filtering, Prototyping a Recommender System Step by Step Part 1: KNN Item-Based Collaborative Filtering:, Fuzzy String Matching in Python, Reverse Mapping and Unflattening, Comprehensive Guide to building a Recommendation Engine from scratch (in Python)

- MIT license
- Copyright 2020 © Jorge A. Lima.