This Repo gives step by step instructions and script to show how build and deploy a mobile (Raspberry Pi) object detector that can be used to detect and report groups of objects detected using TensorFlow and your chosen trained model. The most recent update includes a script that will perform the same object counting on an existing video clip.
Note: The live object counter works best when the camera is aimed at a small area in which objects will move through over the course of a few seconds. To avoid duplicated logs this can be futher enhanced with object tracking to avoid overcounting of very slow moving or stationary groups. Check out my next project where I dive into object and directional tracking here https://github.com/Tqualizer/Directional-object-tracking-with-TFLite-and-Edge-TPU
I started this project over the Easter weekend in lockdown. I built this using a Raspberry Pi 3B+ and standard IR camera. Starting with the boilerplate code here https://github.com/EdjeElectronics/TensorFlow-Object-Detection-on-the-Raspberry-Pi/blob/master/Object_detection_picamera.py . Originally I just wanted a way of counting the ducks which swim by my window but I decided to adapt the code further and share to hopefully be of some more practical use!

- Custom logging based on your object specific criteria (e.g. each time a group of more than 2 people walk past)
- Capture a photo each time your object specific criteria is triggered
- Write the log to csv file for further analysis
- [New 03/08/2020] - New file group_detection_recorded.py added to perform logging on an existing video clip. Check out the output video on Youtube. The concept works but the accuracy isn't great because of the camera angle, fairly basic off the shelf Tensorflow model and limited processing capacity of the Raspberry Pi.

- Set up and install TensorFlow and OpenCV on your Raspberry Pi by following this great guide by Evan https://github.com/EdjeElectronics/TensorFlow-Object-Detection-on-the-Raspberry-Pi/blob/master/Object_detection_picamera.py
The guide walks through the following steps:
- Update the Raspberry Pi
- Install TensorFlow
- Install OpenCV
- Compile and install Protobuf
- Set up TensorFlow directory structure and the PYTHONPATH variable
- Make sure your camera is configured by following these instructions https://www.raspberrypi.org/documentation/configuration/camera.md
- Download or clone this Repo and put the open_cv_group_detection.py in your /object_detection directory
- (optional) Customisation
- Select a custom model and number of objects (as described in the repo referenced in step 1).
For this example I used the same coco model as the boilerplate code but depending on what you want to detect and how accurate you need the model to be, other models can be easily referenced in the code instead. Check out https://github.com/tensorflow/models/blob/master/research/object_detection/g3doc/detection_model_zoo.md for more resources or have a go at training your own model if you have the necessary hardware https://github.com/EdjeElectronics/TensorFlow-Object-Detection-API-Tutorial-Train-Multiple-Objects-Windows-10.
- Select which objects to include in the log file
 # pulling raw output from object detection. Creates a list of dicts
        # with details of each of the objects meeting the threshold in a given frame.
        Validobj = [category_index.get(value) for index, value in enumerate (classes[0]) if scores [0,index]>0.5]

        # Choose your object
        to_detect = 'person'
- Select which criteria to apply for logging in the evidence stamp
        # Creates a log if the chosen object has been detected.
        if Validobj:
            data = [i["name"] for i in Validobj]
            # If in the given frame the number of a given object detected meets the condition then a log is made
            if data.count(to_detect)>2:
                # Writes a line with how many of the object was detected along with a timestamp
                Summary = ["There is a group of " + str(data.count(to_detect)) + " people" ,time.ctime()]
                print(Summary)

                evidence_stamp = [data.count(to_detect),to_detect,time.ctime()]
                output.append(evidence_stamp)
- Specify the save location for the log file and image captures (by default this is the working directory). The log file includes a column for number of objects, object type and timestamp. See evidence.bmp for a sample image capture and output.png for a sample log file.
- Run the open_cv_group_detection.py from your /object_detection directory. To safely stop the process and save outputs press 'q' on the object viewer or Ctrl + C in the command line to exit.

-
Follow the same steps 1-3 above ensuring that you download group_detection_recorded.py into the object_detection directory. This version of the code places an ALERT text over the video when the trigger condition is being met met (rather than taking a screenshot given the recording is already recorded).
-
Make sure the file you want to process is in the same folder as the environment you are using (or specify a different path in the script).
-
When running group_detection_recorded.py from the command line, specify in the input filename in the --args:
/tensorflow1/models/research/object_detection python3 group_detection_recorded.py --video yourvideofile.mp4
- The script will run and when finished the output.avi file will be waiting in your output folder.
Where live capture and photgraphic evidence is required use the open_cv_group_detection.py as described in the main instructions.
When using on people, to avoid data privacy concerns in live use on people the active object viewer and photo capture should be disabled by using the mobile_group_detection.py file instead of the open_cv_group_detection.py.
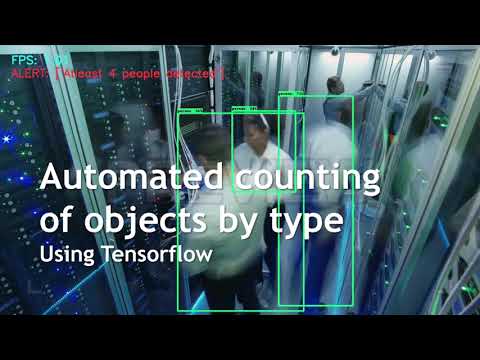
The group_detection_recorded.py enables you to run the group detection on an existing video. The sample given is a stock footage inside a data center to show how it could be used to track if too many people were in a restricted area based on surveilance footage.
The mobile_group_detection.py file is a slimmed down version of the opencv_group_detection.py code. Which is better for collecting data from a location with low to moderate amounts of footfall over an extended period to facilitate further analysis of behaviour patterns.
The appendix includes instructions how to remotely access the detection log in the Raspberry Pi for remote data logging using mobile_group_detection.py
Depending on your use case you might want to set up the group detector in a different location to run remotely and passively collect data over a longer period of time for analysis. I cut out some of the code in the original file and created the instructions below to make this a bit easier.
- Clone or download mobile_group_detection.py
- Follow the instructions to set up SSH here https://www.raspberrypi.org/documentation/remote-access/ssh/windows10.md
- (Optional) Follow the instructions in the normal example above to customise the type and number of objects which trigger the logging.
- Run the mobile_group_detection.py from your /object_detection directory.
Use Ctrl + C to exit the logging mode.
Example of the log file output including a column for number of objects, object type and timestamp.

