If you want to make changes to java-manta without the pain of syncing a development and test environments then using an IDE is strongly recommended in combination with the rest of this document. The recommended IDE is IntelliJ IDEA Community Edition (column on the right). Once you’ve got that set up, move on to the rest of the setup sections for links to install the JDK, Maven, and setting JAVA_HOME.
“Importing” a project in IntelliJ creates a .idea directory in the project root (which is ignored by git) and allows the IDE to run test cases and integrate with Maven. Afterwards the project can be opened from the IntelliJ IDEA project list. It's fine to re-import the project, this shouldn't have any effect.
The path forward depends on whether or not your change is integrated into master yet. If you have not yet merged your change into master the java-manta branch verify job on Joyent's Jenkins deployment can be used to check a branch against the test suite. In the past it’s been pointed at branches under a fork (by manually changing the remote repo) and used to run mvn verify before merging a PR into master.
If your change is already integrated into master see TESTING.md the standard jobs referenced in the java-manta test and release internal documentation can be run and will use master by default.
- JDK 8
- Docker images: openjdk:8-jdk
- Maven 3
- Docker images: maven:3-jdk-8 (uses OpenJDK 8)
- Access to a Manta deployment (if you plan to run integration tests)
Note that most people already have a JRE installed but will need to download a JDK. If you're missing javac you need a JDK. The recommended JDK is Oracle JDK but others may be used.
- OpenJDK 8
- Usually available as openjdk-8-jdk or some variation thereof.
- Unfortunately this may pull in X11 as well, look for a package name ending in
-headlessto avoid this.
- Unfortunately this may pull in X11 as well, look for a package name ending in
- Docker images: openjdk:8-jdk
- Usually available as openjdk-8-jdk or some variation thereof.
- Oracle JDK 8
- Download (latest at the time of writing is 8u181)
- Download (archive)
- Docker images: search https://hub.docker.com or the Docker Store
- Azul Zulu Open JDK 8
When you’re done installing the JDK, make sure the javac -version command outputs your Java version.
We use Maven 3 for managing project builds and dependencies. It can be installed from here using these installation steps (summarized below):
- Download (binary tar.gz or binary zip)
- Compare checksum
$ echo “$CHECKSUM /path/to/download” | sha1sum -c
- Extract download somewhere
- Add to path (add the following to ~/.bash_profile or your shell init script)
$ export PATH=/path/to/apache-maven-x.y.z/bin:$PATH
- Test
$ mvn -v
Using a package-manager provided Maven is not recommended because it makes it hard to manage and upgrade Maven and its dependencies. Using a maven docker container is permissible but generally locks you into OpenJDK.
You should always have JAVA_HOME set. The table below has typical values and commands for finding the current JAVA_HOME based on your PATH. If ever need to manage more than one Java version usage of jenv is high recommended. Here are some typical install locations:
| Installation method | Example path or command |
|---|---|
| Mac OS X (Oracle JDK) | /Library/Java/JavaVirtualMachines/jdk1.8.0_181.jdk/Contents/Home |
| Debian (OpenJDK) | /usr/lib/jvm/java-8-openjdk-amd64/jre/ |
| Generic command (Linux, no jenv) | $ readlink -f $(which javac) |
| Generic command (macOS, no jenv) | $ readlink $(which javac) |
| jenv | $ jenv javahome |
If you’re having issues getting your IDE to pick up JAVA_HOME and are using macOS be aware that default environment variables for graphical applications is configured separately. The following example assumes jenv is being used to manage java versions, but a direct path could of course be supplied instead:
$ launchctl setenv JAVA_HOME "$(jenv javahome)"Much of the configuration passed to Java at runtime is defined through System Properties which is used both to expose information about the runtime and to set custom user configuration. Configuring per-execution parameters to Maven is typically done using properties defined by the Maven plugin in use. While it’s possible to set properties programmatically using the System.setProperties method, passing arguments as -DpropertyName=propertyValue is the most common usage.
Some JDK (older than 8u161) versions may require patches to use ciphers with a key strength greater than 128 bits or for certain TLS certificate cipher suites. This shouldn’t be needed anymore since the configuration option was added in 8u152 and all the policy files are shipped with the JDK as of 8u161. If you desperately need to use an older version here are the steps to install it:
- Download bundle
- Steps
$ unzip jce_policy-8.zip$ cp UnlimitedJCEPolicyJDK8/local_policy.jar UnlimitedJCEPolicyJDK8/US_export_policy.jar $JAVA_HOME/jre/lib/security/
- Verify (should return true)
$ jrunscript -e 'java.lang.System.out.println(java.lang.Integer.MAX_VALUE == javax.crypto.Cipher.getMaxAllowedKeyLength("AES"))'
You should install libnss for two reasons:
- It speeds up encryption.
- Our primary customer uses it.
Steps can be found in java-manta’s USAGE.md file.
Less significant but still useful is the optimized MD5 implementation for which there are also installation notes.
$ git clone https://github.com/joyent/java-manta.git
$ cd java-manta
$ mvn clean install -DskipITs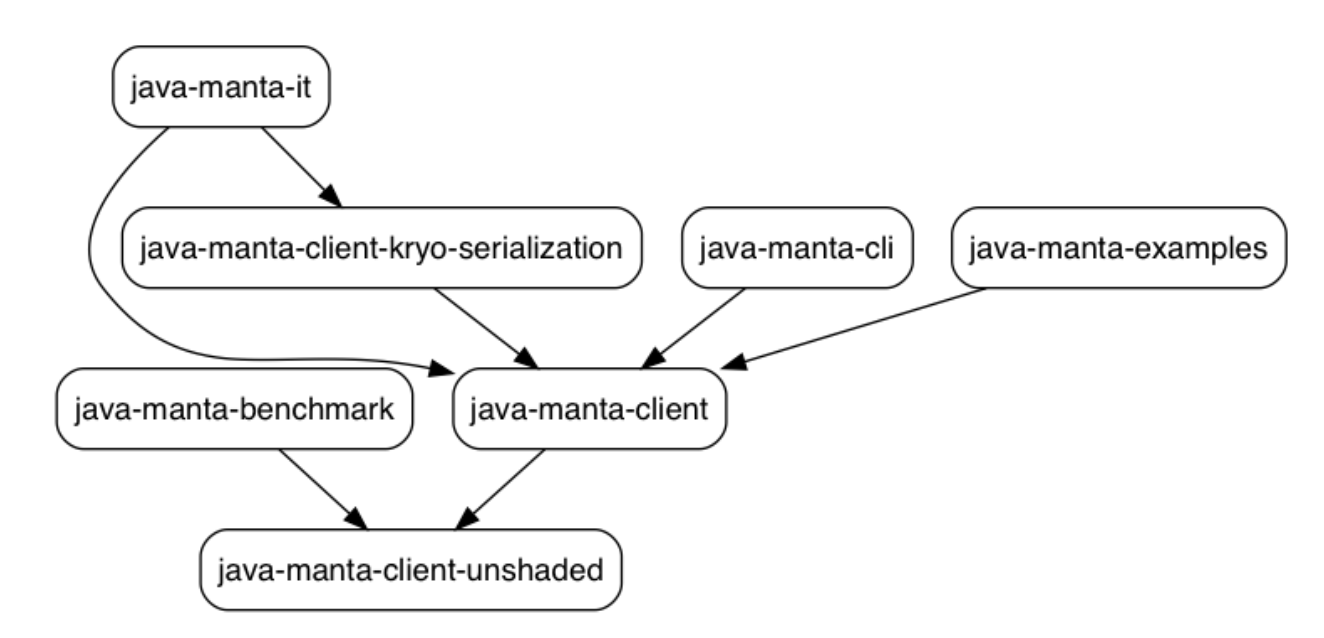
-
java-manta-client-unshaded
- The majority of the library, includes utilities, HTTP access, and client-side encryption
-
java-manta-client
- A package which pulls in java-manta-client-unshaded and “shades” dependencies to produce a package which exposes the fewest number of dependencies.
-
java-manta-benchmark
- Microbenchmarks. Not currently run automatically anywhere.
-
java-manta-cli
- Adds a CLI to java-manta. Can create and validate secret keys in addition to get, put and ls.
-
java-manta-kryo-serialization
- Adds serialization support for the client through kryo
-
java-manta-examples
- Examples.
-
java-manta-it
- Integration tests. These live in their own package so that the integration tests see the same shaded artifact (java-manta-client) that most users see.
Maven has a set of "lifecycles" it uses based on the type of project its working with, jar being the most common. Phases are the same across all projects, but goals specify individual steps to take to move the build along. For example, package is a phase which produces a final artifact and implies earlier goals while jar:jar is a goal which attempts to build an actual JAR file and does nothing else. When a phase is invoked, every prior phase will also be invoked (e.g. mvn test == mvn validate compile test). Here is a general listing of the lifecycle for a jar in addition to a detailed explanation:
- validate: validate the project configuration is consistent
- compile: compile the source code of the project
- test: compile and run unit tests
- package: take the compiled code and package it in its distributable format (e.g a JAR)
- verify: run integration tests and any checks on results to ensure quality criteria are met
- install: install the package into the local repository
- deploy: publishes the final package to a remote repository (typically Maven Central)
Maven can accept both phases and goals in a single invocation but this may not do what you expect. Also prefacing every command with the clean goal makes builds slower but more predictable. There is supposedly functionality for only redoing steps that need to be done in certain Maven plugins but it is more likely to cause incomprehensible errors than actually save you any time.
The project structure moving the integration tests into their own module leads to some slightly confusing scenarios for interacting with the test suite. Be sure to run mvn commands from the parent module directory, they may appear to work within subdirectories but will most likely be in an inconsistent state. Each module has its own test configuration, usually configured by a file named testng.xml or testng-it.xml and is always specified by module’s pom.xml for either the Surefire (unit) or Failsafe (integration) testing plugins. The following table lays out most of the ways you might expect to run the tests if you’re not using an IDE:
| Tests to run | Invocation |
|---|---|
| Unit tests | $ mvn test |
| Single unit test class | $ mvn test -Dtest=MantaClientTest |
| Single unit test method | $ mvn test -Dtest=MantaClientTest#testFoo |
| Unit and integration tests | $ mvn verify |
| Integration tests only | $ mvn install -DskipTests && cd java-manta-it && mvn verify |
| Single integration test | $ mvn verify -Dtest=MantaClientIT |
Those who are using an IDE should find small "play buttons" in the gutter which can be used to run a test class or method. Setting up run configurations in IntelliJ IDEA is not needed for unit tests since they don’t expect credentials to be provided. Running integration tests in an IDE takes a little more work buit the UI is very straightforward.
Logging in Java is a bit more complicated than you might expect. SLF4J is the general logging API that most libraries adhere to. This is separate from the logging implementation which can include Log4J, Logback, java.util.logging, and many others. java-manta in the abstract uses SLF4J for logging and users can supply their own loggers. When working within java-manta Logback is pulled in as a test-only dependency (see this line in java-manta-client-unshaded/pom.xml) so that we can see see our own logs during tests. Configuration of Logback is specific to the module in which it is used and generally can be found at src/test/resources/logback-test.xmlwithin the project module. Log levels are defined as a combination of minimum severity (e.g. ERROR > WARN > DEBUG) and package/class patterns. For example it’s possible to define a log level of DEBUG to name=com.joyent.manta.client.MantaClient alongside a definition for the rest of the package package name="com.joyent.manta" to only log WARN messages.
You may see occasional checks similar to LOGGER.isDebugEnabled() in a conditional. This is done to avoid expensive computation of formatted values that would be evaluated if the statement was not wrapped in that check.
Occasionally you have a really weird bug that you can’t simulate with just Mockito, in which case manual manipulation or termination of requests may be necessary. For this we can use Charles Web Proxy
Charles Web Proxy makes it easy to apply throttling to and simulate failures in HTTP connections.
Installing Charles’ Root Certificate (link)
- Charles > Menu bar > Help > SSL Proxying > Save certificate
- Follow the Adding self-signed certificates to Java’s keystore steps using charles for the $CERT_ALIAS and the exported file from the previous item for the $PATH_TO_CERT
- Note that when using Charles for HTTPS connections, requests will all report CONNECT as the request method and requests will not be inspectable. To correct this situation add the host in the Menu bar > Proxy > SSL Proxying dialog.
In order to get the runtime to proxy connections through Charles the following system properties must be set:
- values:
- $JAVA_HOME: path to your java installation
- $CERT_ALIAS: a name for the certificate
- $PATH_TO_CERT: base64-encoded .pem
- steps:
$ keytool -keystore $JAVA_HOME/jre/lib/security/cacerts -storepass changeit -import -alias $CERT_ALIAS -file $PATH_TO_CERT- Password: “changeit” (no quotes)
- Password again (potentially)
- Trust? “Yes”
$ keytool -keystore $JAVA_HOME/jre/lib/security/cacerts -storepass changeit -list | grep $CERT_ALIAS- Verifies that certificate was added