We introduce AutoFR, a reinforcement learning (RL) framework to fully automate the process of filter rule creation to block ads and minimize visual breakage optimized per-site. The implementation of the framework is based on the paper, "AutoFR: Automated Filter Rule Generation for Adblocking" (USENIX Security 2023). If you use AutoFR for publication, please cite us.
For more information, see:
- USENIX Security 2023 Paper
- USENIX Security 2023 Slides
- USENIX Security 2023 Artifact Evaluation
- Extended Version
- Project Page
The dataset and its detailed description are available. In summary, the dataset contains 1042 zip files, one per-site. Each zip file includes the raw collected data of outgoing HTTP requests, AdGraphs, annotated site snapshots, the action space, filter rules, and more.
This includes a Top5k_rules.csv file that shows all the filter rules created within each zip file.
Users must sign a consent form (at the bottom of the web page) before accessing the dataset.
AutoFR is the first to balance the trade-off between blocking ads vs. avoiding visual breakage. The user gives AutoFR inputs (e.g., the website to generate rules for, and breakage tolerance threshold w) to AutoFR. It will run our RL algorithm based on multi-arm bandits and generate filter rules that block ads while adhering to the given w threshold.
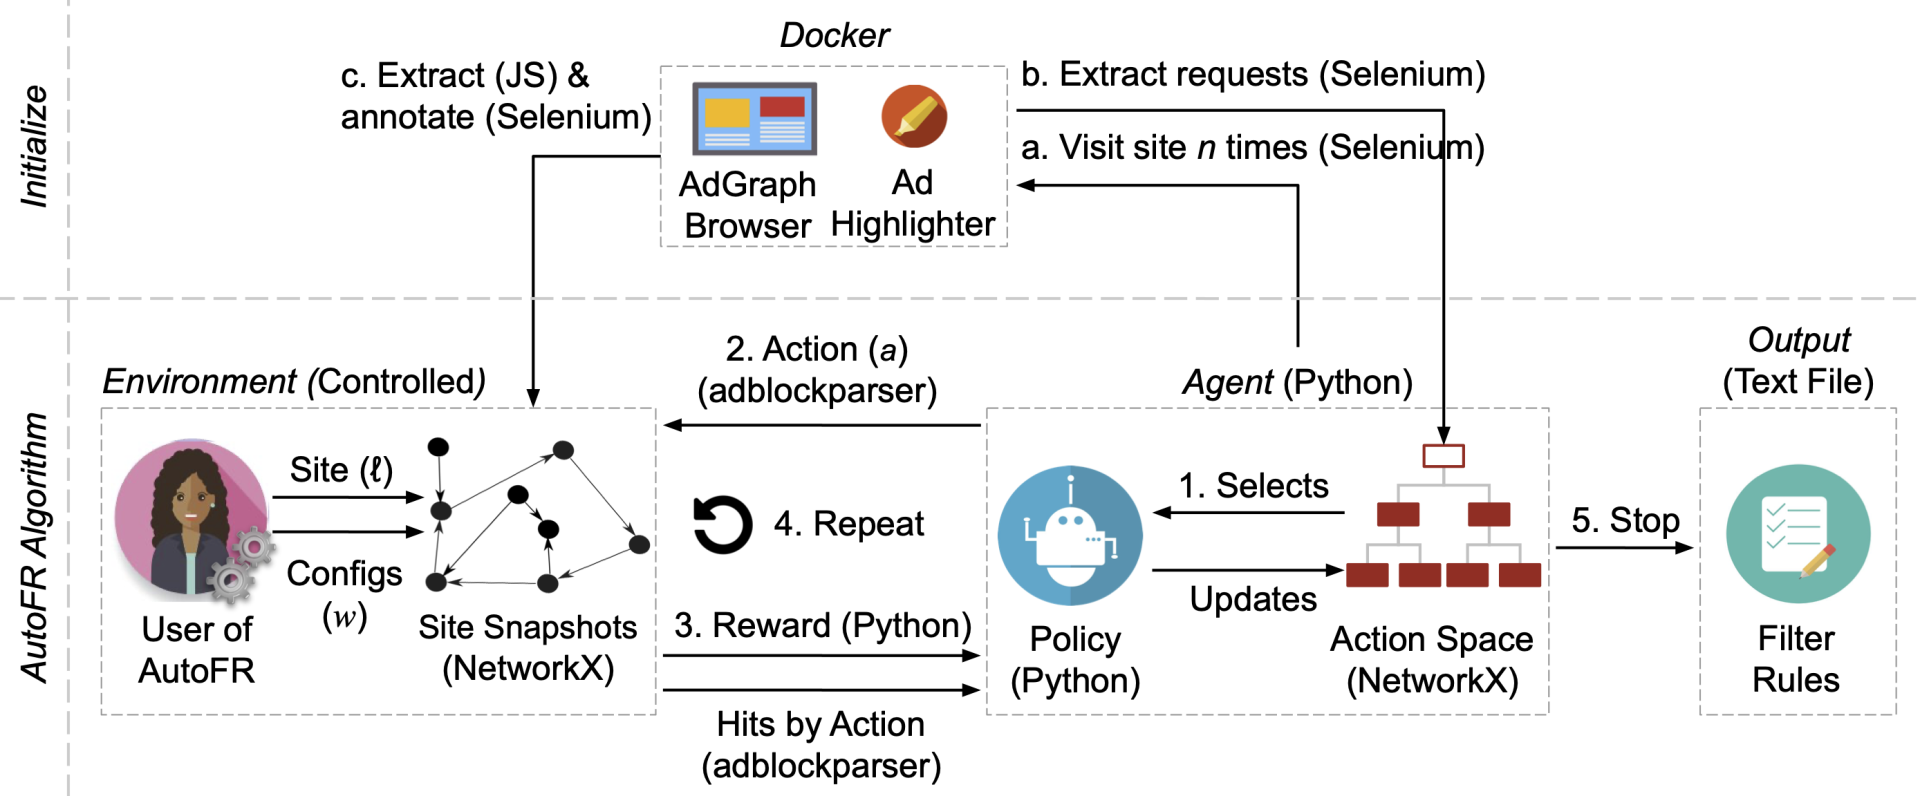
AutoFR Example Workflow (Fig. 4 of paper): INITIALIZE (a–c, Alg. 1): (a) spawns n=10 docker instances and visits the site until it finishes loading; (b) extracts the outgoing requests from all visits and builds the action space; (c) extracts the raw graph and annotates it to denote visible ads, images, and text, using JS and Selenium. Once all 10 site snapshots are annotated, we run the RL portion of the AutoFR procedure (steps 1–4). Lastly, AutoFR outputs the filter rules at step 5, e.g., ||s.yimg.com/rq/darla/4-10-0/html/r-sf.html.
For more information, see Background Information.
Follow the instructions below to run AutoFR. Preview the dependencies.
See Debugging Tips to help solve some common problems.
-
Install the core dependencies.
$ sudo apt-get install git python3 python3-dev python3-pip
$ pip3 install virtualenv
- Install docker using its official instructions.
-
$ git clone https://github.com/UCI-Networking-Group/AutoFR.git
- If you are an artifact reviewer,
git checkout artifact-review -
git submodule update --init --recursive
- If you are an artifact reviewer,
-
Navigate to the project directory using a terminal window.
-
Create a virtual environment and activate it. The "[/save-path/autofrenv]" below is a placeholder for your path and name of your environment. As an example, if you have your virtual environments saved under
/.virtualenvs, then you can do: "/.virtualenvs/autofrenv"
$ virtualenv --python=python3 [/save-path/autofrenv]
$ source [/save-path/autofrenv]/bin/activate
- Install AutoFR dependencies.
$ pip3 install -e .
- Build the docker container.
$ docker build -t flg-ad-highlighter-adgraph --build-arg USER_ID=$(id -u) --build-arg GROUP_ID=$(id -g) -f framework-with-ad-highlighter/DockerAdgraphfile .
- Create output directories that AutoFR expects. See Understanding the Output for description.
$ mkdir temp_graphs; mkdir -p data/output/
- Done. You are now ready to use AutoFR.
- Make sure you have followed the setup instructions.
- Open up the AutoFR project directory using a terminal window.
- Activate your virtual environment.
- Choose a site that has ads with AdChoice transparency logos. We use https://cricbuzz.com as an example here.
- Choose how many docker instances you can start in parallel. This depends on the number of cores you have on your system. Pass it using the
--chunk_thresholdargument. Below, we use6as an example. The--init_state_iterations 10denotes that you require the run to collect 10 site snapshots. -
$ python scripts/autofr_controlled.py --site_url "https://cricbuzz.com" --chunk_threshold 6 --init_state_iterations 10
- Filter rules will be presented at the end.
Explore other possible inputs you can give scripts/autofr_controlled.py by running:
$ python scripts/autofr_controlled.py --help
(autofrenv) python scripts/autofr_controlled.py --help
usage: autofr_controlled.py [-h] --site_url SITE_URL [--output_directory OUTPUT_DIRECTORY] [--chunk_threshold CHUNK_THRESHOLD]
                            [--gamma GAMMA] [--confidence_ucb CONFIDENCE_UCB] [--w_threshold W_THRESHOLD]
                            [--iteration_threshold ITERATION_THRESHOLD] [--init_state_iterations INIT_STATE_ITERATIONS]
                            [--default_q_value DEFAULT_Q_VALUE] [--reward_func_name {RewardByCasesVer1}]
                            [--bandit_klass_name {DomainHierarchyMABControlled}] [--action_space_klass_name {ActionSpace}]
                            [--log_level LOG_LEVEL]

We run AutoFR-C.

options:
  -h, --help            show this help message and exit
  --site_url SITE_URL   Site to test
  --output_directory OUTPUT_DIRECTORY
                        output directory for saving agent
  --chunk_threshold CHUNK_THRESHOLD
                        How many times at once we will spawn a browser instance (reduce this number if your machine cannot
                        handle many parallel processes)
  --gamma GAMMA         How much do we care about future rewards. Default is 1/n. If passed in, it will be treated as a float
                        value
  --confidence_ucb CONFIDENCE_UCB
                        Confidence level for UCB calculation
  --w_threshold W_THRESHOLD
                        Preference to avoid visual breakage. Between 0 and 1, use number closer to 1 if you really care about
                        avoiding breakage.
  --iteration_threshold ITERATION_THRESHOLD
                        Multiplier to how many iterations per round
  --init_state_iterations INIT_STATE_ITERATIONS
                        Number of site snapshots required for AutoFR to run (reduce this number if the process cannot detect ads
                        easily for the website)
  --default_q_value DEFAULT_Q_VALUE
                        whether we do initializing only. New filter rules will be outputted
  --reward_func_name {RewardByCasesVer1}
                        Name of reward function
  --bandit_klass_name {DomainHierarchyMABControlled}
                        Name of bandit control class
  --action_space_klass_name {ActionSpace}
                        Name of action space class
  --log_level LOG_LEVEL
                        Log level
Thank you for trying AutoFR, here I provide some debugging tips.
If you get exceptions such as InvalidSiteFeedbackException: Expected 10 init states but got 0, this means that you are not able to collect valid site snapshots of a website. A valid site snapshot requires that ads are detected (counter of ads > 0).
A. Reduce Required Site Snapshots:
There are a few things you can do. If the exception says that you are able to collect some site snapshots like Expected 10 init states but got 4, then you may want to reduce the number of required site snapshots by passing in a different value for --init_state_iterations
$ python scripts/autofr_controlled.py --site_url "https://cricbuzz.com" --chunk_threshold 6 --init_state_iterations 4
B. Reduce Parallel Processes:
It could be possible that your machine cannot handle the number of parallel processes. Try to reduce the number by changing --chunk_threshold
$ python scripts/autofr_controlled.py --site_url "https://cricbuzz.com" --chunk_threshold 2 --init_state_iterations 4
C. Can Ad Highlighter Detect Ads for the Given Site?
It could simply mean that Ad Highlighter cannot detect any ads for the given website. This could be due to many reasons, such as the website changing over time and no longer serving ads that can be detected by Ad Highlighter, or it could be detecting that you are using a crawler (AutoFR uses Selenium) and purposefully not serving ads.
To verify whether Ad Highlighter can detect ads for the given website, go to the web extension and download its code and install it manually on Chrome.
- Download the code above.
- Open Chrome > Manage Extensions > Load unpacked
- Choose the perceptual-adblocker directory (this is Ad Highlighter). This should install the web extension.
- Remember to disable any adblocker that active for your browser
- Visit the website that you are testing with AutoFR and see if Ad Highlighter will identify those ads (there should be an red-ish overlay on those ads)
- Once you are done verifying, make sure to disable Ad Highlighter and re-active any adblockers before.
If Ad Highlighter does not identify any ads for the given website, this means that you need to update Ad Highlighter code to detect ads. This is beyond the scope of this README, please contact the authors for help.
If you encounter an error where networkx cannot read the site snapshots due to the graphml files containing data of long types, you need to make sure your networkx version is >= 2.6.2.
- Use pip to see the version you are using:
pip show networkx - Try to upgrade your networkx:
pip install networkx --upgrade
Each run of AutoFR will output data into two distinct folders, which are described below. The data/output is related to the collection of site snapshots, while temp_graphs is related our RL algorithm and outputted filter rules.
Go to data/output and go into a folder AutoFRGControlled*AdGraph_Snapshots to see the raw collected data, such as the outgoing HTTP requests, AdGraphs, and site snapshots.
- adgraph_networkx: This holds the site snapshots. (graphml files)
- init_adgraph_site_feedback/adgraph: This holds the raw AdGraphs before annotations. (See Sec. 4.1 for how we annotate raw AdGraphs). There will be 10 of these, representing ten visits to the site. (JSON files)
- init_adgraph_site_feedback/filter_lists: This holds the rules that we applied (if any). (Text files)
- init_adgraph_site_feedback/json: This holds the collected outgoing HTTP requests.
- init_adgraph_site_feedback/screenshots: This holds a screenshot of the site. (PNG files)
- init_adgraph_site_feedback/stats_init.csv: This holds the counters of ads, images, and text.
- init_adgraph_site_feedback/log.log: This holds the verbose logging of the site visit.
Go to temp_graphs and go into a folder AutoFRGControlled_, which represents a run of the AutoFR. It will contain the outputted filter rules, the action space, and various other information.
- action_values.csv: This contains information about the multi-arm bandit run, such as the q-value of each action, the number of pulls per action, and whether we put the arm to sleep or not.
- dh_graph.json: This is the hierarchy action space in JSON format. (See Sec. 3.2.1 on how we build the action space.)
- dh_nodes_history.json: This just holds more logging information about which actions we took per time step t.
- final_rules.txt: These are the filter rules that we generated. (ignore the header comments in this file)
- low_q_rules.txt: These are the rules that could block ads but caused breakage beyond the threshold w. (See Sec. 3.2.2 and 3.3)
- unknown_rules.txt: These are rules that we put to sleep. (See Sec. 3.2.2 and Algorithm 1 line 23.)
- log.log: This holds the verbose logging of our algorithm run.
The output follows our dataset format. See AutoFR Dataset.
Test the rules by applying it on the site that you created them for.
- Install an adblocker, like Adblock Plus, into your browser (instructions depend on your browser).
- Configure the extension by going to its settings. Turn off all filter lists.
- Turn the rules given by AutoFR into per-site rules. For each created rule, append the site it was created for. For instance, if the rule is
||doubleclick.net^for the site cricbuzz.com, then change it to||doubleclick.net^$domain=cricbuzz.com - Add in custom rules given by AutoFR (and transform them to be per-site rules). See further instructions.
- Refresh the site to see if ads are blocked. Note if there is any visual breakage.
- Remember to undo the changes if you use the adblocker personally.
As an example of how site snapshots can be reused, we provide the following instructions on reproducing our results from the paper.
(Note that this only works if you are using the changeset used by the paper and the site snapshots collected during that time. Any changes/improvements to the algorithm of AutoFR or how site snapshots are created will alter the results of the generated filter rules)
- Make sure you have followed the setup instructions.
- Open up the AutoFR project directory using a terminal window.
- Activate your virtual environment.
- Get access to our dataset.
- Download the
Top5K_rules.csvwithin our dataset. Open it and choose a zip file to download, keeping track of the site URL as well. - Here we assume you chose
AutoFRGEval_www.cricbuzz.com_ad3dce7b.zip. Unzip the file. -
$ python scripts/autofr_use_snapshots.py --site_url "https://www.cricbuzz.com/" --snapshot_dir [zip name]/[Snapshots directory]
- Full example:
$ python scripts/autofr_use_snapshots.py --site_url "https://www.cricbuzz.com/" --snapshot_dir AutoFRGEval_www.cricbuzz.com_ad3dce7b/AutoFRGControlled_www.cricbuzz.com_AdGraph_Snapshots_82af60e4
- It should print out the same filter rules as listed in the CSV file for that particular site.
- (optional) To see the output, go to
temp_graphsdirectory and open the newest directory there. See Understanding the Output for more information.
Explore other possible inputs you can give scripts/autofr_use_snapshots.py by running:
$ python scripts/autofr_use_snapshots.py --help
(autofrenv) python scripts/autofr_use_snapshots.py --help
usage: autofr_use_snapshots.py [-h] --site_url SITE_URL [--output_directory OUTPUT_DIRECTORY] --snapshot_dir SNAPSHOT_DIR
                               [--gamma GAMMA] [--confidence_ucb CONFIDENCE_UCB] [--w_threshold W_THRESHOLD]
                               [--iteration_threshold ITERATION_THRESHOLD] [--init_state_iterations INIT_STATE_ITERATIONS]
                               [--default_q_value DEFAULT_Q_VALUE] [--reward_func_name {RewardByCasesVer1}]
                               [--bandit_klass_name {DomainHierarchyMABControlled}] [--action_space_klass_name {ActionSpace}]
                               [--log_level LOG_LEVEL]

We run AutoFR-C using the site snapshots given.

options:
  -h, --help            show this help message and exit
  --site_url SITE_URL   Site to test
  --output_directory OUTPUT_DIRECTORY
                        output directory for saving agent
  --snapshot_dir SNAPSHOT_DIR
                        Path to already init files
  --gamma GAMMA         How much do we care about future rewards. Default is 1/n. If passed in, it will be treated as a float
                        value
  --confidence_ucb CONFIDENCE_UCB
                        Confidence level for UCB calculation
  --w_threshold W_THRESHOLD
                        Preference to avoid visual breakage. Between 0 and 1, use number closer to 1 if you really care about avoiding breakage.
  --iteration_threshold ITERATION_THRESHOLD
                        Multiplier to how many iterations per round
  --init_state_iterations INIT_STATE_ITERATIONS
                        Number of site snapshots required for AutoFR to run (reduce this number if the process cannot detect ads easily for the website)
  --default_q_value DEFAULT_Q_VALUE
                        whether we do initializing only. New filter rules will be outputted
  --reward_func_name {RewardByCasesVer1}
                        Name of reward function
  --bandit_klass_name {DomainHierarchyMABControlled}
                        Name of bandit control class
  --action_space_klass_name {ActionSpace}
                        Name of action space class
  --log_level LOG_LEVEL
                        Log level
For artifact-reviewers and convenience, we also provide a script to automatically check the reproducibility.
- Make sure you have followed the setup instructions.
- Open up the AutoFR project directory using a terminal window.
- Activate your virtual environment.
- Get access to our dataset.
- Download any zips from the dataset into one directory. (you do not need to unzip it)
- Download the
Top5K_rules.csvwithin our dataset. -
$ python scripts/artifact-review/confirm_reproducibility.py --csv_file_path Top5K_rules.csv --snapshots_dir [path to zips]
The confirm_reproducibility script will output a CSV file that summarizes whether the filter rules match. There will also be summary in the console as well.
Example console output:
SUMMARY:
	- Reproduced 3/3
	- Final results in temp_graphs/confirm_reproducible_e400088a.csv
AutoFR was evaluated using Amazon EC2 instance m5.2xlarge, which has 8 cores, 32 GiB of memory, 35 GiB of storage, and up to 10 Gbps of network bandwidth. We recommend something similar, going as low as 16 GiB of memory with 20 GiB of storage.
Limitations: Currently, AutoFR does not work for M1 Macbooks. This is a work in progress.
We list the dependencies that are necessary to run AutoFR. Please follow instructions in Setup section instead to install them.
AutoFR has been tested on Debian 5.10 and Ubuntu 18.04.6 LTS.
- Python 3.6+
- git
- pip3
- virtualenv (or conda)
- docker
- tldextract
- networkx (>=2.6.2)
- adblockparser
- pandas
- numpy
- selenium
- pyvirtualdisplay
See setup.py.
AutoFR integrates browser extensions and an instrumented browser:
- Ad Highlighter: a browser extension that detects iframe ads based on AdChoice logos.
- AdGraph: an instrumented Chromium browser that generates a raw graph representation of how the site is loaded.
- Adblock Plus: a browser extension that blocks HTTP requests using filter rules, and more...
To further understand our system, we describe some important terminology below and reference the paper when needed.
- Filter Rules: AutoFR focuses on filter rules that block HTTP requests to remove ads while minimizing visual breakage (such as missing images and text) for websites. Example of rules with different granularity:
||example.com^,||ads.example.com^,||example.com/ads.js. - Site Snapshots: Graph representations of how a site is loaded. The nodes represent HTML elements, JS scripts, HTTP requests. The edges represent whether HTML elements are connected based on HTML structure, if JS scripts initiated a request, if HTML elements initiated a request, if JS scripts created a HTML element, etc... See Sec 4.1 and Fig. 5.
- Threshold w: It is a design parameter that helps AutoFR balances the trade-off between blocking ads vs. avoiding visual breakage. It ranges from 0 to 1. The higher values represent the user wanting to avoid breakage at the cost of not creating any filter rules. See Sec. 3 and 3.3.2.
- Breakage: In our case, breakage means that after a filter rule blocks some HTTP requests, some legitimate images and text of a website may be missing. For instance, for a news site, breakage would entail missing article titles, descriptions, and images. See Eq. (2) of paper.
- Detecting Visual Components: AutoFR relies on the detection of ads, images, and text on a website. For ads, we rely on Ad Highlighter (see Prior Work Dependencies). For images and text, we write our own custom JS to walk the HTML DOM and identify elements with
tags or CSS
background-url. To determine visibility, we look at whether the element's width and height are > 2px and its opacity > 0.1. See Sec. 4.3.
The web changes naturally. AutoFR is only as good as its components. Thus, if a site does not serve ads that Ad Highlighter can detect or use obfuscation techniques, then AutoFR may not be able to generate rules for the given site. See Sec. 5.3.4 and 4.3. There may be other factors, such as w being too high to generate rules for, etc... Over time, AutoFR will improve as we maintain it, but we cannot guarantee that it will work on every website.
If you create a publication using AutoFR, please cite the corresponding paper as follows:
@inproceedings {le2023autofr-287192,
author = {Hieu Le and Salma Elmalaki and Athina Markopoulou and Zubair Shafiq},
title = {{AutoFR}: Automated Filter Rule Generation for Adblocking},
booktitle = {32nd USENIX Security Symposium (USENIX Security 23)},
year = {2023},
isbn = {978-1-939133-37-3},
address = {Anaheim, CA},
pages = {7535--7552},
url = {https://www.usenix.org/conference/usenixsecurity23/presentation/le},
publisher = {USENIX Association},
month = aug
}
We also encourage you to provide us (athinagroupreleases@gmail.com) with a link to your publication. We use this information in reports to our funding agencies.
Feel free to contact the authors, specifically Hieu Le if you have any questions.
To integrate AdGraph successfully, we thank its authors (Umar Iqbal), who graciously provided the necessary code to help parse AdGraphs. We include it in adgraphapi with slight modifications.