Waterloo Steel:Platform Hardware Setup
[Last generated: Wed 4 Oct 2023 14:07:37 EDT]
- 0. Common
- 1. Adlink MXE 211 (Robotnik SUMMIT PC)
-
2. Jetson Orin (Barrett WAM External PC)
- 2.0 Flash Linux OS & Install JetPack ✌️
- 2.1 [Optional*] (Jetson) RT Kernel 😋
- 2.2 [:wrench: if Manual] Peak Linux Driver (Out-of-tree Linux RT Header)
- 2.3 [:wrench: if Manual] Install ROS
- 2.5 [:wrench: If Manual] How to Build Libbarrett Hardware Library?
- 2.4 [:star: automated] UWARL ROS Catkin Workspace Setup
- 2.5 ZED Stereo-Camera
- 2.6 [:wrench: If Manual] Intel i515 Lidar Mono-Camera
- 2.7 [:wrench: If Manual] USB Wifi Dongle D-Link DWA 182
- 2.8 [:wrench: If Manual] Vicon
- 3. Steam Deck
📓 This cleanup is based on Logbook on V2 Upgrade, and semi-automated with our uwarl-robot_configs packages. So you do not have to troubleshoot much.
Highly recommended to install the items below !
$ ./uwarl-robot_configs/scripts/auto-install_xrdp_screen.sh🚨 Xfce is lighter, GNOME is quite heavy, not recommended for remote screen via ssh.
ℹ️ Ref: XFCE XRDP: https://www.hiroom2.com/ubuntu-2004-xrdp-xfce-en/
⚠️ No rviz, as it requires display and gpu acc, xrdp is just a network access
-
Install on Jetson:
$ sudo apt-get install x11vnc
# set pwd:
$ x11vnc -storepasswd
# start hosting:
$ x11vnc -forever -bg -usepw -httpdir /usr/share/vnc-java/ -httpport 5901 -display :1
$ x11vnc -forever -bg -usepw -httpdir /usr/share/vnc-java/ -httpport 5577 -display :1
# Kill:
sudo pgrep x11vnc
# [OUTPUT]: 1234 //process ID returned from the command, then:
kill 1234
-
SSH over from Mac:
$ ssh uwarl-orin@192.168.1.10 -L 5900:localhost:5900
-
Connect:
- Click Desktop
- [ CMD + K ]
- Enter:
vnc://localhost
-
without monitor <--- not possible???/ :sweat:
Attemps:
# command:
mkdir -p ~/.config/autostart
cp /usr/share/applications/vino-server.desktop ~/.config/autostart/.

cd /usr/lib/systemd/user/graphical-session.target.wants
sudo ln -s ../vino-server.service ./.
gsettings set org.gnome.Vino prompt-enabled false
gsettings set org.gnome.Vino require-encryption false
gsettings set org.gnome.Vino authentication-methods "['vnc']"
gsettings set org.gnome.Vino vnc-password $(echo -n 'arlarl'|base64)


# modify:
$ sudo vim /etc/X11/xorg.conf
# add with:
Section "Screen"
   Identifier    "Default Screen"
   Monitor       "Configured Monitor"
   Device        "Tegra0"
   SubSection "Display"
       Depth    24
       Virtual 1280 800 # Modify the resolution by editing these values
   EndSubSection
EndSection
-
https://en.wikipedia.org/wiki/Xvfb
sudo apt install xvfb

export DISPLAY=:1
Xvfb "$DISPLAY" -screen 0 1024x768x24 &
fluxbox &
x11vnc -display "$DISPLAY" -bg -nopw -listen localhost -xkb


ssh -N -T -L 5900:localhost:5900 uwarl-orin@192.168.1.10 &
 vncviewer -encodings 'copyrect tight zrle hextile' localhost:5900
-
Available: Android, IOS, Linux, Mac, Win
-
Fast and efficient and more secure than VNC, lighter than xrdp
-
Virtual display , so you can run rviz without monitor
-
🎶 Since Jetson has GPU and is the main computing unit with visions, some modules require a display installed when testing and running rviz within the network. Now, it is possible with NO Machine.
-
-
NO Machine: https://downloads.nomachine.com
# dummy display driver {needed for display acc}:
$ sudo apt-get install xserver-xorg-video-dummy -y
# add fake:
$ sudo vim /etc/X11/xorg.conf
# add with:
Section "Device"
    Identifier  "Configured Video Device"
    Driver      "dummy"
EndSection
Section "Monitor"
    Identifier  "Configured Monitor"
    HorizSync 31.5-48.5
    VertRefresh 50-70
EndSection
Section "Screen"
    Identifier  "Default Screen"
    Monitor     "Configured Monitor"
    Device      "Configured Video Device"
    DefaultDepth 24
    SubSection "Display"
    Depth 24
    Modes "1920x1080"
    EndSubSection
EndSection
# NO Machine URDC:
$ cd ~/JX_Linux
# update link from https://downloads.nomachine.com/download/?id=114&distro=ARM
$ wget https://download.nomachine.com/download/8.4/Arm/nomachine_8.4.2_1_arm64.deb
$ sudo dpkg -i nomachine_8.4.2_1_arm64.deb- Other notes: https://kb.nomachine.com/AR02R01074
# NO Machine URDC:
$ cd ~/JX_Linux
# update link from x86_64 / amd64
$ wget https://download.nomachine.com/download/8.5/Linux/nomachine_8.5.3_1_amd64.deb
$ sudo dpkg -i nomachine_8.5.3_1_amd64.deb- Download NoMachine and open it, it will show any NoMachine available in the WLAN network
- For headless monitor configuration, copy it from the config (with lots settings on resolution):
$ sudo apt-get install xserver-xorg-video-dummy -y
$ sudo cp ~/uwarl-robot_configs/desktop/etc/X11/xorg.conf /etc/X11/xorg.conf$ sudo cp ~/uwarl-robot_configs/desktop/suspend_until $HOME
# Takes a 24hour time HH:MM as its argument
# Example:
#
$ suspend_until 9:30
# suspend_until 18:45
#
# You can create a root cron job that calls this script to execute at a
# specific time in the evening and then awake in the morning:
#
$ sudo crontab -e
# ---------------------------------------------
# Now enter something like to run the suspend script at 23:30:
#
30 23 * * * /home/jx/suspend_until 09:30-
This script is used to auto-sleep if you left the computer on for the day.
-
⚠️ So make sure to disable, if you have overnight session. -
Alternatively, use [0.1.5 Remote Desktop Auto-Wake upon shutdown:] to allow scheduling upon a manual shutdown triggered.
- Instruction:
# Let's create a system service:
$ sudo vim /etc/systemd/system/run-before-shutdown.service

#---- Copy Below & modify home directory:
[Unit]
Description=Setup auto-wake at 9am upon shutdown
DefaultDependencies=no
Before=shutdown.target

[Service]
Type=oneshot
ExecStart=/home/jx/uwarl-robot_configs/desktop/auto_wake_at 09:00
TimeoutStartSec=0

[Install]
WantedBy=shutdown.target

#---- Now reload and enable shutdown service:
$ systemctl daemon-reload
$ systemctl enable run-before-shutdown.service
$ systemctl status run-before-shutdown.service- generate key
ssh-keygen -t ed25519 -C "your_email@example.com" - copy the public key
cat ~/.ssh/id_ed25519.pub - paste to GitHub SSH keys under personal account profile
-
$ uname -r: OS check -
$ cat /prov/version_signature: identify kernel -
$ arp -a: Scan Local Network Devices and IPs -
$ tree -L 1: list hierarchy of directory in depth=1,may require:sudo apt install tree
-
install zsh first
$ sudo apt install zsh
# change to default in zsh
$ sudo chsh -s $(which zsh)
-
Oh-my-zsh (THE hipster dev tool + coke)
$ sudo apt install curl
$ sudo apt install git
$ sudo apt install vim
$ sh -c "$(curl -fsSL https://raw.githubusercontent.com/ohmyzsh/ohmyzsh/master/tools/install.sh)"

# to modify themes:
$ sudo vim ~/.zshrc
## Recommended themes: `ys` and `jonathan`
$ source ~/.zshrc
- https://linuxize.com/post/getting-started-with-tmux/
- Pretty/Easy-to-use Custom Mod: https://www.hamvocke.com/blog/a-guide-to-customizing-your-tmux-conf/ (except ctrl-b mod)
📓 Do not use multiple
sshclients, as they will make the system a bit heavier.
🔥 Tmux can still run in the background, even if the computer is disconnected from the internet.
⚠️ Normal ssh sessions without tmux will terminate the program if your ssh client is disconnected
-
set github editor to vim:
$ git config --global core.editor "vim"or have env variable in zshrc:
export GIT_EDITOR=vim -
Why VIM? ---> personal preference
$ sudo apt install tree
$ tree -L 2

# Example outputs:
.
├── README.md
├── scripts
│   ├── auto-config_UWARL_catkin_ws.zsh
│   ├── common.sh
│   ├── git_functions.sh
│   └── shortcuts.sh
├── summit
│   ├── install_geographiclib_datasets.sh
│   ├── rgbd_summit.rviz
│   ├── ros-melodic-robotnik-msgs_2.2.0-0bionic_amd64.deb
│   ├── summitxl_params.env
│   ├── summitxl_ros_config.bash
│   ├── summitxl_ros_config.zsh
│   └── user_services
└── wam
└── barrett.zip- Refer to https://github.com/bvaisvil/zenith
$ sudo apt-get install ros-noetic-rviz
$ rosrun rviz rviz
####################
# IF ERROR: qt.qpa.plugin: Could not find the Qt platform plugin "xcf" in ""
# - possible resolutions:
### a) display indexing error
    export DISPLAY=:0
### b) maybe try with xcb
    export QT_QPA_PLATFORM=xcb
### c) workaround for no display and qt error
		export QT_QPA_PLATFORM=offscreen
# - try again:
$ rosrun rviz rviz| Ubuntu 18.04 - RT | Intel(R) Atom(TM) Processor E3950 @ 1.60GHz - 4 Cores - x64_86 | ROS-Melodic | NOT_NETDEV PCAN | 8 GB | 25W-35.2W |
|---|
-
RT kernel patch: https://stackoverflow.com/questions/51669724/install-rt-linux-patch-for-ubuntu
[INSERT-HERE] Should be self-explanatory, good luck, and maybe log your steps as well.
ℹ️ If needed, refer Linux User Manual
-
Download Peak Driver:
#download:
$ wget https://www.peak-system.com/fileadmin/media/linux/files/peak-linux-driver-8.15.2.tar.gz
#untar:
$ tar -xzf peak-linux-driver-8.15.2.tar.gz
-
Build driver:
$ cd peak-linux-driver-8.15.2.tar.gz $ sudo make clean $ sudo make -
Install driver:
-
NO NETDEV with default peak-linux-driver make file
⚠️ with netdev, it wont work for summit controllermake, but WAM requires netdevmake -C driver NET=NETDEV_SUPPORT$ sudo make install
-
(Optional) Configure PC CAN interfaces
$ cat /etc/modprobe.d/pcan.conf:#### Below is the configuration found from summit-PC: ### # pcan - automatic made entry, begin -------- # if required add options and remove comment # options pcan type=isa,sp install pcan modprobe --ignore-install pcan # pcan - automatic made entry, end ----------
-
loading driver:
$ sudo modprobe pcan

# check if it's loaded properly:
$ sudo dmesg | grep pcan
🟠 If dmseg failed: operation note permitted. ----> unlock restriction from non-root
$ sudo sysctl kernel.dmesg_restrict=0
If it still does not work, reboot. Else, troubleshooting is needed.
-
check PCAN-USB is configured properly
$ cat /proc/pcan

*------------- PEAK-System CAN interfaces (www.peak-system.com) -------------
*------------- Release_20180720_n (8.6.0) May 25 2021 11:16:42 --------------
*------------- [mod] [isa] [pci] [pec] [dng] [par] [usb] [pcc] --------------
*--------------------- 1 interfaces @ major 243 found -----------------------
*n -type- -ndev- --base-- irq --btr- --read-- --write- --irqs-- -errors- status
32    usb   -NA- ffffffff 000 0x001c 00000000 00000000 00000000 00000000 0x0000
-
-
setup
60-can.rulesfor robotnik summit CAN controller-
$ sudo vim /etc/udev/rules.d/60-can.rules
# add a line:
KERNEL=="pcanusb*", SYMLINK+="pcan_base", MODE="0666"
Delete this "pcanusb" for WAM mode driver can0
-
-
Reload udev rules or reboot to take effect:
$ sudo service udev reload
$ sudo service udev restart
$ sudo udevadm trigger
$ sudo rmmod pcan
$ sudo modprobe pcan
-
Connect Peak USB-CAN dongle, and validate:
$ sudo dmesg | grep pcan
$ ls /dev/pcanusb*
🚩 [TODO] May be worth it to backup udev rules and scripts into uwarl-robot_configs.
-
Pre-req:
-
Make sure SSH authenticated with Github, see instruction @ [0.2 SSH Keys and Github](#0.2 SSH Keys and Github)
-
Zsh: 0.4 ZSH & oh-my-zsh
-
-
Clone configurations:
$ cd ~ && git clone git@github.com:UW-Advanced-Robotics-Lab/uwarl-robot_configs.git
-
Install the repo with auto-script:
$ cd ~ && ./uwarl-robot_configs/scripts/auto-config_UWARL_catkin_ws.zsh
📓 this script will install automatically based on the user name (e.g. uwarl-orin) to identify the PC space
-
Install Hardware Package:
$ sudo dpkg -i ~/uwarl-robot_configs/summit/ros-melodic-robotnik-msgs_2.2.0-0bionic_amd64.deb⚠️ You may not find this one from the server directly, but I did hard work for you, as stated below:⚠️ In Melodic, you will see errror on dependencymelodic-msgs, which is not available in melodic server, and required a local build, which will be done later with catkin build, just ignore this error-
📓 we can actually build one :D
$ cd UWARL_catkin_ws/uwarl-robotnik_msgs
$ catkin build --this
$ bloom-generate rosdebian --os-name ubuntu --ros-distro melodic
$ fakeroot debian/rules binary
-
Build base_hw dpkg:
sudo dpkg -i uwarl-robotnik_base_hw/lib/ros-melodic-robotnik-base-hw-lib_****_amd64.deb
-
-
Configure ROS Environment:\
# (Optional) Ensure ip are correct in the env.
$ sudo vim ~/uwarl-robot_configs/summit/user_services/environment
# Copy ROS env:
$ sudo cp ~/uwarl-robot_configs/summit/user_services/environment ~/.ros/
-
Catkin Build:
# source robot config env & ros
$ source ~/.zshrc
# build:
$ cd $ROS_CATKIN_WS && catkin_build
### Trick:
$ build_ws # from anywhere, which will does the job for you :P (Jack is too lazy)
-
Let's use system boot as a method to auto-boot services, as they can be restarted easily with status logs
This is different from what Robotnik was doing, but way better :P
-
User system Permissions:
$ sudo usermod -a -G dialout $USER
$ sudo usermod -a -G root $USER
-
Create auto roslaunch:
$ cd ~
# load system services:
#[OPTIONAL] roscore only:
$ sudo cp uwarl-robot_configs/summit/user_services/roscore.service /usr/lib/systemd/user
#[this one] roscore and roslaunch:
$ sudo cp uwarl-robot_configs/summit/user_services/roscorelaunch@.service /usr/lib/systemd/user
#[OPTIONAL] depends on remote roscore:
$ sudo cp uwarl-robot_configs/summit/user_services/roslaunch@.service /usr/lib/systemd/user

# create launch for summit:
$ systemctl --user daemon-reload
$ systemctl --user enable roscorelaunch@waterloo_steel_bringup:waterloo_steel_summit.launch

# uninstall:
$ systemctl --user disable roscorelaunch@waterloo_steel_bringup:waterloo_steel_summit.launch

# Start at bootup instead of graphical login
sudo loginctl enable-linger $USER
# check system:
$ systemctl --user status roscorelaunch@waterloo_steel_summit_bringup:waterloo_steel_summit.launch

# restart:
$ systemctl --user restart roscorelaunch@waterloo_steel_summit_bringup:waterloo_steel_summit.launch

# stop:
$ systemctl --user stop roscorelaunch@waterloo_steel_summit_bringup:waterloo_steel_summit.launch

# check log:
$ journalctl --user --user-unit=roscorelaunch@waterloo_steel_summit_bringup:waterloo_steel_summit.launch.service
# live:
$ journalctl --follow --user --user-unit=roscorelaunch@waterloo_steel_summit_bringup:waterloo_steel_summit.launch.service# install roscore service:
$ source ~/uwarl-robot_configs/scripts/git_functions.sh && install_roscore_systemctl_service
# use roscore service shortcuts:
$ summit_systemctl [mode: reinstall, status, restart, stop, history, follow]ℹ️ You may want to prepare the ROS first as instructed in 1.8 [:star:] UWARL ROS Catkin Workspace Setup
-
https://github.com/RobotnikAutomation/robotnik_pad
-
ds4drv automatic install:
$ sudo ./ds4drv-install.sh
📓 This step also modifies the
udevfile:/etc/udev/rules.d/50-ds4drv.rules-
Since PS4 Hidraw mode creates two jsX devices.
- one by DS4DRV
- one by OS upon pairing (only buttons, no acc)
-
There could be a race condition between the name of the devices, hence, we need a rules at the udev level, and prioritize js0 as the OS version, and then, js1 will be registered for ds4drv.
-
-
Check service:
$ systemctl status ds4drv.service
-
Configuration setting:
$ sudo vim ds4drv.conf
-
[Troubleshoots] You may encounter:
-
🚨 Please install
pip install six==1.13or above, so ps4drv does not fail -
💁♂️ If not working, try
sudo, sigh -
💁♂️ if systemctl cannot find package for ds4drv, make sure installed using
sudo python3.6 -m pip install -U ds4drvinstead of pip tool to be clear💁♂️ if does not work, try clearpath branch: https://github.com/clearpathrobotics/ds4drv
-
-
Bluetooth dongle (pluggable usb bluetooth 4.0 @ usb 2.0 port):
🎩 This is the magical dongle that works like magic, the one that came with Robotnik does not work well in Linux.
-
check Bluetooth socket layer init status
$ dmesg | egrep -i 'blue|firm' | cut -c 16-
-
Check:
$ sudo systemctl status bluetooth.service # <-- make sure it is working $ rfkill list $ hcitool dev -
Connect:
$ sudo bluetoothctl

#----- Command:
[bluetooth]# scan on
[bluetooth]# trust MAC
[bluetooth]# agent on
[bluetooth]# pair MAC
-
Check if jsX live is connected:
$ ls /dev/input
-
Check udev name for js0 as "Sony Entertainment ***":
$ udevadm info -a /dev/input/js0
-
🚩 [TODO] May be worth it to backup udev rules and scripts into uwarl-robot_configs. ---Jack
-
PX4: https://docs.px4.io/main/en/dev_setup/building_px4.html
-
ROS Guide: http://wiki.ros.org/RobotnikAutomation/Tutorials/Use%20Pixhawk%20in%20AGV
$ sudo apt-get install ros-melodic-mavros ros-melodic-mavros-extras
-
Steps:
-
Identify the serial number:
$ udevadm info -a /dev/ttyUSB0 | grep serial

# --- Output:
    SUBSYSTEMS=="usb-serial"
    ATTRS{serial}=="FTA31EZ3"
    ATTRS{serial}=="0000:00:15.0"
-
Create / Modify udev:
$ sudo vim /etc/udev/rules.d/50-pixhawk.rules

## -- Paste Below:
KERNEL=="ttyUSB[0-9]*", OWNER="summit", GROUP="dialout", MODE="0666"
KERNEL=="ttyUSB[0-9]*", ATTRS{idProduct}=="6001", ATTRS{serial}=="FTA31EZ3", NAME="%k", SYMLINK="ttyUSB_PX4", GROUP="dialout", MODE="0666"
If using USB-to-micro_USB:
KERNEL=="ttyUSB[0-9]*", OWNER="summit", GROUP="dialout", MODE="0666"
SUBSYSTEM=="tty", ATTRS{idVendor}=="26ac", ATTRS{idProduct}=="0011", NAME="%k", SYMLINK="tty_PX4", GROUP="dialout", MODE="0666"
-
reload and restart rules:
$ sudo service udev reload
$ sudo service udev restart
$ sudo udevadm trigger
-
🚩 [TODO] May be worth it to backup udev rules into uwarl-robot_configs. ---Jack
-
-
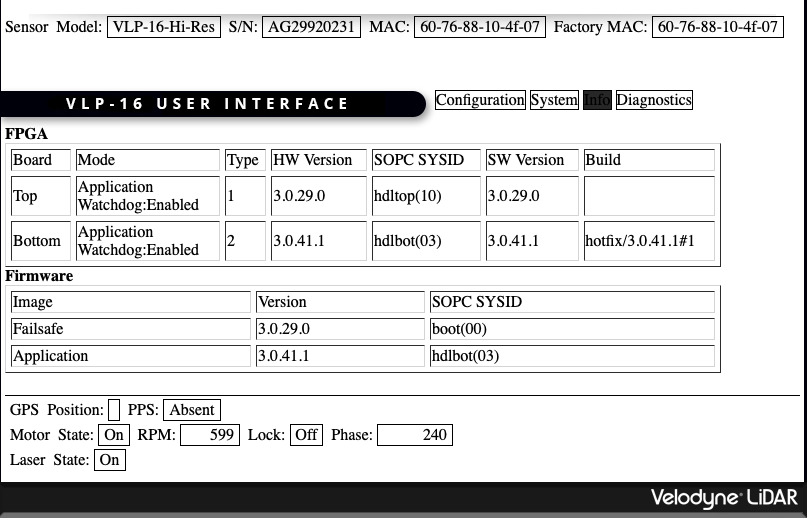
Updated to 3.0.41 on Oct-19,2022
- Now we have DHCP :)
-
⚠️ Make sure the velodyn is on different subnet with the router, else you will not be able to use wifi at all due to conflicts -
ROS: http://wiki.ros.org/velodyne/Tutorials/Getting%20Started%20with%20the%20Velodyne%20VLP16
$ sudo apt-get install ros-melodic-velodyne
# test launch
$ roslaunch velodyne_pointcloud VLP16_points.launch
$ rosnode list
$ rostopic echo /velodyne_points
# rviz:
$ rosrun rviz rviz -f velodyne
-
Please refer to the instruction Logbook:WAM-PC-Setup.md
-
Adlink was originally purchased as WAM External PC, but reutilized to host as a SUMMIT PC, since summit only support x86 architecture
-
But you can dynamically switch the current system by
-
Modifying can udev rules:
$ sudo vim /etc/udev/rules.d/60-can.rules

# clear the file
# for Summit:
KERNEL=="pcanusb*", SYMLINK+="pcan_base", MODE="0666"

# for WAM:
RUN+="/bin/reset_can.sh"
-
re-installing NON/NETDEV-pcan driver
# NOTE: these two directories are pre-built with PCAN instruction above
### for switching from [Summit ---> WAM]
# uninstall NON-NETDEV:
$ cd ~/UWARL_drivers/peak-linux-driver-8.14.0-rt-no-ndev
$ sudo make uninstall
# install NETDEV:
$ cd ~/UWARL_drivers/peak-linux-driver-8.14.0
$ sudo make install

# reactivate:
$ sudo modprobe pcan
$ sudo rmmod pcan
$ sudo reboot

# check:
$ sudo dmesg | grep pcan
$ cat /proc/pcan
-
swapping out the PCAN dongle
-
| Ubuntu 20.04 - RT - Tegra | Arm® Cortex®-A78AE v8.2 64-bit CPU 2.2GHz - 12 Cores - aarch64/arm64 | ROS-Noetic | NETDEV PCAN | 32 GB | 15~60W |
|---|
- On Ubuntu 20.04 PC, install SDK Manager
- Install [ JetPack 5.0.2 | Jetson Linux r35.1] Linux For Jetson AGX Orin Modules
- Jetson Linux Release Doc: https://developer.download.nvidia.com/embedded/L4T/r35_Release_v1.0/Jetson_Linux_Release_Notes_r35.1.pdf
- Kernel Packages: https://docs.nvidia.com/jetson/archives/r35.1/DeveloperGuide/text/SD/Kernel/KernelCustomization.html#using-the-jetson-linux-real-time-kernel-package
- Getting Started: https://developer.nvidia.com/embedded/learn/get-started-jetson-agx-orin-devkit
- Boot Jetson into Flashing mode (By restarting the hardware, while holding the other two buttons to enter the recovering mode.)
- Just use manual flashing mode with pre-configure:
account: uwarl-orin
password: xxxxxx
- If you are going to use NVMe SSD mainly, please skip the SDK installation once it flashes OS.
- eMMC is still a default kernel booting directory, even if BIOS change
- Proceed with step 2.0.b below
- No need to wait for expensive installation of Jetpack, we will install them on NVMe SSD
-
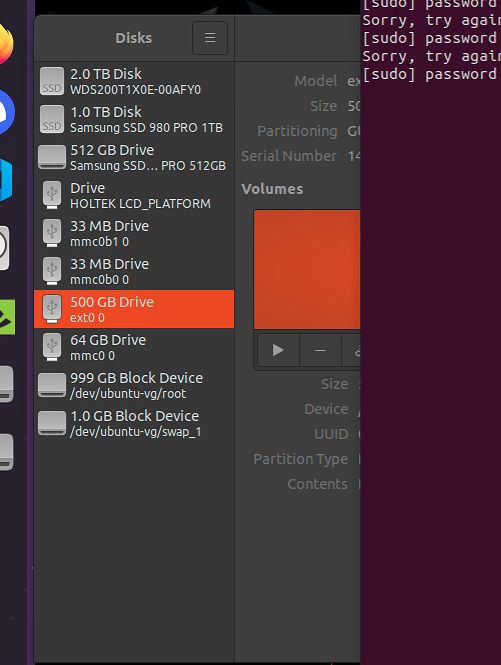
Boot with eMMC SSD Kernel
- Open [Disk]
- Delete all partitions, and make sure entire volume is fee
-
🚫 [No longer needed] Configure free ssd:
-
SSH into the Jetson Orin from eMMC boot
$ ssh uwarl-orin@192.168.1.10 -
Check the NVMe drive’s device name (e.g. /dev/nvme0n1):
$ lsblk -d -p | grep nvme | cut -d\ -f 1
Note that there must be two spaces after the ‑d.
-
Create a new GPT
$ sudo parted /dev/nvme0n1 mklabel gpt
-
Create Partition:
$ sudo parted /dev/nvme0n1 mkpart APP 0GB 500GB
-
Format APP as an ext4 partition and mount it.
$ sudo mkfs.ext4 /dev/nvme0n1p1
$ sudo mount /dev/nvme0n1p1 /mnt
-
-
[Proceed next step]
NVMe is much faster (x5-10) than EMMc SSD, but you would want to install JetPack and updates with eMMC first just in case.
-
[Optional, may need to manually do this in the end] Configure BIOS:
-
Boot Computer and enter BIO with [ESC] at the boot screen
-
configure boot order to the
nvmeoveremmc
-
-
Try flash by selecting [ NVMe ] in the pre-configure, along with:
account: uwarl-orin
password: xxxxxx
⚠️ It will fail at Flashing!!! At least it will prepare and compile all installation files. (R35.1), dunno if it will be fixed. To note, NVMe support and UEFI Boot Manager were only introduced after JetPack 5.
- But at least you will see on your host PC:
-
Wipe The SSD: by formatting the disk to remove old partitions
-
Manually flashing OS after you see NVME drive is available on host PC:
# Pre-Requisite: nvme is now mounted as /dev/sdf on host PC, from previous step
# In Host PC:
$ cd ~/{Target-HW-Image-Folder}/JetPack_5.0.2_Linux_JETSON_AGX_ORIN_TARGETS/Linux_for_Tegra

# sdf has been recognized by host computer now as shown in previous step
$ sudo BOARDID=3701 BOARDSKU=0000 FAB=TS4 ./tools/kernel_flash/l4t_initrd_flash.sh -c tools/kernel_flash/flash_l4t_external.xml --external-device sdf --direct sdf jetson-agx-orin-devkit external

### ARCHIVED
# flash manually:
#$ sudo BOOTDEV=nvme0n1p1 ./flash.sh jetson-agx-orin-devkit nvme0n1p1
# not this command:
#$ sudo ./tools/kernel_flash/l4t_initrd_flash.sh --external-device nvme0n1p1 -c ./tools/kernel_flash/flash_l4t_external.xml -S 490GiB --erase-all --showlogs jetson-agx-orin-devkit nvme0n1p1
-
Plug-in DP Monitor, and manually configure ubuntu at boot with
uwarl-orin- user name : uwarl-orin
- do not install chrome
- ...
🧀 Last installation (Nov. 21, 2022) was successfully onto NVMe. 485.4 GB / 491.4 GB Available, Boot directly from NVMe. 467.3 GB after installing JetPack 5 SDK
[System Check]:
- Heat Sink Fan running
$ sudo jetson_clocks --fan - DP working
- SSH available by default
🙅 Last resource, to migrate onto NVMe manually in earlier releases:
https://github.com/jetsonhacks/rootOnNVMe (It's not booting from NVMe, but rather booting from eMMC, and switching to NVMe by a system-ctl service)
-
Select Power Mode: 50W once logged in, and reboot
-
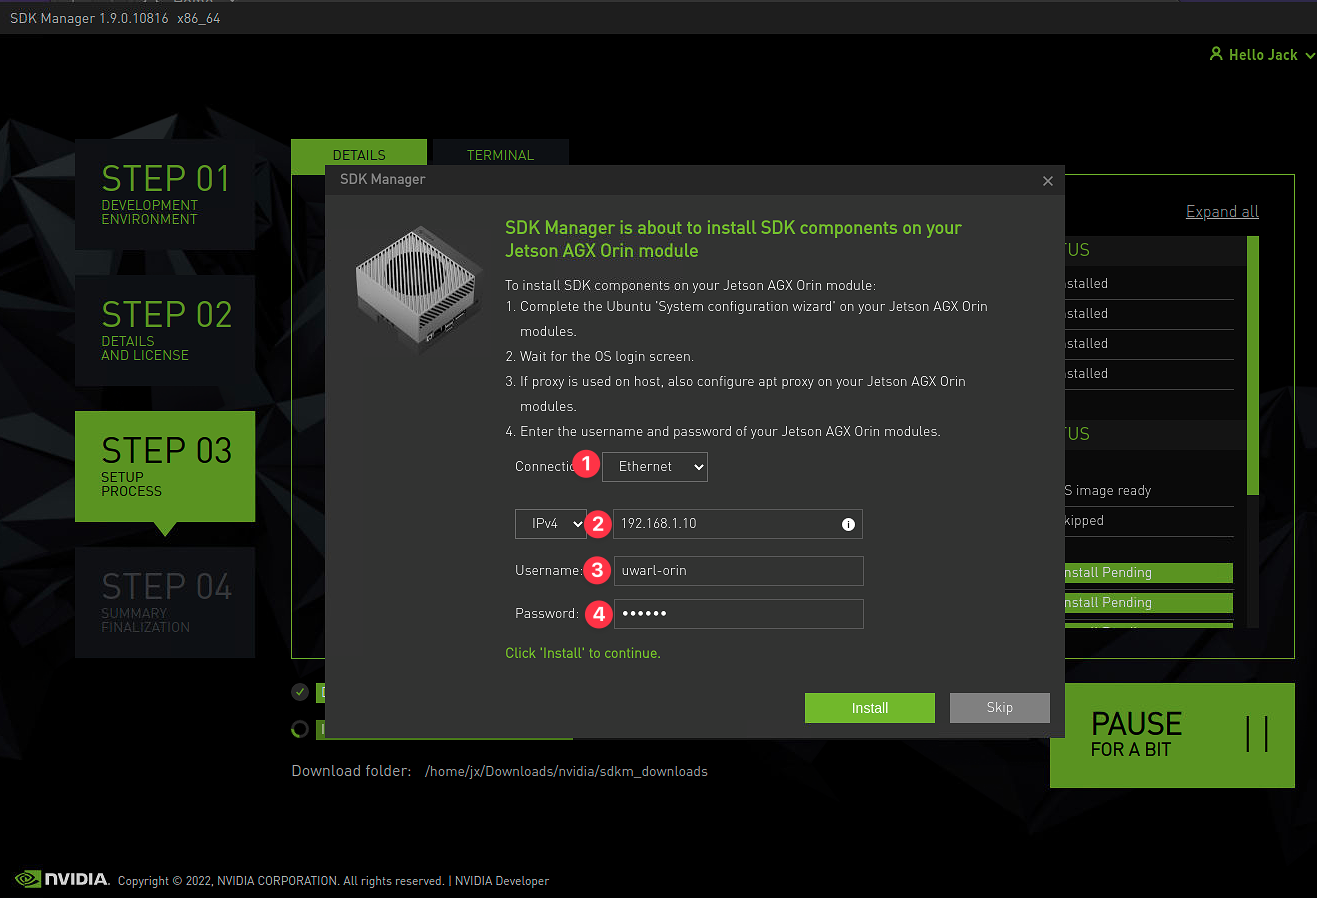
After flashing OS, unplug the flashing USB cable, and launch SDK Manager
Assuming Host PC and Jetson is under the same network (plug host PC WAN into the LAN port of the robot)
-
Plug in Ethernet, and make sure your laptop is sharing to another computer under IPv4 network setting
- at your host pc, check ethernet IPv4:
$ arp -aand enter the network info into Jetson SDK manager
- at your host pc, check ethernet IPv4:
-
[if in discrete steps] Skip the Jetson Linux Flashing Interface (by cancelling the selection)
-
Configure Ethernet for installing Jetson SDK:
-
Wait for installation. And DONE 🍻
- make sure the jetson is on
- else, reboot the robot
- Else, reset the Jetson
- Else, proceed the next troubleshoot: 2.0.c.2
- make sure computer is connected to network
- Possible issues:
- NVMe SSD failed (Encountered once on April 15 2023)
- Jetson is toasted (have not yet encountered, issue warranty)
- Resoltutions:
- 📓 If NVMe SSD failed, connect keyboard and monitor,
- and press F11 at the bootup
- @BIOS, select the eMMc to boot into eMMc OS
- Boot into Ubuntu
- If failed, meaning eMMC OS image may be also corrupted
- Remove NVMe SSD
- Reinstall Jetpack with Nvidia SDK Manager via USB C (only one USB C is able to do the flashing)
- We can wipe NVMe by deleting all partitions0
- If failed, meaning eMMC OS image may be also corrupted
- reinstall OS with usb C on external PC
- select NVMe
- proceed with 2.0.b.1 and 2.0.b.3 for detailed instructions
📓 TAG: jetson_35.1, the public release DOES NOT HAVE RT KERNEL, SAD!!
- So you have to compile from source:
⚠️ The procedure has been verified, but we will revert back to non-RT (Dec. 09), and wait for the official release of the RT kernel header version. (Since some packages that require header files would have to be explicitly compiled with locally built kernel.)
⚠️ The display may not work after RT kernel, so we are reverting back to non-RT, as we need a display driver to use a certain library.[2022 Dec. 09, reflashing jetson back to default non-RT]
📓 RT Display fix solution at cross compile time: as mentioned in step 2.1.1.(B) step #9
- Plan-A should be perform before Step 1
- Plan-B can be performed after Step 1
- After switching to RT, you need to recompile: pcan,
- Please refer Logbook on Jetson Setup (May be outdated, so do it jointly with Plan-B descriptions)
-
Create Driver Directories, so we can download any other drivers here
$ mkdir $HOME/JX_Linux -
In your browser, go to https://developer.nvidia.com/embedded/jetson-linux-archive.
-
Locate and download the Jetson Linux source files (Driver Package Sources) for your release.
# r35.1 as an example: $ wget https://developer.nvidia.com/embedded/l4t/r35_release_v1.0/sources/public_sources.tbz2 -
Extract the
.tbz2file:$ tar -xjf public_sources.tbz2
-
Extract the kernel source file:
# make a shortcut here:
$ export TEGRA=$HOME/JX_Linux/Linux_for_Tegra/source/public
# extract kernel:
$ cd $TEGRA
$ tar -xjf kernel_src.tbz2
This extracts the kernel source to the
kernel/subdirectory. -
Apply RT Kernel:
$ cd $TEGRA/kernel
$ ./kernel-5.10/scripts/rt-patch.sh apply-patches
### Expected OUTPUT:
#> The PREEMPT RT patches have been successfully applied!
-
🚫(ON NON-Jetson HOST PC) Cross Compile:
$ export CROSS_COMPILE_AARCH64_PATH=<toolchain-path>
$ export CROSS_COMPILE_AARCH64=<toolchain-path>/bin/aarch64-buildroot-linux-gnu-
-
Kernel out:
$ mkdir kernel_out
$ export kernel_out=$TEGRA/kernel/kernel_out
$ cd $kernel_out
-
⭐ Make display module ref-nov-04-nvidia-forum:
#Build display kernel:
$ export LOCALVERSION="-tegra"
$ export IGNORE_PREEMPT_RT_PRESENCE=1
# modify nvbuild.sh:
$ vim $TEGRA/nvbuild.sh
## Line 105, specify these for modules in order to build display modules:
	"${MAKE_BIN}" -C "${source_dir}" ARCH=arm64 \
		LOCALVERSION="-tegra" \
		CROSS_COMPILE="${CROSS_COMPILE_AARCH64}" \
		CC="${CROSS_COMPILE_AARCH64}gcc" \
		LD="${CROSS_COMPILE_AARCH64}ld.bfd" \
		AR="${CROSS_COMPILE_AARCH64}ar" \
		CXX="${CROSS_COMPILE_AARCH64}g++" \
		OBJCOPY="${CROSS_COMPILE_AARCH64}objcopy" \
		TARGET_ARCH=aarch64 \
		"${O_OPT[@]}" -j"${NPROC}" \
		--output-sync=target modules
-
Install Dependencies for kernel build (Missing OpenSSL development package):
$ sudo apt-get install libssl-dev

# $ sudo apt-get install libncurses-dev flex bison openssl libssl-dev dkms libelf-dev libudev-dev libpci-dev libiberty-dev autoconf- Build & wait for a while ⌛ (~1/2 hour on orin)
$ cd $TEGRA && ./nvbuild.sh -o $kernel_out -
Replace
/boot/Imagewith a copy of this file:# a copy backup: $ cd $HOME $ sudo mv /boot/Image /boot/Image.bak.non-rt # override the current boot: $ sudo cp $kernel_out/arch/arm64/boot/Image /boot/Image $ sudo cp $kernel_out/arch/arm64/boot/dts/nvidia/* /boot $ sudo cp $kernel_out/arch/arm64/boot/dts/nvidia/tegra234-p3701-0000-p3737-0000.dtb /boot/dtb/kernel_tegra234-p3701-0000-p3737-0000.dtb $ sudo cp $kernel_out/drivers/gpu/nvgpu/nvgpu.ko /usr/lib/modules/$(uname -r)/kernel/drivers/gpu/nvgpu/nvgpu.ko #$ sudo cp $kernel_out/arch/arm64/boot/dts/nvidia/* /boot/dtb/
-
Save built kernel to
/usr/src:# - build package dependencies: sudo apt update sudo apt install -y build-essential flex bison libssl-dev libelf-dev # - build config make config # - check if kernel source has it before $ ls /usr/src # - copy kernel_out into `/usr/src/{uname -r}` $ sudo mkdir /usr/src/linux-headers-5.10.104-rt63-tegra-ubuntu20.04_aarch64/ $ sudo cp -r /usr/src/linux-headers-5.10.104-tegra-ubuntu20.04_aarch64/* /usr/src/linux-headers-5.10.104-rt63-tegra-ubuntu20.04_aarch64/ # - make an empty kernel $ cd /usr/src/linux-headers-5.10.104-rt63-tegra-ubuntu20.04_aarch64/ $ sudo rm -rf kernel-5.10 # - copy kernel over # $ sudo mkdir kernel-5.10 # $ sudo cp -r $kernel_out/* kernel-5.10 # - alternatively, make a symbolic link, to avoid conflicts $ sudo ln -s $kernel_out kernel-5.10
-
Install Kernel to the
/lib/modules# - inside `/usr/src/{uname -r}` to install into `/lib/modules` $ cd $kernel_out $ sudo make modules_install # output: DEPMOD 5.10.104-rt63-tegra $ ls /lib/modules # output: [5.10.104-rt63-tegra (<--what we compiled), 5.10.104-tegra]
-
Install custom kernel to the
/usr/include:$ cd $kernel_out && sudo make headers_install INSTALL_HDR_PATH=/usr
-
Set up for building external modules (later, needed for other drivers):
$ sudo make modules_prepare
-
Override EMMC boot
🔥 It seems that the rootfs boot is still through EMMC
$ sudo mount /dev/mmcblk0p1 /mnt $ sudo cp /boot/Image /mnt/boot/Image $ sudo cp -r /boot/dtb/* /mnt/boot/dtb -
Reboot:
$ sudo reboot 0 $ uname -a Linux uwarl-orin 5.10.104-rt63-tegra #1 SMP PREEMPT RT Tue Nov 22 09:18:41 EST 2022 aarch64 aarch64 aarch64 GNU/Linux -
🙅 Kernel Test (https://www.kernel.org/doc/html/latest/dev-tools/kselftest.html):
TODO: when running kselftest, it freezes, need someone to investigate?
# export current kernel
$ export kernel_out=$HOME/JX_Linux/kernel_out
$ cd $kernel_out && sudo make summary=1 kselftest
-
In future, to compile other drivers, you need to specify header:
# export current kernel
$ export kernel_src=/usr/src/linux-headers-5.10.104-rt63-tegra-ubuntu20.04_aarch64/kernel-5.10
Possible Make commands within
$kernel_src---> imported from/home/uwarl-orin/JX_Linux/Linux_for_Tegra/source/public/kernel/kernel-5.10/Makefile$ cat /home/uwarl-orin/JX_Linux/Linux_for_Tegra/source/public/kernel/kernel-5.10/MakefileTo see possible commands to run in kernel output:
help:
	@echo  'Cleaning targets:'
	@echo  '  clean		  - Remove most generated files but keep the config and'
	...
	@echo  '* modules	  - Build all modules'
	@echo  '  modules_install - Install all modules to INSTALL_MOD_PATH (default: /)'
	...
  @echo  '  modules_prepare - Set up for building external modules'
	...
	@echo  '  headers_install - Install sanitised kernel headers to INSTALL_HDR_PATH'; \
  ...
  @echo  'Kernel selftest:'
	@echo  '  kselftest         - Build and run kernel selftest'
	@echo  '                      Build, install, and boot kernel before'
	@echo  '                      running kselftest on it'
	@echo  '                      Run as root for full coverage'
	@echo  '  kselftest-all     - Build kernel selftest'
	@echo  '  kselftest-install - Build and install kernel selftest'
	@echo  '  kselftest-clean   - Remove all generated kselftest files'
	@echo  '  kselftest-merge   - Merge all the config dependencies of'
	@echo  '		      kselftest to existing .config.'
	@echo  ''
	@$(if $(dtstree), \
		echo 'Devicetree:'; \
		echo '* dtbs             - Build device tree blobs for enabled boards'; \
		echo '  dtbs_install     - Install dtbs to $(INSTALL_DTBS_PATH)'; \
		echo '  dt_binding_check - Validate device tree binding documents'; \
		echo '  dtbs_check       - Validate device tree source files';\
		echo '')
📓 Has been added as part of the automated script in 2.4 step on Dec. 12, 2022.
Compile PCAN with this custom rt-kernel:
# download driver:
$ wget https://www.peak-system.com/fileadmin/media/linux/files/peak-linux-driver-8.15.2.tar.gz

# unzip:
$ tar -xzf peak-linux-driver-8.15.2.tar.gz

# build driver with netdev:
$ sudo make -C driver NET=NETDEV_SUPPORT KERNEL_VERSION="5.10.104-rt63-tegra"
# KERNEL_LOCATION=$kernel_src
# LOCALVERSION="-tegra"

### OUTPUT ###:
#*** Host OS Release=Ubuntu v20.04
#*** Host machine kernel version=5.10.104-rt63-tegra
#*** Driver kernel version=5.10.104-rt63-tegra (5.10.104)
#*** Path to kernel sources=/lib/modules/5.10.104-rt63-tegra/build

# install:
$ sudo make install KERNEL_VERSION="5.10.104-rt63-tegra"

# load pcan
$ sudo modprobe pcan

# testing:
$ sudo dmesg | grep pcan

# udef rules:
sudo vim /etc/udev/rules.d/60-can.rules
RUN+="/bin/reset_can.sh"
⚠️ netdevsupport is needed for WAM
⚠️ Kernel location should be the compiled kernel output with RT-kernel, the/usr/srcdoes not contain rt-kernel with custom build
ℹ️ http://wiki.ros.org/noetic/Installation/Ubuntu
📓 Has been added as part of the automated script!
sudo sh -c 'echo "deb http://packages.ros.org/ros/ubuntu $(lsb_release -sc) main" > /etc/apt/sources.list.d/ros-latest.list'

sudo apt install curl # if you haven't already installed curl
curl -s https://raw.githubusercontent.com/ros/rosdistro/master/ros.asc | sudo apt-key add -

sudo apt update

sudo apt install ros-noetic-desktop-full# (Optional) Ensure ip are correct in the env.
$ sudo vim ~/uwarl-robot_configs/summit/user_services/environment
# Copy ROS env:
$ sudo cp ~/uwarl-robot_configs/summit/user_services/environment ~/.ros/Use our
uwarl-libbarrettwith fixes to support arm based system📓 Has been added as part of the automated script!
-
Clone lib:
$ cd $HOME
$ git clone git@github.com:UW-Advanced-Robotics-Lab/uwarl-libbarrett.git
# make sure it's checkout @ uwarl/noetic/dev-3.0.2
-
Install dependencies
cd ~/uwarl-libbarrett/scripts && ~/uwarl-libbarrett/scripts/install_dependencies.sh
$ sudo reboot 0
📓
uwarl/noetic/dev-3.0.2is a modified version for our robot, and install libconfig into~/JX_Linuxpath, and compile with aarch64 custom header. The official version has out-dated and does not work detect arm64 arch. -
Continue to build library and install:
# install libbarrett:
cd ~/uwarl-libbarrett
export CC=/usr/bin/clang
export CXX=/usr/bin/clang++
cd ~/uwarl-libbarrett && cmake .
make -j$(nproc)

sudo make install

# build libbarrett example programs:
cd ~/uwarl-libbarrett/examples && cmake .
make -j$(nproc)
-
(Optional, this version has fixed the config in build files) copy libbarrett configurations from
uwarl-robot_configsrepo for vertical config (program assusudo make installme horizontal)
Install Catkin Workspace + Hardware Setup + ROS in one script
-
Pre-req:
-
Make sure SSH authenticated with Github, see instruction @ [0.2 SSH Keys and Github](#0.2 SSH Keys and Github)
-
Zsh: 0.4 ZSH & oh-my-zsh
-
-
Clone configurations:
$ cd ~ && git clone git@github.com:UW-Advanced-Robotics-Lab/uwarl-robot_configs.git
-
Install the repo and configure hardware with auto-script:
$ cd ~ && ./uwarl-robot_configs/scripts/auto-config_UWARL_catkin_ws.zsh
📓 this script will install automatically based on the user name (e.g. uwarl-orin) to identify the PC space
🔥 This will install ROS Noetic for you, if you have ubuntu 20.04 focal (like Jetson) , otherwise, you have to install manually OR add a script to it as well?
-
Reboot is Required if it is the first time installing libbarrett !!
-
Catkin Build:
# source robot config env & ros
$ source ~/.zshrc
# build:
$ build_ws # from anywhere, which will does the job for you :P (Jack is too lazy)
# source:
$ source_ws # lemme know if we should auto-source after build, :wink:
-
Install ZED SDK: https://www.stereolabs.com/developers/release/
$ cd ~/JX_Linux
$ wget https://download.stereolabs.com/zedsdk/3.8/l4t35.1/jetsons
$ mv jetsons ZED_SDK_Tegra_L4T35.1_v3.8.2.zstd.run
$ sudo apt install zstd
$ sudo chmod +x ZED_SDK_Tegra_L4T35.1_v3.8.2.zstd.run
$ ./ZED_SDK_Tegra_L4T35.1_v3.8.2.zstd.run
-
Install
realsensehardware lib:# linux udpate: $ sudo apt-get update && sudo apt-get upgrade && sudo apt-get dist-upgrade # linux backend: $ sudo apt-get install git libssl-dev libusb-1.0-0-dev pkg-config libgtk-3-dev # clone repo: $ cd $HOME/JX_Linux $ git clone https://github.com/IntelRealSense/librealsense.git $ cd librealsense # 1. setup udev: $ ./scripts/setup_udev_rules.sh # 2. install libuvc for RSUSB $ libuvc_installation.sh # build: $ mkdir build && cd build # (option 1) RSUSB $ cmake ../ -DCMAKE_BUILD_TYPE=Release -DBUILD_EXAMPLES=true -DFORCE_RSUSB_BACKEND=true -DBUILD_PYTHON_BINDINGS=true -DBUILD_GRAPHICAL_EXAMPLES=true -DBUILD_WITH_CUDA=false -DPYTHON_EXECUTABLE=/usr/bin/python3 # (option 2) Kernel Patch Note: NOT AVAIL for Jetpack 5 # $ sudo make uninstall && make clean # if rebuild $ make -j$(($(nproc)-1)) && sudo make install
-
Install Realsense-ROS
- ros1 legacy: https://github.com/IntelRealSense/realsense-ros/tree/ros1-legacy
- latest is ROS2 based: https://github.com/IntelRealSense/librealsense
- Local: based on workspace
-
https://www.intelrealsense.com/how-to-multiple-camera-setup-with-ros/
Serial: f1320485 #EE
Serial: f1271800 #base

roslaunch realsense2_camera rs_camera.launch camera:=cam_EE serial_no:=f1320485 Initial_reset:=true depth_fps:=15 color_fps:=15 color_enable_auto_exposure:=0

# filters:=spatial,temporal,pointcloud

roslaunch realsense2_camera rs_camera.launch camera:=cam_base serial_no:=f1271800 Initial_reset:=true depth_fps:=15 color_fps:=15 color_enable_auto_exposure:=0
-
Refer to https://github.com/cilynx/rtl88x2bu
-
Instruction:
-
$ cd JX_Linux
$ git clone https://github.com/cilynx/rtl88x2bu.git
$ cd rtl88x2bu
$ make ARCH=arm64 #Note: aarch_64 is arm64 relabel, otherwise, CMAKE does not know
$ sudo make install
$ sudo reboot

# Now you will see USB wifi selection besides the original PCI wifi
-
-
Just use port 801, other ports require some sort network management
-
$ roslaunch vicon_bridge vicon.launch
🔦 You may end up with a broken 🚫 Jetson, and require to reflash again completely. Be careful with iptables, if you are going to delete any iptable configs
# check ip and port and dev
$ ip route show | grep default
# default via 192.168.1.1 dev eth0 proto dhcp metric 100
# default via 129.97.71.1 dev wlan1 proto dhcp metric 600

# First of all - you should check if forwarding is allowed at all:
cat /proc/sys/net/ipv4/conf/wlan1/forwarding
cat /proc/sys/net/ipv4/conf/eth0/forwarding
# If both returns 1 it's ok. If not do the following:
echo '1' | sudo tee /proc/sys/net/ipv4/conf/wlan1/forwarding
echo '1' | sudo tee /proc/sys/net/ipv4/conf/eth0/forwarding

# Table Rule: port wlan1 51001 to 192.168.1.10:51001
$ sudo iptables -t nat -A PREROUTING -p udp -i wlan1 --dport 51001 -j DNAT --to-destination 192.168.1.10:51001

$ sudo iptables -A FORWARD -p udp -d 192.168.1.10 --dport 51001 -m state --state NEW,ESTABLISHED,RELATED -j ACCEPT


# check
$ ip route
sudo iptables -P INPUT ACCEPT
sudo iptables -P FORWARD ACCEPT
sudo iptables -P OUTPUT ACCEPT-
Note:
- SteamOS 3.0 is arch based.
-
pacmaninstead ofapt-get
-
Spec:
Architecture:            x86_64
  CPU op-mode(s):        32-bit, 64-bit
  Address sizes:         44 bits physical, 48 bits virtual
  Byte Order:            Little Endian
CPU(s):                  8
  On-line CPU(s) list:   0-7
Vendor ID:               AuthenticAMD
  Model name:            AMD Custom APU 0405
    CPU family:          23
    Model:               144
    Thread(s) per core:  2
    Core(s) per socket:  4
    Socket(s):           1
    Stepping:            2
- refer to https://github.com/ctu-vras/steam-deck-ros-controller, BUT do not follow their instructions, as their configuration files are for their system. Ours are auto-configured with step: 3.2 [:star: automated] UWARL ROS Catkin Workspace Setup
⚠️ *At any time, if you are in the gaming mode, switching to desktop mode is done via the Power off menu. (after pressing physical steam button) **
📓*To summon the on-screen keyboard, press STEAM+X. To hide it, press B.
⚠️ Keep the Deck connected to a power source to prevent it from falling asleep.*
-
Set the amount of reserved GPU memory to 4 GB (in Desktop mode, the auto mode somehow doesn't work and VRAM is capped at 1 GB normally).
-
Still in gaming mode, go to Settings->Enable developer mode .
-
Still in gaming mode, go to Developer->Enable Wifi power management and turn it off (it lowers the performance and make SSH sessions very sluggish). This will want a reboot. Do it.
-
Switch to Desktop mode (see the notice above).
-
Tap the Steam icon in taskbar, select Settings -> Controller -> Desktop configuration. This menu allows you to configure the gamepad behavior, so that the
joy_nodecan read it. Press X to browse available configs. Select Templates->Gamepad->Apply configuration. Do any other adjustments you like, but do not touch the JOYSTICK MOVE areas. You can't return these values back! What I do is configure L4 as Ctrl+R, L5 as Ctrl+C, R4 as up arrow and R5 as down arrow.📓 Jack has created a custom profile that we can use shortcut buttons and touch pad as mouse trackpad while the joystick as game controller.
-
Open terminal (Konsole) from the KDE app menu->System.
-
Set the user's password: type
passwdand type your password twice. Now you can usesudo.$ passwd
-
Make the filesystem read-write: 📓 Need to disable after OS updates
$ sudo steamos-readonly disable
-
Enable SSH server:
$ sudo systemctl enable sshd.service && sudo systemctl start sshd.service .
# Now you can finally connect to the deck via SSH from your laptop.

# deck@steamdeck
$ ssh deck@192.168.1.15
-
Clone the steam-deck-ros-controller repository:
$ mkdir JX_Linux
$ git clone https://github.com/ctu-vras/steam-deck-ros-controller
-
Config files:
(deck@steamdeck JX_Linux)$ sudo cp -r steam-deck-ros-controller/etc/NetworkManager/dispatcher.d/pre-up.d/disable-wifi-power-saving.sh /etc/NetworkManager/dispatcher.d/pre-up.d/
(deck@steamdeck JX_Linux)$ sudo cp -r steam-deck-ros-controller/etc/systemd/logind.conf.d/* /etc/systemd/logind.conf.d/
echo "keyserver hkps://keyserver.ubuntu.com" | sudo tee -a /etc/pacman.d/gnupg/gpg.conf
wget https://archlinux.org/packages/core/any/archlinux-keyring/download -O ~/arch-keyring.tar.zst
sudo pacman-key --init
sudo pacman-key --populate
sudo pacman-key --refresh-keys
sudo pacman -U ~/arch-keyring.tar.zst
yay -S base-develwget "https://github.com/conda-forge/miniforge/releases/latest/download/Mambaforge-$(uname)-$(uname -m).sh"
bash Mambaforge-$(uname)-$(uname -m).sh
# follow the install steps; when finished, open a new bash console
conda install mamba -c conda-forge
mamba create -n ros_env_3_8 python=3.8
conda activate ros_env_3_8
conda config --env --add channels conda-forge
conda config --env --add channels robostack
conda config --env --add channels robostack-experimental
mamba install ros-noetic-desktop ros-noetic-image-transport-plugins
mamba install compilers cmake pkg-config make ninja catkin_tools
mamba install rosdep
rosdep init # note: do not use sudo!
rosdep update
pip install -U vcstool-
Pre-req:
-
Make sure SSH authenticated with Github, see instruction @ [0.2 SSH Keys and Github](#0.2 SSH Keys and Github)
-
Zsh: 0.4 ZSH & oh-my-zsh
-
-
Clone configurations:
$ cd ~ && git clone git@github.com:UW-Advanced-Robotics-Lab/uwarl-robot_configs.git
-
Install the repo and configure hardware with auto-script:
$ cd ~ && ./uwarl-robot_configs/scripts/auto-config_UWARL_catkin_ws.zsh
-
Config ros and catkin:
ros-noetic-global-planner-1.17.1-py38he9ab703_6 requires python 3.8.*
-
$ source_all $ cd_ws $ cd .. $ catkin config --extend /home/deck/mambaforge/envs/ros_env_3_8 -
# UWARL_catkin_ws missing:
$ mamba install ros-noetic-ddynamic-reconfigure
$ mamba install ros-noetic-robot-localization
$ mamba install ros-noetic-mavros
$ mamba install ros-noetic-joint-state-controller
$ mamba install ros-noetic-velocity-controllers
$ mamba install ros-noetic-gmapping
$ mamba install ros-noetic-map-server
mamba install -y ros-noetic-amcl
mamba install -y ros-noetic-twist-mux
mamba install -y ros-noetic-diff-drive-controller
-
-
Catkin Build:
# source robot config env & ros
$ source ~/.zshrc
# build:
$ build_ws # from anywhere, which will does the job for you :P (Jack is too lazy)
# source:
$ source_ws # lemme know if we should auto-source after build, :wink:
$ sudo pacman -S --needed git base-devel# you may be missing fakeroot:
$ sudo pacman -S fakeroot$ cd ~/JX_Linux
$ git clone https://AUR.archlinux.org/visual-studio-code-bin.git
$ cd visual-studio-code-bin/
$ makepkg -s
# install:
$ sudo pacman -U visual-studio-code-bin-*.pkg.tar.xz$ cd /usr
$ wget https://download.nomachine.com/download/8.3/Linux/nomachine_8.3.1_1_x86_64.tar.gz
$ sudo tar zxvf nomachine_8.3.1_1_x86_64.tar.gz
$ sudo /usr/NX/nxserver --install redhat-
🏷️ [ Lab ]:
-
🏷️ [ Logbook ]:
-
🏷️ [ Tips ]:
-
🏷️ [ Waterloo Steel ]: