Step By Step Tutorial
Partial documentation port from Radoslaw's original Step by Step.
Windows only code examples from this step by step guide can be found here.
The UbiGame project can be divided into:
- GameEngine: A basic SFML library wrapper and some utility tools to start out quickly. You are more than welcome to modify that part as needed, it only supports basic functionality.
- Game: Where the game logic happens. The game's entry point is in GameBoard class.
The best place to start to look for game logic would be the GameBoard:
The UbiGame is based on an Entity system. This means that everything that is shown, manipulated or moved will be called an Entity.
An Entity does not really do much:
- It has a position/size/rotation -> therefore it exists in Game World.
- It is Updated every frame, so every time a game logic frame ends, the entity will have it’s Update() function called.
- Entity also has Components.
So let’s start off by creating our Player entity. In GameBoard.cpp we add a new function and a new member m_player:
class GameBoard
{
    public:
	GameBoard();
	virtual ~GameBoard();

	void Update();
	bool IsGameOver() { return false; }

    private:
	void CreatePlayer();          // <-- Added Function
	GameEngine::Entity* m_player; // <-- Added Member
};
GameBoard::GameBoard()
{
    CreatePlayer(); // <-- Create Entity on Constructor
}

void GameBoard::CreatePlayer()
{
    m_player = new GameEngine::Entity();                            // <-- Create new entity
    GameEngine::GameEngineMain::GetInstance()->AddEntity(m_player); // <-- Add the entity to the engine
}
Inside that function the actual player entity is created and added to the main engine system. Without it the entity will not be updated and it will not be rendered. The engine needs to know that we created it, in order to work with it, this step ensures that.
At this point, if we run the app nothing will happen. We first need to tell our engine to draw the player. To do that, we’re going to use a component.
Components are what we equip the entity with, in order to give it functionality. A set of components ultimately controls what an entity can do.
In order to get our entity to be drawn on the screen we will use the RenderComponent and attach it to our player entity. Some basic components are ready to be used in the GameEngine/EntitySystem/Components folder.
void GameBoard::CreatePlayer()
{
	m_player = new GameEngine::Entity();
	GameEngine::GameEngineMain::GetInstance()->AddEntity(m_player);

	m_player->SetPos(sf::Vector2f(10.0f, 10.0f));            // <-- Give the position 10,10 to the entity
	m_player->SetSize(sf::Vector2f(10.0f, 10.0f));           // <-- Give the size 10,10 to the entity

	m_player->AddComponent<GameEngine::RenderComponent>();   // <-- Add a RenderComponent to the entity
}
The render function is called every frame, in which it grabs the entity position and size, and draws a rectangle with m_fillColor (which can be set by void SetFillColor(sf::Color fill) { m_fillColor = fill; }). The render target provided as the function parameter is pointing to window, which in reality means - draw on the active window.
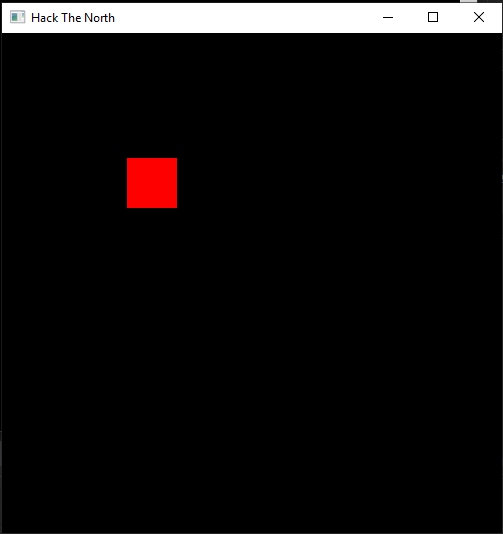
void GameBoard::CreatePlayer()
{
	m_player = new GameEngine::Entity();
	GameEngine::GameEngineMain::GetInstance()->AddEntity(m_player);

	m_player->SetPos(sf::Vector2f(50.0f, 50.0f));  // <-- Move its initial position
	m_player->SetSize(sf::Vector2f(50.0f, 50.0f)); // <-- Make the square bigger

	GameEngine::RenderComponent* render = m_player->AddComponent<GameEngine::RenderComponent>(); // <-- Capturing the new component

	render->SetFillColor(sf::Color::Red); // <-- Change the fill color to Red
}
This is the first game component we’ll create in this example. Let’s call it PlayerMovementComponent. For this we will create 2 new files called PlayerMovementComponent.h and PlayerMovementComponent.cpp.
#pragma once

#include "GameEngine/EntitySystem/Component.h"

namespace Game
{
    class PlayerMovementComponent : public GameEngine::Component
    {
    public:
        virtual void Update() override;
        virtual void OnAddToWorld() override;
    };
}
#include "PlayerMovementComponent.h"

using namespace Game;

void PlayerMovementComponent::Update() {}

void PlayerMovementComponent::OnAddToWorld() {}
Once created, we can make our entity react to keyboard inputs in the component update function, and modify the game logic accordingly. Let’s expand our new component Update() function:
#include <SFML/Window/Keyboard.hpp>   //<-- Add the keyboard include in order to get keyboard inputs

#include "GameEngine/GameEngineMain.h" //<-- Add this include to retrieve the delta time between frames

using namespace Game;

void PlayerMovementComponent::Update()
{
    Component::Update();

    //Grabs how much time has passed since last frame
    const float dt = GameEngine::GameEngineMain::GetTimeDelta();

    //By default the displacement is 0,0
    sf::Vector2f displacement{ 0.0f,0.0f };

    //The amount of speed that we will apply when input is received
    const float inputAmount = 100.0f;

    if (sf::Keyboard::isKeyPressed(sf::Keyboard::Left))
    {
        displacement.x -= inputAmount * dt;
    }

    if (sf::Keyboard::isKeyPressed(sf::Keyboard::Right))
    {
        displacement.x += inputAmount * dt;
    }

    //Update the entity position
    GetEntity()->SetPos(GetEntity()->GetPos() + displacement);
}
sf::Keyboard::isKeyPressed will return true only if we actually press that key on the keyboard. Since this function is called every frame of the game, it translates to: If user presses the key, grab the velocity, multiply it by dT, and apply it to our entity.
Next step is to simply add the component to our Player Entity
#include "Game/Components/PlayerMovementComponent.h"

// ...

void GameBoard::CreatePlayer()
{
	m_player = new GameEngine::Entity();
	GameEngine::GameEngineMain::GetInstance()->AddEntity(m_player);

	m_player->SetPos(sf::Vector2f(50.0f, 50.0f));
	m_player->SetSize(sf::Vector2f(50.0f, 50.0f));

	//Render
	GameEngine::RenderComponent* render = m_player->AddComponent<GameEngine::RenderComponent>();

	render->SetFillColor(sf::Color::Red);

	//Movement
	m_player->AddComponent<Game::PlayerMovementComponent>();  // <-- Added the movement component to the player
}
If we want to have something more artistic than a plain color square, UbiGame supports sprite rendering. The SpriteRenderComponent has the basics to start using sprites in our game.
Note that this component extends the RenderComponent. The main new functionality is the method void SetTexture(eTexture::type texture). This method needs a eTexture::type. This type is defined in TextureManager.h.
First we will place an image in the Resources Folder. For this example we are placing a Player.png.

Next, we will update the following code in TextureManager.h in order to let the Texture Manager know where to find it.
namespace eTexture
{
	enum type
	{
		None = -1,
		Player,     //<-- Add a new entry for our new texture
		Count,
	};
}

inline const char* GetPath(eTexture::type texture)
{
	switch (texture)
	{
	case eTexture::Player: return "Player.png"; //<-- The name of the image on disk
	}
	return "UnknownTexType";
}
Once this is done, we swap the RenderComponent we had on the player, to the use the SpriteRenderComponent, and attach our new texture there:
#include "GameEngine/EntitySystem/Components/SpriteRenderComponent.h" //<-- Remember to include the new component we will use
//...
void GameBoard::CreatePlayer()
{
m_player = new GameEngine::Entity();
GameEngine::GameEngineMain::GetInstance()->AddEntity(m_player);
m_player->SetPos(sf::Vector2f(50.0f, 50.0f));
m_player->SetSize(sf::Vector2f(50.0f, 50.0f));
//Render
GameEngine::SpriteRenderComponent* render = m_player->AddComponent<GameEngine::SpriteRenderComponent>(); //<-- Use the SpriteRenderComponent
render->SetFillColor(sf::Color::Red);
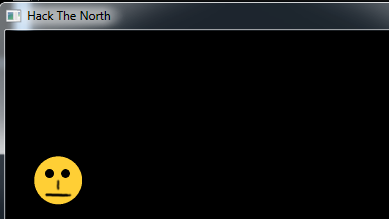
render->SetTexture(GameEngine::eTexture::Player); // <-- Assign the texture to this entity
//Movement
m_player->AddComponent<Game::PlayerMovementComponent>();
}
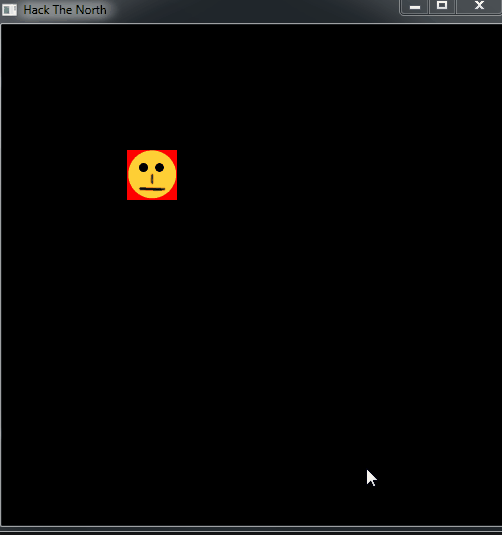
The red square in the background is happening because the SpriteRenderComponent is still calling it’s basic RenderComponent::Render() function which drew our square in the last example. We can just set the fill color to transparent (render->SetFillColor(sf::Color::Transparent);) in order to make the rectangle disappear.
It is a good practice to try to avoid having lots of separate texture files for each entity shown on the screen, since loading and parsing it comes with an overhead. Tiled textures are usually implemented to reduce this effect, where we can have multiple images on a single texture, and only draw the section wanted within the image. This is also the used to achieve animated textures.
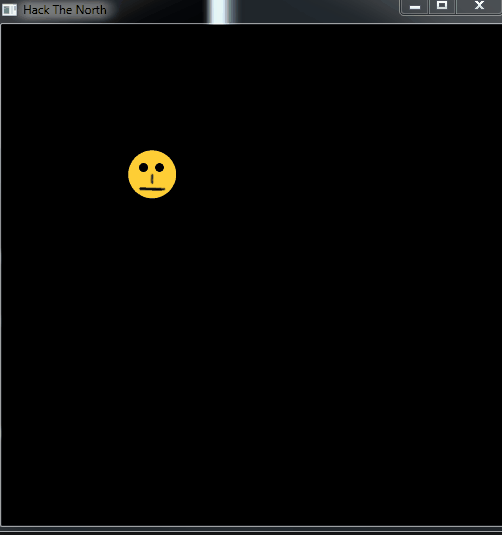
Let’s update our player.png texture, to contain 3 tiles:
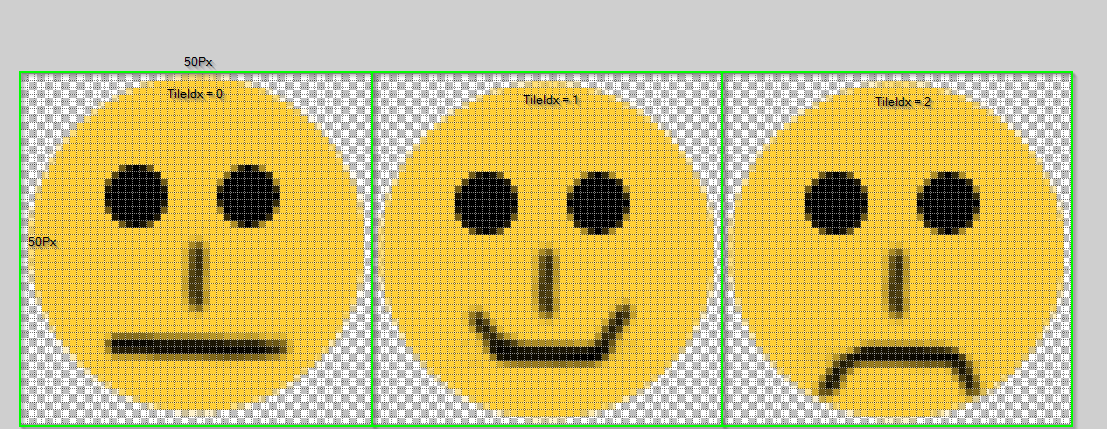
By default the SpriteRenderComponent tries to fit the texture inside the specified entity size, for our example this leads to a squished image.
In order to go back to what we had before, we need to provide additional texture information. First we will add to the TextureManager.cpp the tile size for our texture.
namespace TextureHelper
{
	sf::Vector2f GetTextureTileSize(GameEngine::eTexture::type texture)
	{
		switch (texture)
		{
		case eTexture::Player: return sf::Vector2f(50.0f, 50.0f);
                //Add here the tile sizes
		}

		return sf::Vector2f(-1.f, -1.f);
	}
}
Now we can define which tile we want to use in the SpriteRenderComponent using the method void SpriteRenderComponent::SetTileIndex(sf::Vector2i vect). The input of this function is the index of our tile in a 2d grid.
We will update our PlayerMovementComponent so we can change the used tile with the press of a button.
void PlayerMovementComponent::Update()
{
    //... previous movement code ...

    int maxFaces = 3;
    if (sf::Keyboard::isKeyPressed(sf::Keyboard::F))
    {
         ++m_currentFaceIndex;  // <-- We need to add a new int m_currentFaceIndex attribute member to the class
         if (m_currentFaceIndex>= maxFaces) m_currentFaceIndex= 0;
         GameEngine::SpriteRenderComponent* render = GetEntity()->GetComponent<GameEngine::SpriteRenderComponent>();
         if (render)
         {
             render->SetTileIndex(sf::Vector2i(m_currentFaceIndex,0));
         }
    }
}
This code snippet will do what we intended but if we hold the F key we will be changing the tile every frame.

In order to have a better behavior, we can update the code to perform the tile increment only on key release.
void PlayerMovementComponent::Update()
{
    //... previous movement code ...

    int maxFaces = 3;
    if (sf::Keyboard::isKeyPressed(sf::Keyboard::F))
    {
        m_fWasPressed = true; // <-- Add a new bool m_fwasPressed and initialize it to false;
    }
    else if (m_fWasPressed) // <-- Check if it was pressed ( we already know here that is not currently pressed )
    {
         m_fWasPressed = false; // <-- Reset our WasPressed flag

         ++m_currentFaceIndex;
         if (m_currentFaceIndex>= maxFaces) m_currentFaceIndex= 0;
         GameEngine::SpriteRenderComponent* render = GetEntity()->GetComponent<GameEngine::SpriteRenderComponent>();
         if (render)
         {
             render->SetTileIndex(sf::Vector2i(m_currentFaceIndex,0));
         }
    }
}
For more material on this refer to Radoslaw's original Step by Step.