THIS IS VERY OUTDATED AND PROLLY DOESNT WORK ANYMORE ALSO HEROKU REMOVED FREE TIER SO RIP
Easily Send HTTP Requests to Roblox API/Discord Webhooks
You will need a Heroku and GitHub account.
Create a Heroku account here (https://signup.heroku.com) Login here (https://id.heroku.com/login) if you already have a Heroku account
Create a Github account here (https://github.com/signup?user_email=&source=form-home-signup) Login here (https://github.com/login) if you already have a GitHub account
-
After you are logged into your Heroku account, click here to go to the dashboard (https://dashboard.heroku.com/apps)
-
On the top right, click
Newand clickCreate new app

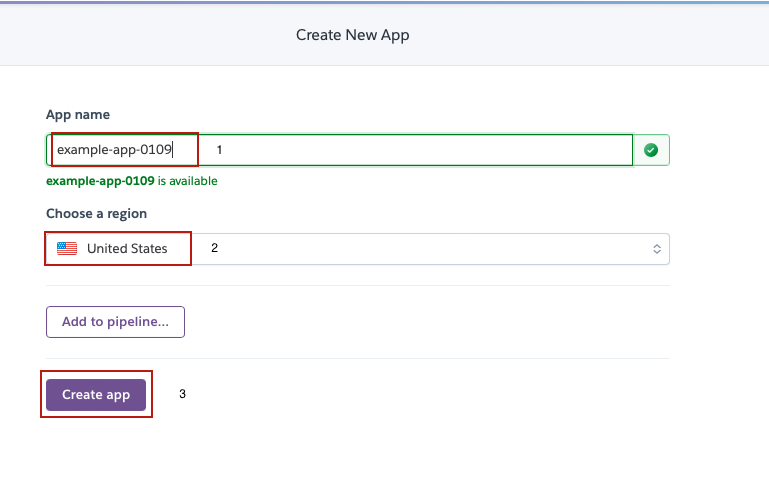
- Choose your app name, region and then click
Create app
- Click on GitHub and click
Connect to GitHub


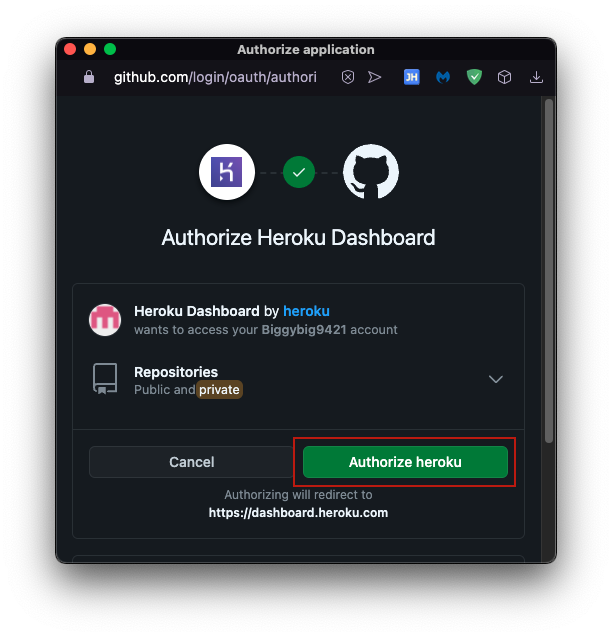
- Click
Authorize Heroku(You have to login into Github first)
- When you've connected your GitHub account to Heroku, you will see this page.


- After you fork this repository, go back to Heroku and search
HttpProxyServicethen clickConnect

- Now click
Deployand wait until Heroku finish deploying your app

- After your app is deployed, click on
View.

- Copy your app URL, you will need this later.

-
Click here to go to your Heroku account dashboard (https://dashboard.heroku.com/apps)
-
Click on your app

- Click
Settings

- Click
Reveal Config Vars

- Type your user in the
Keybox and paste your Roblox account cookie inside theValuebox (You will need this for authentication)
Notes: Your user name cannot be PORT because it will break the code


- You can add multiple users.

Notes: You need to put your full cookie including the _|WARNING
-
Now follow the same steps but type in
passwordin theKeybox and type in your password in theValuebox (This password will be used to lock your app) -
You can also use this website (https://1password.com/password-generator/) to generate secure passwords.

Notes: Your password must contain only underscores, letters (a-z), and numbers to prevent problems.
- Head over to
Deploy

- Scroll down and click
Deploy Branch

- Now, wait until Heroku finishes deploying your app.
Notes: Your Roblox cookie resets every time you log in/out of your account. If you want to use your alt account cookie then open incognito mode and login into your alt account, get your cookie, and close the window so your cookie won't reset.
Every time you update/add/delete a config var, you will have to deploy your app again for the changes to take effect EVEN if you have Automatic Deployment enabled.
-
Create a new ModuleScript in ServerStorage and rename it to
HttpProxyService -
Replace the code inside your ModuleScript with this code (https://github.com/Unstable0/HttpProxyService/blob/main/HttpProxyService.lua)
-
Go to line 5 where it says
local Url = ""

- Paste your Heroku app URL that you copied earlier.


(Make sure there is no / at the end of your URL)
Parameters
| Name | Type | Default | Required |
|---|---|---|---|
| url | string | true | |
| params | dictionary | {} | false |
Returns
Example
local HttpProxyService = require(game:GetService("ServerStorage"):WaitForChild("HttpProxyService"))

local FormattedData = HttpProxyService:FormatParams("https://catalog.roblox.com/v1/search/items/details", {
	Category = 3,
	Keyword = "Pants"
})

print(FormattedData) --> https://catalog.roblox.com/v1/search/items/details?Category=3&Keyword=PantsParameters
| Name | Type | Default | Description | Required |
|---|---|---|---|---|
| password | string | Your app password | true |
Returns
HttpProxy
Examples
local HttpProxyService = require(game:GetService("ServerStorage"):WaitForChild("HttpProxyService"))
local HttpProxy = HttpProxyService:New(Password here) --Put your app password here

local Data = HttpProxy:GetAsync("https://www.roblox.com")

print(Data)Parameters
| Name | Type | Default | Description | Required |
|---|---|---|---|---|
| url | string | The web address you are requesting data from | true | |
| decode | bool | true | Whether the request decodes the response | false |
| headers | dictionary | {} | Used to specify some HTTP request headers | false |
Returns
Response Body
Examples
Search roblox catalog with the keyword Pants and print the results
local HttpProxyService = require(game:GetService("ServerStorage"):WaitForChild("HttpProxyService"))
local HttpProxy = HttpProxyService:New(Password here) --Put your app password here

local FormattedData = HttpProxyService:FormatParams("https://catalog.roblox.com/v1/search/items/details", {
	Category = 3,
	Keyword = "Pants"
})

local Data = HttpProxy:GetAsync(FormattedData)

for Index, Asset in pairs(Data.data) do
	print(Asset.name)
end
If you want to send a get request to Roblox APIs with user credentials, add a currentuser header with the user name you added to the config vars. Examples below.
Get the friend count for User1

local HttpProxyService = require(game:GetService("ServerStorage"):WaitForChild("HttpProxyService"))
local HttpProxy = HttpProxyService:New(Password here) --Put your app password here

local Data = HttpProxy:GetAsync("https://friends.roblox.com/v1/my/friends/count", true, {
	currentuser = "User1" --Replace with the user you added in the config var (Case sensitive)
}) --> { count: number_of_friends }

print(Data.count) --> 4 (Number of friends request on the first user)
Get the friend count for User2

local HttpProxyService = require(game:GetService("ServerStorage"):WaitForChild("HttpProxyService"))
local HttpProxy = HttpProxyService:New(Password here) --Put your app password here

local Data = HttpProxy:GetAsync("https://friends.roblox.com/v1/my/friends/count", true, {
	currentuser = "User2" --Replace with the user you added in the config var (Case sensitive)
}) --> { count: number_of_friends }

print(Data.count) --> 414 (Number of friends request on the second user)
See https://friends.roblox.com/docs#!/Friends/get_v1_my_friends_count
Parameters
| Name | Type | Default | Description | Required |
|---|---|---|---|---|
| url | string | The web address you are requesting data from | true | |
| decode | bool | true | Whether the request decodes the response | false |
| data | dictionary | {} | The data being sent | false |
| headers | dictionary | {} | Used to specify some HTTP request headers | false |
Returns
Result
Examples
Send a Hello! message using discord webhook.
local HttpProxyService = require(game:GetService("ServerStorage"):WaitForChild("HttpProxyService"))
local HttpProxy = HttpProxyService:New(Password here) --Put your app password here

HttpProxy:PostAsync("https://discord.com/api/webhooks/123456789012345678/83LgJzu7Qjmfyt1dunqEz651J1jh68kJijwkPaJuJnah7UjjekFgmRhti2_mLakIJneh", true, {
	content = "Hello!"
})
If you want to send a post request to Roblox APIs with user credentials, add a currentuser header with the user name that you added to the config vars. Examples below.
Favorite the gear Body Swap Potion (https://www.roblox.com/catalog/78730532/Body-Swap-Potion) using User1 credentials
local HttpProxyService = require(game:GetService("ServerStorage"):WaitForChild("HttpProxyService"))
local HttpProxy = HttpProxyService:New(Password here) --Put your app password here

HttpProxy:PostAsync("https://catalog.roblox.com/v1/favorites/users/USER_ID_HERE/assets/78730532/favorite", true, nil, {
	currentuser = "User1" --Replace with the user you added in the config var (Case sensitive)
})
Favorite the gear Body Swap Potion (https://www.roblox.com/catalog/78730532/Body-Swap-Potion) using User2 credentials
local HttpProxyService = require(game:GetService("ServerStorage"):WaitForChild("HttpProxyService"))
local HttpProxy = HttpProxyService:New(Password here) --Put your app password here

HttpProxy:PostAsync("https://catalog.roblox.com/v1/favorites/users/USER_ID_HERE/assets/78730532/favorite", true, nil, {
	currentuser = "User2" --Replace with the user you added in the config var (Case sensitive)
})
Replace USER_ID_HERE with your roblox account user id, see https://users.roblox.com//docs#!/Users/get_v1_users_authenticated
See https://catalog.roblox.com/docs#!/Favorites/post_v1_favorites_users_userId_assets_assetId_favorite
Parameters
| Name | Type | Default | Description | Required |
|---|---|---|---|---|
| url | string | The web address you are requesting data from | true | |
| decode | bool | true | Whether the request decodes the response | false |
| data | dictionary | {} | The data being sent | false |
| headers | dictionary | {} | Used to specify some HTTP request headers | false |
Returns
Result
Examples
If you want to send a patch request to Roblox APIs with user credentials, add a currentuser header with the user name that you added to the config vars. Examples below.
Thumbs up the game Crossroads (https://www.roblox.com/games/1818/Classic-Crossroads) using User1 credentials
local HttpProxyService = require(game:GetService("ServerStorage"):WaitForChild("HttpProxyService"))
local HttpProxy = HttpProxyService:New(Password here) --Put your app password here

local UniverseId = HttpProxy:GetAsync("https://games.roblox.com/v1/games/multiget-place-details?placeIds=1818", true, {
	currentuser = "User1" --Replace with the user you added in the config var (Case sensitive)
})[1].universeId --Get the game universe ID

HttpProxy:PatchAsync("https://games.roblox.com/v1/games/" .. tostring(UniverseId) .. "/user-votes", true, {
	vote = true
}, {
	currentuser = "User1" --Replace with the user you added in the config var (Case sensitive)
}) --Thumbs up the game
Thumbs up the game Crossroads (https://www.roblox.com/games/1818/Classic-Crossroads) using User2 credentials
local HttpProxyService = require(game:GetService("ServerStorage"):WaitForChild("HttpProxyService"))
local HttpProxy = HttpProxyService:New(Password here) --Put your app password here

local UniverseId = HttpProxy:GetAsync("https://games.roblox.com/v1/games/multiget-place-details?placeIds=1818", true, {
	currentuser = "User2" --Replace with the user you added in the config var (Case sensitive)
})[1].universeId --Get the game universe ID

HttpProxy:PatchAsync("https://games.roblox.com/v1/games/" .. tostring(UniverseId) .. "/user-votes", true, {
	vote = true
}, {
	currentuser = "User2" --Replace with the user you added in the config var (Case sensitive)
}) --Thumbs up the game
For thumbs down, change vote to false.
See https://games.roblox.com//docs#!/Votes/patch_v1_games_universeId_user_votes
Parameters
| Name | Type | Default | Description | Required |
|---|---|---|---|---|
| url | string | The web address you are requesting data from | true | |
| decode | bool | true | Whether the request decodes the response | false |
| headers | dictionary | {} | Used to specify some HTTP request headers | false |
Returns
Response Body
Examples
If you want to send a delete request to Roblox APIs with user credentials, add a currentuser header with the user name that you added to the config vars. Examples below.
Unfavorite the gear Body Swap Potion (https://www.roblox.com/catalog/78730532/Body-Swap-Potion) using User1 credentials
local HttpProxyService = require(game:GetService("ServerStorage"):WaitForChild("HttpProxyService"))
local HttpProxy = HttpProxyService:New(Password here) --Put your app password here

HttpProxy:DeleteAsync("https://catalog.roblox.com/v1/favorites/users/USER_ID_HERE/assets/78730532/favorite", true, {
	currentuser = "User1"
})
Unfavorite the gear Body Swap Potion (https://www.roblox.com/catalog/78730532/Body-Swap-Potion) using User2 credentials
local HttpProxyService = require(game:GetService("ServerStorage"):WaitForChild("HttpProxyService"))
local HttpProxy = HttpProxyService:New(Password here) --Put your app password here

HttpProxy:DeleteAsync("https://catalog.roblox.com/v1/favorites/users/USER_ID_HERE/assets/78730532/favorite", true, {
	currentuser = "User2"
})
Replace USER_ID_HERE with your roblox account user id, see https://users.roblox.com//docs#!/Users/get_v1_users_authenticated
See https://catalog.roblox.com/docs#!/Favorites/delete_v1_favorites_users_userId_assets_assetId_favorite
If you installed using recommended method
Open GitHub (https://github.com)

Click on your repository

If it says This branch is x commits behind Unstable0:main, it means there is an update.

Tp update, click on Fetch Upstream and click Fetch and merge


After you fetched the latest version, click here (https://dashboard.heroku.com/apps) to go to your Heroku account dashboard
Click on your app
Click Deploy

Scroll down and click Deploy Branch to update.

Notes: You can enable automatic deployment so next time when you fetch the latest version on your repository, Heroku will re-deploy your app automatically (Meaning you do not need to re-deploy on your app dashboard)
