md2thmlpdf can convert markdown files to HTML and PDF with predefined styles.
The purpose is to replace Latex to produce standard documents like lessons, articles, etc. Latex is a good tool but styling with CSS is easier and more flexible than old Latex syntax.
With md2htmlpdf, you edit your style in CSS file, edit contents with markdown and you can generate beautiful documents in HTML and PDF.
HTML and PDF files look pretty the same, so you can put the HTML file on the web or print the PDF file for your students.
md2htmlpdf uses 2 external tools :
- pandoc
- wkhtmltopdf
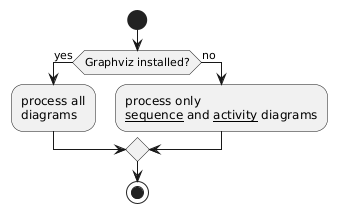
⚠️ if you want footers in PDF you need the QT-patched version in Arch Linux !
You can install theese tools with your favorite distribution.
If you want to use equations, you need internet access to reach the transform application codecogs
md2htmlpdf requires 1 or 3 arguments.
-
Usage with 1 argument : md2htmlpdf markdownFile.md
Example : md2htmlpdf examples/proportionnalite.md
-
Usage with 3 arguments : md2htmlpdf templateFile.template cssFile.css markdownFile.md
- Template file to apply
- Css file to apply
- Markdown file to convert
Example : md2htmlpdf templates/lesson.template css/lesson.css examples/proportionnalite.md
All pandoc extensions for markdown are usable (equation, emoji, tables, ...)
At the beginning of markdown file put a Yaml Metadata Block to describe your document like this :
---
title : The Wonderful title
author : My Name
date : 20/04/2018
what : you want
---
After a blank line you can write your document using markdown syntax. Look example files in examples directory.
auto_title.template that works like in previous version.
Or you can write title like in old template with (no number and title class) :
# Your nice title {- .title}
You can edit your text using the standard Markdown syntax. But Pandoc includes a lot of extensions that are very useful like GFM - GitHub Flavored Markdown. So you can easily write : code blocks, task lists, tables, emojis 😃, strikethrough...
The example file proportionnalite.md shows you how to use them.
Insert blank lines in Markdown is not always easy. You can insert a blank line between Line 1 and Line 2 like this :
Line 1

\

Line 2
Use the standard Latex syntax :
- Image float to left and text fill the right :
{.floatleft} - Image float to right and text fill the left :
{.floatright} - Image is a block in the center :
{.center}
If you want a caption for this image you need to wrap the content in a span like this :
- Image float to left with caption under and text fill the right :
[ <= insert 2 blank spaces at the end of line to break the flow!!!
The caption !]{.floatleft}
- Image float to right with caption under and text fill the left :
[ <= insert 2 blank spaces at the end of line to break the flow!!!
The caption !]{.floatright}
- Image is a block in the center with caption under :

Add nice borders to your images with the class imgbox like this :
{.imgbox}
You can use Plantuml online server to integrate without dependency Plantuml diagrams :
-
Paste your code into plantuml server
-
Put generated URL in your markdown file like an image :
Insert your columns in a block :
::: cols

:::
::: cols

::: col12
First column
:::

::: col22
Second column
:::

:::
::: cols

::: col13
First column
:::

::: col23
Second column
:::

::: col33
Third column
:::

:::
::: warning
You can add a warning block by using this syntax.
:::
One Pandoc Markdown extension is very powerful. You can assign a class name to a piece of text and decorate it as you want in the CSS file.
If you write in your Markdown file : bla bla bla [your important text here]{.inlinewarning} bla bla bla.
your important text here becomes a span with the class name inlinewarning, so you can style this piece of text in the CSS file.
In CSS file :
.inlinewarning {
background-color: yellow;
text-decoration: underline;
}You can use the previous tip to force page breaks. At the end of the default CSS file you can find the @media print section.
In this section you can set values for widows and orphans and choose if you want to avoid a page break after the titles.
But you can also use the classes .pagebreakbefore and .pagebreakafter in your Markdown file to force a page break everywhere you want. Just add {.pagebreakbefore} after a title, like this :
# Wonderful title{.pagebreakbefore}
You can also assign these 2 classes to any piece of text using the previous tip.
You can find fonts used in the examples in the Fonts directory.
- Graphviz without dependency
- Code2flow without dependency