This is a course requirement for CS191/192 Software Engineering Courses of the Department of Computer Science, College of Engineering, University of the Philippines, Diliman under the guidance of Ma. Rowena C. Solamo for AY 2020-2021.
-
Aloveros, Aira Mae
-
Galino, John Henry
-
Israel, Kurt Ian Khalid
-
Yu, Jeremy Vincent
For end users who are not interested in installing Godot to build our project from source, we have included a pre-built APK for you at the project root. However, because Vecteezy does not allow us to provide its images to end-users without taking measures to prevent you from copying them, and we did not want to implement such measures, we have replaced all such images with non-copyrightable black shapes in the pre-built APK. However, if you want to see our full project, including the Vecteezy images that we are not free to distribute, you must download the images yourself, put them into the locations specified in the Release Notes, and export the project to APK form (or any other format you want). For compliance with the licenses of the assets we used and the main Godot binary, we have included COPYRIGHT.txt, which contains all required legal notices, in the main project directory. If you choose to redistribute our project, whether as a pre-built binary or as a copy of the source tree, you must also distribute COPYRIGHT.txt in order to comply with all applicable licenses.
Make sure that you have Git installed in your device. You can check if you have Git installed by opening your terminal (Powershell/Command Prompt for Windows) and typing git --version. This command should output the current version of Git installed in your system. If this results to an error, then you may need to install Git.
- Go to Git's official website and download the latest release for Windows.
- Run the installer. In the Choosing the default editor used by Git, choose whichever text editor you are most comfortable with. Otherwise, leave the defaults alone.
- Once the installer has finished, check if the installation is successful by running
git --versionin PowerShell or Command Prompt.
-
If you have
wingetinstalled, you may also use it to install Git.wingetis already included in your system if you are running Windows 11 or a recent version of Windows 10. If not, you may installwingetby following the instructions in this link. -
Once you have installed
winget, type the following command on PowerShell or Command Prompt.winget install --id Git.Git -e --source winget -
Once the installation is finished, check the install by running
git --version.
- Go to Git's official website and download the latest release for Mac.
- Run the installer. In the Choosing the default editor used by Git, choose whichever text editor you are most comfortable with. Otherwise, leave the defaults alone.
- Once the installer has finished, check if the installation is successful by running
git --versionin your terminal.
-
You may also install Git by installing Xcode in your system. To install Xcode, run the following command in your terminal.
xcode-select --install -
Once installed, check for the presence of Git by running
git --versionfrom your terminal.
Git is usually included in most Linux distributions. In the case that it is not installed, you may install it through your package manager.
sudo apt install git
sudo dnf install git # (Fedora 22 and later)
sudo yum install git # (up to Fedora 21)
sudo emerge --ask --verbose dev-vcs/git
sudo pacman -S git
sudo zypper install git
Once you have Git working on your device, you must now get a local clone of the repository. To do this, open your terminal (or Powershell/Command Prompt) and navigate to the folder where you want to place the project using cd.
If you are not comfortable working in the terminal, in Windows, you may also do the above by opening the folder where you want to place the project through File Explorer and doing Shift + Right-click on an empty space. This will open a context menu, where you can click "Open PowerShell Window Here" to open the directory inside PowerShell.
For Mac, you may also do this by drag-and-dropping the folder where you want to put the project to the Terminal icon in the Dock, or typing cd in the Terminal, dragging the folder to the Terminal window, then pressing Enter.

For Linux, some distros might have "Open in Terminal" in their right-click context menu, similar to Windows, while others might not. If your distro doesn't have the context menu, then you can try dragging the folder to your terminal after typing cd and pressing Enter.
Once you have your folder opened in the terminal, you can then clone the project by entering the command below.
git clone https://github.com/Vax-CS192/Vax.git
This will create a copy of the repository in the folder you chose. Open the Godot Editor, then import the project folder to open it in Godot.
There are only two main folders in the project: Assets and Scenes.
This folder will contain all the visual and audio elements that the game will have. Please make sure to place all assets that you need for a screen in a separate folder inside Assets.
This folder should contain all the scenes and scripts that are needed for the game. It is already subdivided by subsystem, with the intention that all scenes and scripts related to a subsystem will be placed in the folder for that subsystem. However, you are free to change the directory structure as long as it doesn't affect the other subsystems.
The recommended workflow for this project folder is Github Flow.
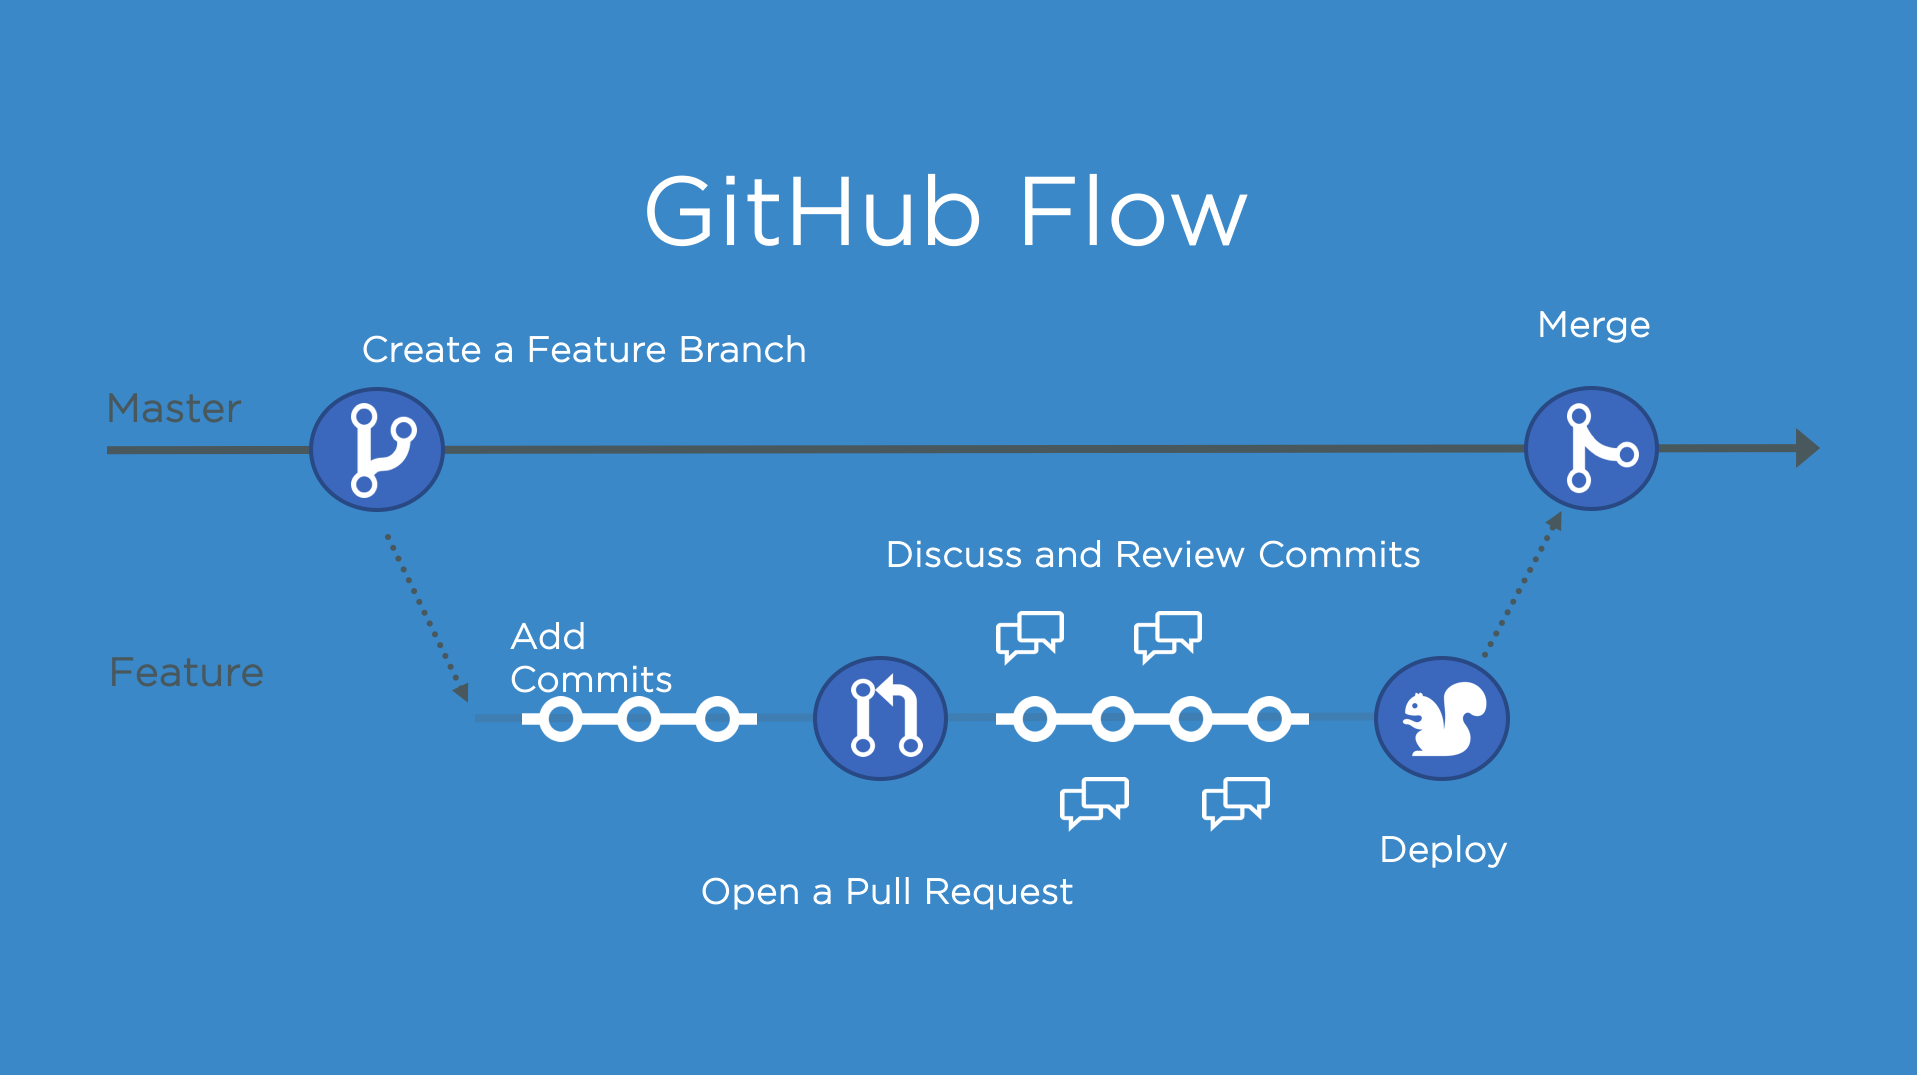
TL;DR version
-
When you want to work on a screen, you must first create a feature branch. A feature branch is like an environment where you can safely make your changes to the project without overwriting the work of others. You can create a feature branch by opening the project folder in a terminal (you may use the steps in Initial Clone) and entering the command below.
git checkout -b <insert-branch-name> # Example: git checkout -b LabThe command above will create a new branch with your chosen name and place you on that branch. You can check which branch you are currently on by entering
git branchand you can transfer between existing branches by usinggit checkout <name-of-branch-you-want-to-go-to>.Note:
git checkout -bcreates a new branch based on the branch you are currently on. Most of the time, for this project, you will need to be in the main branch first before creating a new branch so that the new branch contains the latest updates to main. So if you want to create a new branch, you may use the following commands.git checkout main # Go to main branch git pull # Update main branch to the latest changes git checkout -b <insert-name> # Create new branch based on main -
Work on the screen in Godot. When testing your screen, please prefer to use the "Play Scene" button (F6) instead of the "Play" button. The "Play" button is usually used when testing the entire game, not a specific scene only.
-
When you've finished your changes, you must commit your changes to your branch. This can be done by entering the following commands in the terminal.
git add .
git commit -m <Summary of what you changed>
Now, we can upload the changes you made to Github. However, before we can upload your changes, we must make sure that your changes aren't in conflict with the changes that other contributors have made. Thus, run the following command.
git pull --rebaseThis will synchronize your changes with the repository in Github and output any conflicts that you will have to fix. Once the command doesn't output an error
anymore, you may now upload your changes using this command.git pushThis command will upload your changes to your branch in Github.
-
When you've finished working on your screen, or you want to make your changes available to the other contributors, you can do a pull request to the main branch in order to update the main branch in Github. This link summarizes the steps needed to create a pull request. If your pull request shows that there are no conflicts, then feel free to merge the pull request. You can also ask others for their comments if you want to.

When performing git push, Github will ask for your username and password, but it will not accept the password to your account when you enter it. This is because Github has stopped accepting account passwords last year and now implements personal access tokens. To create a token, you can follow the instructions here. When Github asks for a password again, use the personal access token instead to successfully perform the git push.