Case Study from: © 2012 Pearson Education, Inc., Upper Saddle River, NJ. All Rights Reserved.
We begin our design process by presenting a requirements document that specifies the ATM system’s overall purpose and what it must do. Throughout the case study, we refer to the requirements document to determine what functionality the system must include.
Requirements Document: A local bank intends to install a new automated teller machine (ATM) to allow users (i.e., bank customers) to perform basic financial transactions (Fig. 25.1). Each user can have only one account at the bank. ATM users should be able to view their account balance, withdraw cash (i.e., take money out of an account) and deposit funds (i.e., place money into an account).
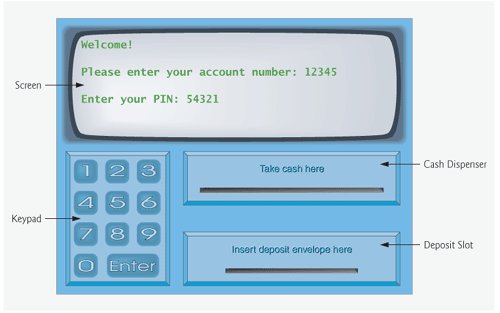
Fig. 25.1 | Automated teller machine user interface.
The user interface of the automated teller machine contains the following hardware components:
- a screen that displays messages to the user
- a keypad that receives numeric input from the user
- a cash dispenser that dispenses cash to the user and
- a deposit slot that receives deposit envelopes from the user.
The cash dispenser begins each day loaded with 500 $20 bills. [Note: Owing to the limited scope of this case study, certain elements of the ATM described here do not accurately mimic those of a real ATM. For example, a real ATM typically contains a device that reads a user’s account number from an ATM card, whereas this ATM asks the user to type an account number using the keypad. A real ATM also usually prints a receipt at the end of a session, but all output from this ATM appears on the screen.]
The bank wants you to develop software to perform the financial transactions initiated by bank customers through the ATM. The bank will integrate the software with the ATM’s hardware at a later time. The software should encapsulate the functionality of the hardware devices (e.g., cash dispenser, deposit slot) within software components, but it need not concern itself with how these devices perform their duties. The ATM hardware has not been developed yet, so instead of writing your software to run on the ATM, you should develop a first version of the software to run on a personal computer. This version should use the computer’s monitor to simulate the ATM’s screen, and the computer’s key- board to simulate the ATM’s keypad.
An ATM session consists of authenticating a user (i.e., proving the user’s identity) based on an account number and personal identification number (PIN), followed by creating and executing financial transactions. To authenticate a user and perform transactions, the ATM must interact with the bank’s account information database. [Note: A database is an organized collection of data stored on a computer.] For each bank account, the database stores an account number, a PIN and a balance indicating the amount of money in the account. [Note: For simplicity, we assume that the bank plans to build only one ATM, so we do not need to worry about multiple ATMs accessing this database at the same time. Furthermore, we assume that the bank does not make any changes to the information in the database while a user is accessing the ATM. Also, any business system like an ATM faces reasonably complicated security issues that go well beyond the scope ofa first- or second- semester computer science course. We make the simplifying assumption, however, that the bank trusts the ATM to access and manipulate the information in the database without significant security measures.]
Upon first approaching the ATM, the user should experience the following sequence of events (shown in Fig. 25.1):
-
The screen displaysa welcome message and prompts the user to enter an account number.
-
The user enters a five-digit account number, using the keypad.
-
The screen prompts the user to enter the PIN (personal identification number) associated with the specified account number.
-
The user enters a five-digit PIN, using the keypad.
-
If the user enters a valid account number and the correct PIN for that account, the screen displays the main menu (Fig. 25.2). If the user enters an invalid account number or an incorrect PIN, the screen displays an appropriate message, then the ATM returns to Step 1 to restart the authentication process.
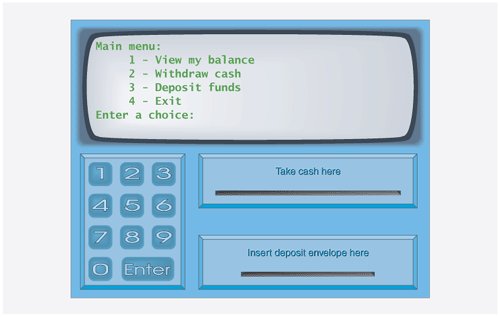
Fig. 25.2 | ATM main menu.
After the ATM authenticates the user, the main menu (Fig. 25.2) displays a numbered option for each of the three types of transactions: balance inquiry (option 1), withdrawal (option 2) and deposit (option 3). The main menu also displays an option that allows the user to exit the system (option 4). The user then chooses either to perform a transaction (by entering 1, 2 or 3) or to exit the system (by entering 4). If the user enters an invalid option, the screen displays an error message, then redisplays to the main menu.
If the user enters 1 to make a balance inquiry, the screen displays the user’s account balance. To do so, the ATM must retrieve the balance from the bank’s database.
The following actions occur when the user enters 2 to make a withdrawal:
-
The screen displays a menu (shown in Fig. 25.3) containing standard withdrawal amounts: $20 (option 1), $40 (option 2), $60 (option 3), $100 (option 4) and $200 (option 5). The menu also contains an option to allow the user to cancel the transaction (option 6).
-
The user enters a menu selection (1–6) using the keypad.
-
If the withdrawal amount chosen is greater than the user’s account balance, the screen displays a message stating this and telling the user to choose a smaller amount. The ATM then returns to Step 1. If the withdrawal amount chosen is less than or equal to the user’s account balance (i.e., an acceptable withdrawal amount), the ATM proceeds to Step 4. If the user chooses to cancel the transaction (option 6), the ATM displays the main menu (Fig. 25.2) and waits for user input.
-
If the cash dispenser contains enough cash to satisfy the request, the ATM proceeds to Step 5. Otherwise, the screen displays a message indicating the problem and telling the user to choose a smaller withdrawal amount. The ATM then re- turns to Step 1.
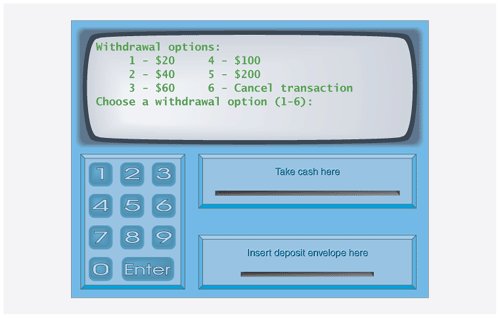
Fig. 25.3 | ATM withdrawal menu.
-
The ATM debits (i.e., subtracts) the withdrawal amount from the user’s account balance in the bank’s database.
-
The cash dispenser dispenses the desired amount of money to the user.
-
The screen displays a message reminding the user to take the money.
The following actions occur when the user enters 3 (while the main menu is displayed) to make a deposit:
-
The screen prompts the user to entera deposit amount or to type 0 (zero) to cancel the transaction.
-
The user enters a deposit amount or 0, using the keypad. [Note: The keypad does not contain a decimal point or a dollar sign, so the user cannot type a real dollar amount (e.g., $1.25). Instead, the user must entera deposit amount asa number of cents (e.g., 125). The ATM then divides this number by 100 to obtaina number representing a dollar amount (e.g., 125 / 100 = 1.25).]
-
If the user specifies a deposit amount, the ATM proceeds to Step 4. If the user chooses to cancel the transaction (by entering 0), the ATM displays the main menu (Fig. 25.2) and waits for user input.
-
The screen displays a message telling the user to insert a deposit envelope into the deposit slot.
-
If the deposit slot receives a deposit envelope within two minutes, the ATM cred- its (i.e., adds) the deposit amount to the user’s account balance in the bank’s database. This money is not immediately available for withdrawal. The bank first must physically verify the amount of cash in the deposit envelope, and any checks in the envelope must clear (i.e., money must be transferred from the check writer’s account to the check recipient’s account). When either of these events occurs, the bank appropriately updates the user’s balance stored in its database. This occurs independently of the ATM system. If the deposit slot does not receive a deposit envelope within this time period, the screen displays a message that the system has canceled the trans- action due to inactivity. The ATM then displays the main menu and waits for user input.
After the system successfully executes a transaction, the system should redisplay the main menu (Fig. 25.2) so that the user can perform additional transactions. If the user chooses to exit the system (option 4), the screen should display a thank you message, then display the welcome message for the next user.