Default theme for VirtoCommerce Storefront used by Electronics sample store. It includes the largest number of features and support latest updates of Storefront so it always stay actual.

Main article: theme development on virtocommerce.com/docs

- Install prerequisites.
- Clone repo.
- In Visual Studio, go to Team Explorer → Clone → Enter https://github.com/VirtoCommerce/vc-theme-default.git as URL and C:\vc-theme-default (for example) as path.
- Or execute command
(where C:\vc-theme-default is path to folder where you want to clone repo).
git clone https://github.com/VirtoCommerce/vc-theme-default.git "C:\vc-theme-default"
- Link you theme repo to store. Execute:
(where C:\vc-platform\VirtoCommerce.Platform.Web\App_Data\cms-content is path to CMS content storage configured at platform & storefront deployment steps, 'Electronics' is your store name and 'C:\vc-theme-default' is path to your theme repo).
mklink /d "C:\vc-platform\VirtoCommerce.Platform.Web\App_Data\cms-content\Themes\Electronics\default" "C:\vc-theme-default" - Open theme folder in your IDE:
- In Visual Studio (including 2017) go to File → Open → Website
- In Visual Studio Code, go to File → Open → Folder
- Select C:\vc-theme-default (where C:\vc-theme-default is path to folder where you want to clone repo) and open it.
- Install Node.js dependencies.
- In Visual Studio all dependencies will be installed automatically. Just wait a few minutes.
- In Visual Studio Code and other editors, you need to run
to install Node.js dependencies.npm install
You need to have local installation of storefront. Follow this article step-by-step to install storefront from binaries or source code.
If you have Visual Studio 2015 with Update 3 and above, you don't need install any prerequisites. Latest versions of Node.js and Gulp already included in your Visual Studio installation and supported in built-in Task Runner Explorer.
Task Runner Explorer, Node.js and Gulp already included in your Visual Studio installation. However, you need update your Node.js to at least 4.0.0.
- Update Node.js to v4.0.0 at least (we recommend latest LTS version). Use C:\Program Files\nodejs installation path (change Program Files to Program Files (x86) on 64-bit machine).
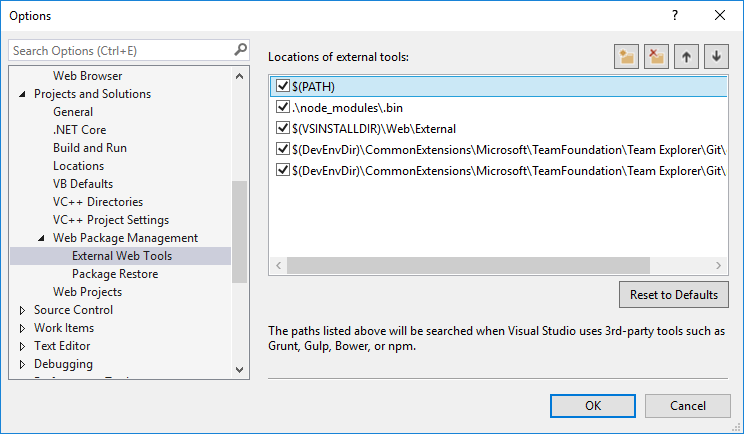
- Add Node.js installation path to External Web Tools or move $(PATH) to top:
You need install:
- Task Runner Explorer Visual Studio extension
- Install Node.js v4.0.0 or above (we recommend latest LTS version)
-
npm install gulp -g
- Install Node.js v4.0.0 or above (we recommend latest LTS version)
-
npm install gulp -g
Liquid is the templating engine that powers Virto Commerce templates. Go to Liquid documentation.
Main article: bundling & minification on virtocommerce.com/docs
Bundling is a technique you can use to improve request load time. Bundling improves load time by reducing the number of requests to the server (assets such as CSS and JavaScript will be combined to single file per file format).
{% raw %}{{ 'bundle/scripts.js' | static_asset_url | append_version | script_tag }}{% endraw %}
- static_asset_url means that this file is static content of site
- script_tag or stylesheet_tag will generate
or
<script ... ><link rel="stylesheet" ... > - append_version is used to correctly invalidate browser cache for bundles. It calculate hash of file and append it as part of query string in url. Make sure that it's added after static_content_url (or other url filter), not after script_tag, stylesheet_tag (or other html tags).
When you run the default task to bundle & minify theme, the following happens:
- ESLint runs and output warnings and errors in javascript code.
- Javascript minifies and source maps generates.
- CSS processes by Autoprefixer with the following browsers support (documentation may be sometimes outdated; browser versions specified in gulpfile then specified in docs, not vice versa).
- CSS minifies and source maps generates.

Bundling & minification will work automatically when you save file and on build.
Bundling & minification will work automatically on build. If you want to automatically bundle & minify files on save, please, install & configure Blade Runnner Visual Studio Code extension.
Run
gulp watch
on command line if you want to bundle & minify files on save or run
gulp default
manually when you need to bundle & minify theme files.
Attention: while theme including bundlesconfig.json file, you must not use Bundler & Minifier Visual Studio extension with theme. We're using gulp to bundle & minify files on theme, because it support a lot of possible customizations and has a plugins for css minification and correct source maps generation. Wrong source map generation and lack of css minification is a primary reason why we do not use Bundler & Minifier extension in Visual Studio.
Tip: if bundling & minification failed, you, probably, need to run gulp watch task manually after that. In Visual Studio, go to Task Runner Explorer and click Run on task watch. In Visual Studio Code go to Command Palette (Ctrl+Shift+P) and type
task watch
then press Enter.
The following gulp tasks available to you:
- default: default task. Bundles and minifies theme files.
- clean: removes bundled & minified files.
- lint: runs eslint to check for warnings & errors in javascript files. Look at eslint site for details.
- min and min:js, min:css, min:html: minify all or specified types of files.
- watch: watching to any changes on bundled & configuration files and update bundles when any change occurs.
- compress: creates zip package with all needed files to deploy theme on storefront.
Main article: how to localize theme on virtocommerce.com/docs
Storefront theme localization is very similar to VirtoCommerce Platform localization. Check it for details on working with translation files.
- Make a copy of <theme repository location>\locales\en.default.json file
- Rename the copied file to begin with your needed language 2 letter code (e.g., "es.default.json").
- Translate the file content.
- Open your store in VirtoCommerce Platform ( More → Browse → Stores → <your store> ).
- Check whether your language exists in the "Additional languages" available values list or add it in case it's missing:

Copyright (c) Virtosoftware Ltd. All rights reserved.
Licensed under the Virto Commerce Open Software License (the "License"); you may not use this file except in compliance with the License. You may obtain a copy of the License at
http://virtocommerce.com/opensourcelicense
Unless required by applicable law or agreed to in writing, software distributed under the License is distributed on an "AS IS" BASIS, WITHOUT WARRANTIES OR CONDITIONS OF ANY KIND, either express or implied.