This repository contains the python implementation used to segment tumours from 2D brain scans using the U-Net archietecture. The code was developed based on the research I carried out during my disertation for my MSc degree at University College Dublin where I explored medical image segmentation using a basic U-Net architecture and benchmarked its performance to other similar segmentation methods.
Please note that U-Net and LinkNet were implemented using Tensorflow 2.0 and all scripts available are written in python 3.8. Using older versions of either software may cause conflicts and may hinder your ability to run each individual scripts. To install these requirements please see the following commands below.
pip install tensorflow
sudo apt-get install python3
Besides the listed requirements several scripts will also require you to install several packages that you may be missing from your most current installation of python 3.8. A list of the most un-common packages that were used during this project have been created so you can easily install these using the following commands.
pip install opencv-python
pip install nibabel
pip install nilearn
pip install scikit-fuzzy
./Data/: This folder contains the CSV files generated after training Model 1 & Model 2 of U-Net../Evaluation Results/: This folder contains the TXT files generated by Evaluator.py../Evaluation Scans/: This folder contains the test data used during the training phase of the network../Masks/: This folder contains the corresponding ground truth masks of the extracted test sets../Models/: This folder contains the H5 models generated by U-Net's Train.py script../Results/: This folder contains the predictions generated via U-Net's Predict.py script../Segmentation_Methods/: This folder contains the results and implementation of our benchmarking algorithms../Evaluation Results/: This sub-folder contains the TXT files generated via each benchmarking script../KMeans Results/: This sub-folder contains the results obtained using the KMeans.py script../LinkNet/: This sub-folder contains the results & implementation of LinkNet../Water Shed Results/: This sub-folder contains the results obtained using the Water_Shed.py script../Fuzzy_C_Means.py: Contains the implementation of fuzzy c-means which will generate predictions to a target directory../KMeans.py: Contains the implementation of k-means which will generate predictions to a target directory../Water_Shed.py: Contains operations of thresholding, the water shed algorithm and morphological operations.
./UNet/: Contains the implementation of U-Net in the form of PY scripts../Train.py: Generates the dataset via several small callable functions../Model.py: Creates the U-Net model, must be called directly to build the model../Train.py: Calls the previous scripts and trains the built model via a call to fit../Predict.py: Call to generate predictions based on the trained model from the previous script.
./Converter.py: Class to convert MINC 3D images to NII format../Display.py: Contains several functions which can be used to display 3D MR images../Evaluator.py: Contains the implemetations of metrics used to evaluate a models segmentation performance../Load.py: Used to load in either 3D or 2D imagery../Preprocess.py: Contains various functions to manipulate the images including the slice extractor.
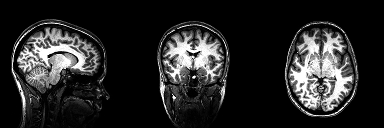
The original 3-dimensional dataset used during the early stages of this project is not included with this repository, it can, however, be retrieved from the following link. Each 3-dimensional MRI brain scan was converted to a basic PNG image via the use of the slice extractor which can be found in Preprocess.py. See later sections of this read me for a detailed tutorial on this procedure. The dataset extracted using this function can be retrieved using the following link. The dataset is structured so that it is easier to run your computations on one of three perspective planes.
Once you have downloaded the MRI data you can avail of the function created in Load.py to either load in a single 3-dimensional image or load in all MRI files which is stored in a basic list. The functions call the directory parameter to load the images from the selecting folder. These functions can also be used on any form of 3-dimensional imagery including DICOM and Nii files.
def loadImages(self):
    self.files = os.listdir(self.dirImages)
    data_all = []
    for i in self.files:
        self.images = nib.load(self.dirImages + i)
        data_all.append(self.images)
    return data_all
The script Preprocess.py contains many functions that you may use to preporcess your images. These functions are mainly suited to 2-dimensional images, however, the slice extractor is can only accecpt 3-dimensional imagery. The slice extractor is a very simple function which loops through a list of MRI images and depending on the paramters provided by the user in their main the function will either extract a mask or a image on one of the three perspective planes. The function takes several self explanatory parameters, however, see the code below for an example on the extraction.
def sliceExtractor(self, imageData, numSlices, OUTDIR=' ', Image=False, Mask=False, coronal=False, sagittal=False, transversal=False):
    for i in range(numSlices):
        if Image:
            if coronal:
                slices = imageData[:, i, :]
                flipVertical = cv2.flip(slices, 0)
                cv2.imwrite(OUTDIR + "Coronal_" + str(i) + ".png", flipVertical)
        .
        .
.The UNET was developed by Olaf Ronneberger et al. for Bio Medical Image Segmentation. The architecture contains two paths. First path is the contraction path (also called as the encoder) which is used to capture the context in the image. The encoder is just a traditional stack of convolutional and max pooling layers. The second path is the symmetric expanding path (also called as the decoder) which is used to enable precise localization using transposed convolutions. Thus it is an end-to-end fully convolutional network (FCN), i.e. it only contains Convolutional layers and does not contain any Dense layer because of which it can accept image of any size.
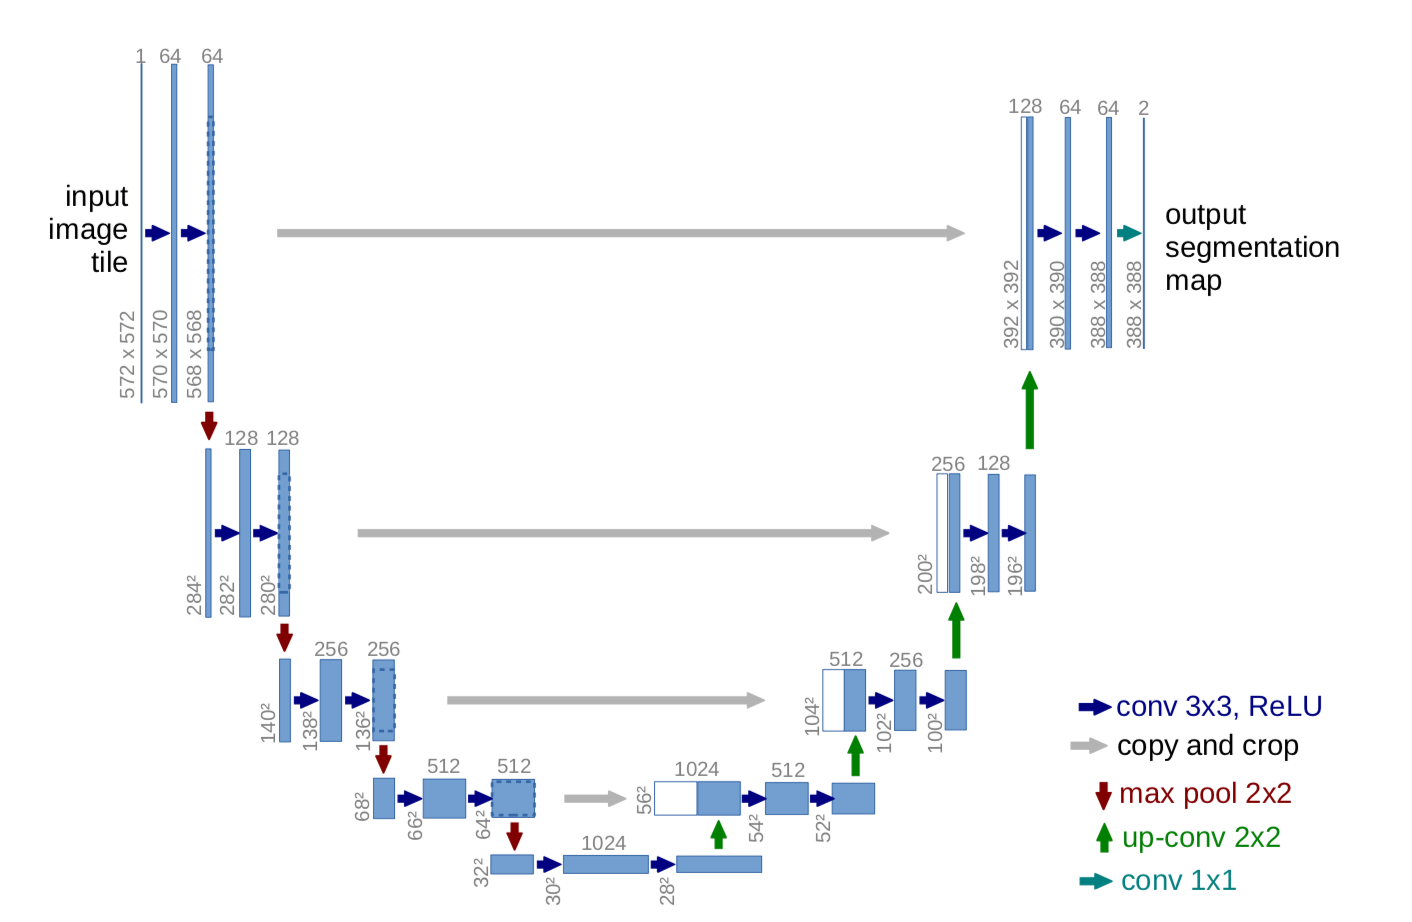
The files to run the network can be found in the folder titled UNet. The files are sequential order meaning each file depends on the other. The script Data.py is very simple it intakes your image directory and creates a data pipeline to load your images using tensorflow. The script Model.py is where the main implementation of U-Nets architecture recides. This file does not have to be executed but the function build_model builds your model, hence the name, and should be called directly from the training script Train.py. The script Train.py should be executed directly from the command line to run the network. This network is fine-tuned to for 1 class segmentation, to convert this network to suit the application of multi-class segmentation you will need to mopdify several paramaters. Finally, the script Predict.py is used to load the saved model's created during training which can be loaded from the directory "../Models". Using this script you can export the predictions made using a loaded model to a directory of your choice.
To evaluate your prediction images obtained from either U-Net or one of the provided benchmarking algorithms you simply have to edit the evaluator script Evaluator.py. The evaluator scripts contains four performance metrics which can be used to evaluate an array of prediction images against the original ground truth masks. To use this file you must change the directory of your images to match the image files you are trying to evaluate. These directory paths have automatically been set according to the most recent file evaluated. Once compiled, the script will output a small table of results which is the overall average of all results for each metric. With this output the script will also write the results to a specified directory provided before compiliation.
Systematic benchmarking was used to compare the performance of our proposed models to that of more widely used image processing/computer vision segmentation techniques. The alogorithms chosen for the purposes of benchmarking includes the following:
- Binary Thresholding & the watershed algorithm
- K-Means
- Fuzzy C-Means
- LinkNet
Methods 1-3 are manual based segmentation algorithms meaning they require manual assistance to segment specific regions of interest (ROI) from 2-dimensional imagery. Each method is based on existing techniques which were applied to extract brain tumours from an MRI brain scan or were used for a similar purpose in the domain of medical computer imagery. Each script can be executed directly from the command line which will in turn write the prediction images to a provided directory which can then be used for evaluation purposes by re-running the Evaluator.py script. Each individual script comes with seperate implementations of the proposed steps which is discussed within each paper, please try to understand these methods before altering parameters as these methods were written to work in coherence with it's other neighbouring functions. For example, see the code block below. This function was written for the purpose of skull extraction more commonly known as skull stripping. The function is cruicial to the operation of k-means to produce an array of images for the algorithm to use for evaluation purposes.
def skullStrip(self, images):
    gray_imgs = []
    brains = []
    for i in range(len(images)):
        gray_img = cv2.cvtColor(images[i], cv2.COLOR_BGR2GRAY)
        gray_imgs.append(gray_img)
        ret, thresh = cv2.threshold(gray_imgs[i], 0, 255, cv2.THRESH_OTSU)
        .
        .
        .
If you wish to run LinkNet, you can safely assume the same procedure used during your operation of U-Net meaning you need only to run the Train.py & Predict.py scripts. The output of LinkNet's Predict.py will write new predictions in the form of binary maps were each map is on a scale between 0 - 255 which easily allows you to evaluate your data with Evaluator.py. To note, please create the directory to store LinkNets results and csv files as the python scripts written DO NOT create these directories.
Along with repository some files have been included which were not used during development or were used at a very early satge during the devlopment cycle. These files were included in case they may be of use at a later stage if development of a similar project was to commence. These two files are Display.py and Converter.py. Display.py was used during the early development stage of the project, its purpose was to display certain 3-dimensional slices to the screen via a simple function which intakes the analysts slice number. However, as the dataset was coverted to 2-dimensional these functions were no longer needed. To call these functions you should directly call them from a main function coupled with operations written in the Load.py script.
def displayImages(self, dataFile, numImages, startSlice, incSlices):
    fig, ax = plt.subplots(1, numImages, figsize=[18, 6])
    self.img = self.image.loadImage(self.imageDir + dataFile)
    self.imageData = self.img.get_fdata()

    for i in range(numImages):
        ax[i].imshow(self.imageData[startSlice, :, :], 'gray')
        ax[i].set_xticks([])
        ax[i].set_yticks([])
        ax[i].set_title('Slice number: {}'.format(startSlice), color='r')
        startSlice += incSlices

    fig.subplots_adjust(wspace=0, hspace=0)
    plt.show()
The second script Converter.py is a simple 3-dimensional converter which can be used to convert MRI .MNC files to .NII files. The script was used early during the projects development cycle, however, decisions were later madce to stick with .MNC files as nibabel has appropriate compatibility with these 3-dimensional MRI files. Caution, use of this file should be avoided as data loss was recorded as the files were converted. Instead of using this script I would suggest you use the more appropriate MINC toolkit.
def conversion(self):
    for i in range(len(self.fileList)):
        minc = load(self.dir + self.fileList[i])
        basename = self.fileList[i].split(os.extsep, 1)[0]
        out = Nifti1Image(minc.get_fdata(), affine=self.affine)
        save(out, self.dir + basename + '.nii.gz')
        print("Converting: ", basename)